Overview
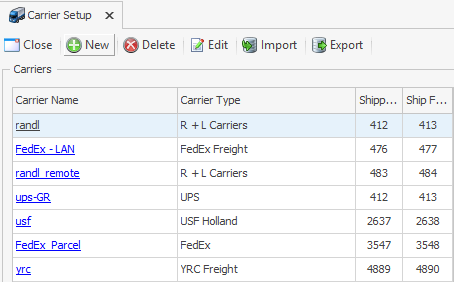
The Carrier Setup screen allows the user to configure carriers to be used during shipments. The tool strip at the top has the normal options (i.e. Close, New, Delete, Edit), plus Import and Export.
Table of Contents
Carrier Editor
Double-clicking on a carrier or clicking New or Edit on the tool strip will bring up the Carrier Editor.
The left side of the popup has all editable settings for carriers.
The Carrier Type dropdown is populated by all accessible modules in the installation. At the time of this writing, this includes UPS (Freight LTL included), FedEx, FedEx Freight, GSO, Purolator, R + L Carriers, SAIA, Stamps, YRC Freight, XPO, and USF Holland.
Checking Is Inactive will prevent this carrier from being used to generate shipments or getting rates.
Changing the Write Back Rate setting to Account will write the rate unique to the shipper back to the shipping amount instead of the List rate. The Account rate is the negotiated rate the carrier provides.
Both the Company Address field and Ship From Address field need to be populated in order to save a carrier. To simplify this process, the Copy Address button, available at the bottom of both Company Address and Ship From Address, will take the entire address from one side and copy it to the other.
On the right side of the popup are two tabs: Carrier Option and Mappings.
Carrier Options are pre-carrier connection settings. In the image below, the area is left blank to signify this; each Carrier’s options are outlined in their particular section of this documentation.
The Mappings tab is used to specify how carrier-specific settings are brought in from particular Shipping Sources to Carrier Options.

Country Reference
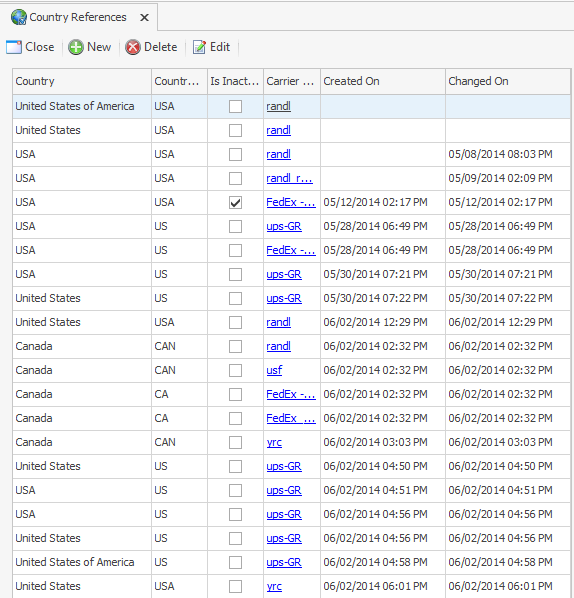
The "Country Reference" screen allows the user to configure different countries to set carrier-specific Country Codes when addresses are evaluated for shipment. SalesPad offers built-in country references for the country names (United States) and the 2 (US) and 3 (USA) character abbreviations for each country. This will handle the majority of any country references needed.
The tool strip at the top has the normal options (i.e. Close, New, Delete, and Edit) found on most setup screens.
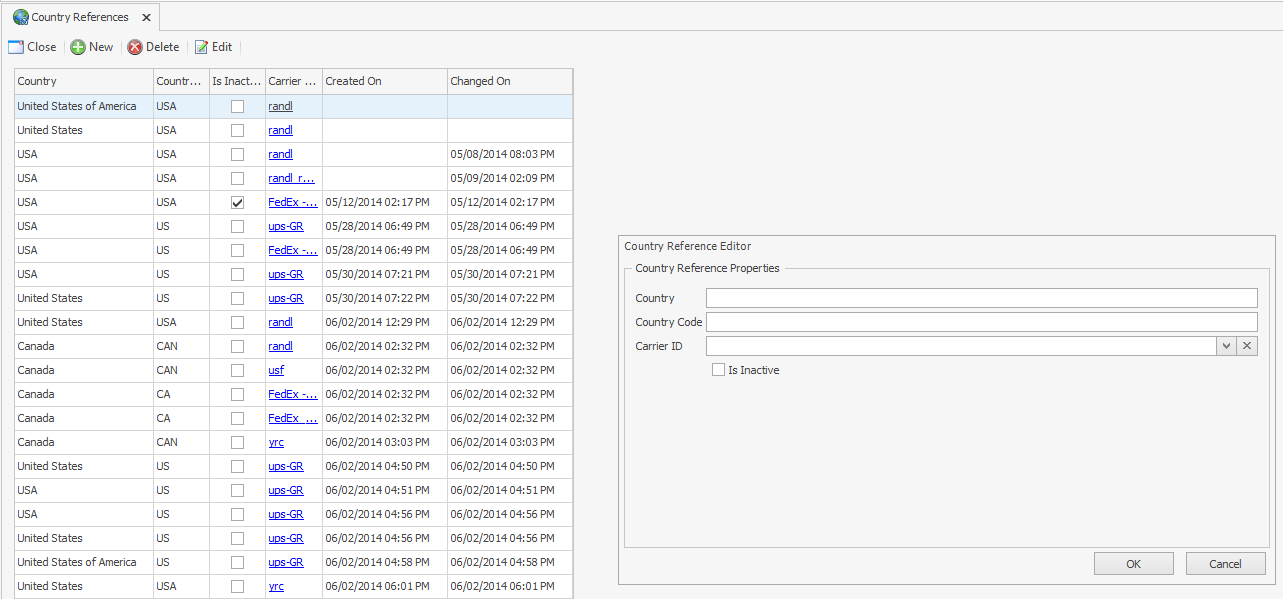
Double-clicking on a country code or clicking New or Edit on the tool strip will bring up the Country Reference Editor.
The flow of this popup is as follows:
- Set Country to the same text you normally do in either your Shipping Sources or normal addresses.
- Set Country Code to the corresponding Country Code that the Carrier would expect given the country.
- Set the Carrier ID to the Carrier you want to apply this mapping to.
As an example, if Carrier ID was set to UPS, Country was set to United States, and Country Code was set to US, then any time the country of an address is set to United States, the Country Code will be set to US.
Checking Is Inactive will cause the Country Reference to no longer be applied.
Shipping Method Setup
Overview
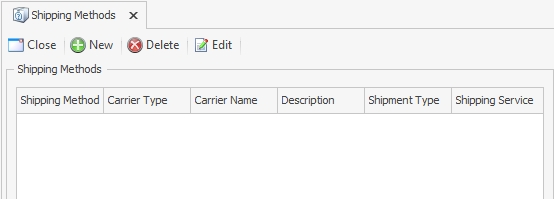
The Shipping Method Setup screen is used to map a GP Shipping Method to a Carrier’s Shipment Service for easier shipment generation.
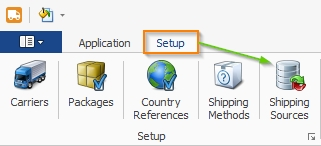
Location
Shipping Methods can be found under the Setup ribbon tab:

Use
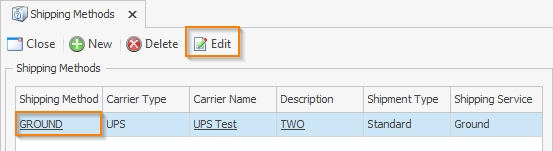
Upon opening, you will see the New, Delete, and Edit buttons, as well as the grid displaying existing shipping method mappings:
Creating a New Shipping Method Mapping
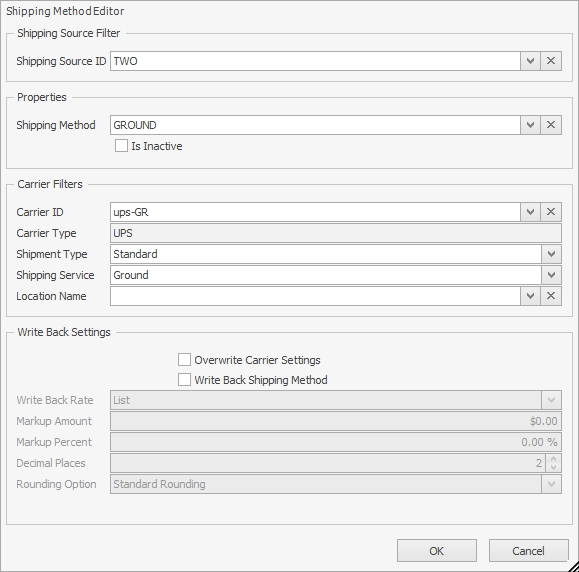
To create a new shipping method mapping, click the New button to get started. This will bring up the "Shipping Method Editor" window.
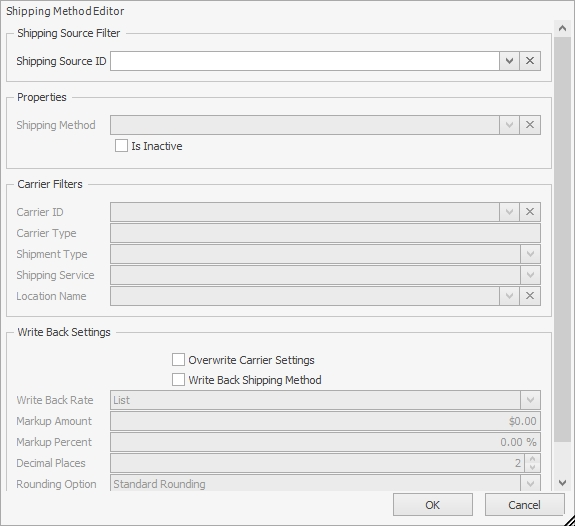
- Shipping Source Filter
- *Required* Shipping Source ID – Choose a shipping source from the dropdown menu:
-

- Properties
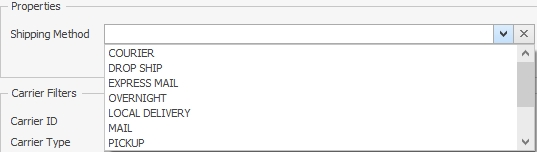
- *Required* Shipping Method – Choose a GP shipping method from the dropdown menu. This dropdown is populated based on the GP company database the shipping source is linked to:
-
- Carrier Filters
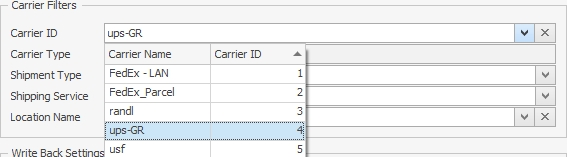
- *Required* Carrier ID – Choose a carrier you want to use on the generated shipment from the dropdown menu. Carriers listed in the dropdown menu are created in Carriers Setup.
- *Required* Shipment Type – Choose the shipment type for the selected carrier from the dropdown menu. Most carriers will have only one option.
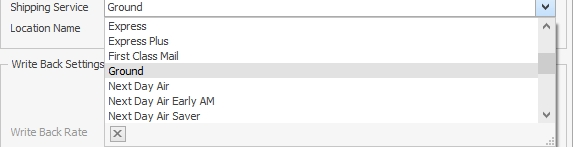
- *Required* Shipping Service – Choose the carrier’s shipping service that will be used on the generated shipment from the dropdown menu.
-
Location Name – Choose a location/site ID from the dropdown menu if you want to restrict this mapping to work only when out of a specific location/site.
- Write Back Settings
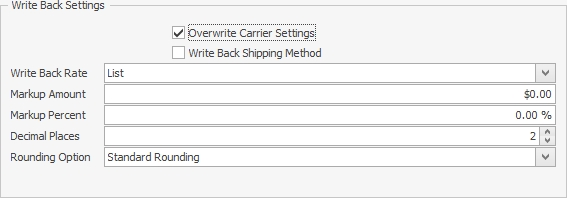
- These settings allow you to override the default carrier’s write back settings for a particular shipping method.
- If you want to access the settings, check the Overwrite Carrier Settings checkbox.
- Write Back Shipping Method – This will change the shipping method on the document according to the shipping method, based on the shipping carrier and service ultimately used on the shipment when clicking Finish Shipment in Shipment Editor.
- For Example: You have a shipping method called Ground that uses UPS Ground service. You have another shipping method called Next Day Air that uses UPS Next Day Air service. You have a document with the Ground shipping method. You generate a shipment for the document and it selects UPS Ground as the service. You change the service on the shipment to Next Day Air and click “Finish Shipment.” ShipCenter will see the Next Day Air shipping method mapping and change the document’s shipping method to Next Day Air.
Note: This will only work if the carrier service you choose in Shipment Editor also has a shipping method mapping set up.
- For Example: You have a shipping method called Ground that uses UPS Ground service. You have another shipping method called Next Day Air that uses UPS Next Day Air service. You have a document with the Ground shipping method. You generate a shipment for the document and it selects UPS Ground as the service. You change the service on the shipment to Next Day Air and click “Finish Shipment.” ShipCenter will see the Next Day Air shipping method mapping and change the document’s shipping method to Next Day Air.
- These settings allow you to override the default carrier’s write back settings for a particular shipping method.
- When you have finished filling out the fields, click OK to save the shipping method mapping.
Edit an Existing Shipping Method Mapping
To edit an existing shipping method mapping, highlight it in the grid and click the Edit button. Alternatively, you can click on the shipping method’s hyperlink to bring up the Shipping Method Editor.
Shipping Sources
Shipping Sources allows users to link ShipCenter to a GP company database. Multiple sources can be made so that ShipCenter can see multiple GP company databases or test and production databases.
Shipping Sources can be found under the Setup ribbon tab:
Upon opening, you will see the New, Delete, and Edit options, as well as the grid displaying existing shipping sources:
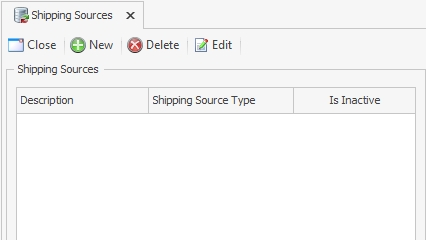
Create a New Shipping Source
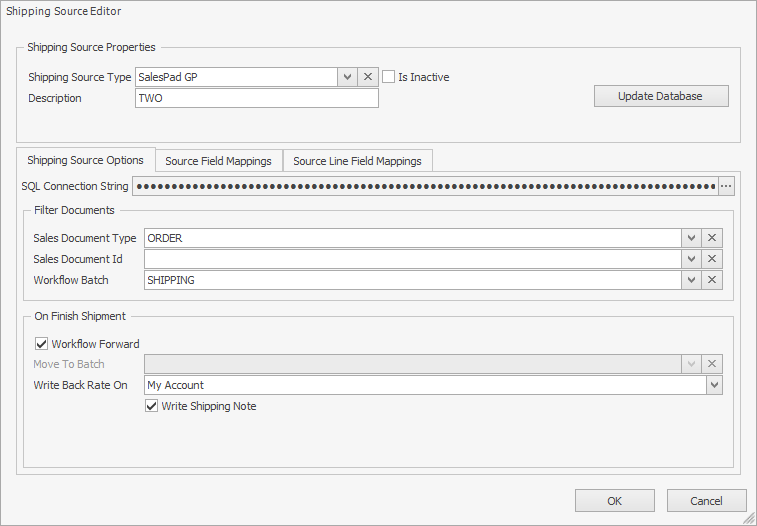
To create a new shipping source, click the New button. The "Shipping Source Editor" will appear.
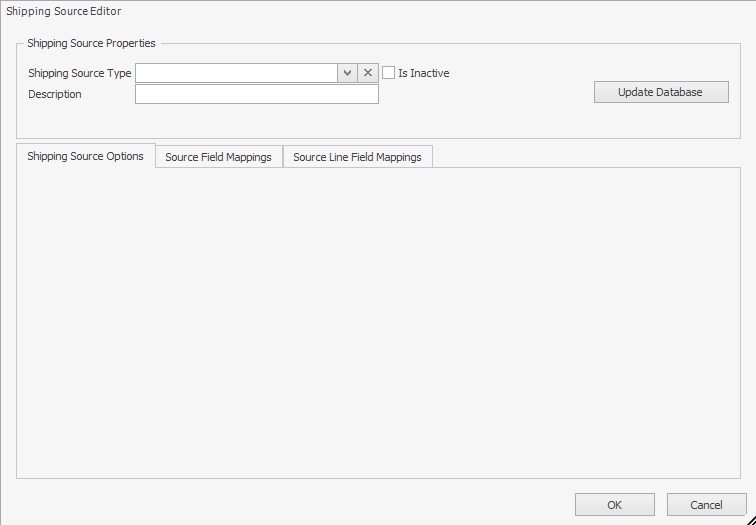
- Shipping Source Properties
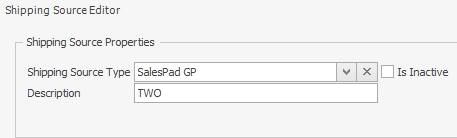
- Shipping Source Type – Choose SalesPad GP from the dropdown menu.
- Description – Add a description for the shipping source. This will be the visible name of the shipping source throughout ShipCenter.
-
- Shipping Source Options
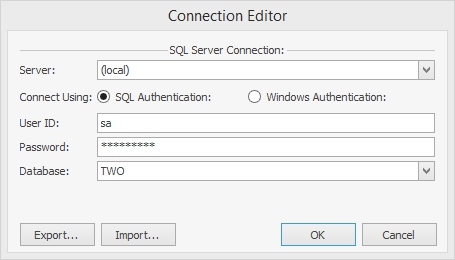
- SQL Connection String – Click on the ellipsis button (…) on the far right of the field to bring up the "Connection Editor" window. Filling out the fields in the window will be similar to creating the connection to the ShipCenter database.

- Server – Choose the location of the SQL Server Instance housing the SalesPad GP installation from the dropdown menu.
- Connect Using:
- SQL Authentication – Enter the SQL Server system administration user ID and password in the appropriate fields.
- Windows Authentication – Use Windows Authentication to log into the SQL Server Instance if an appropriate user has been set up in the SQL Server Instance.
- Database – Choose the SalesPad GP/GP company database you want to link to from the dropdown menu.
- Click OK when finished.
- Workflow Batch – Enter the name of the workflow queue or batch to limit which open sales documents appear in Shipment Monitor.
- If left blank, it will try to bring in open sales documents from all queues/batches.
- Sales Document Type – Enter the sales document type (Quote, Oroder, Ivoice, Return) to limit which open sales documents appear in Shipment Monitor.
- If left blank, it will try to bring in open sales documents of all types.
- Move To Batch and Workflow Forward Checkbox
- Move To Batch – Enter the name of the queue/batch you want the sales document to move to when the Finish Shipment button in clicked in the Shipment Editor.
- Does NOT forward the document through SalesPad’s workflow.
- Workflow Forward – Check this box if you want the sales document to be forwarded through SalesPad’s workflow when the Finish Shipment button is clicked in the Shipment Editor.
- You can use one setting or the other, but not both. Enabling Workflow Forward will disable the Move To Batch setting.
- Move To Batch – Enter the name of the queue/batch you want the sales document to move to when the Finish Shipment button in clicked in the Shipment Editor.
- Write Back Rate On – Choose from the dropdown menu what billing options (My Account, Recipient, COD, Third Party) will trigger the write back of shipping information to the associated sales document.
- Write Shipping Note – Check this box if you want a note created on the associated sales document containing shipping information (Freight amount, package dimensions, weight, etc.).
- Click OK when finished and the new shipping source will be saved.
- SQL Connection String – Click on the ellipsis button (…) on the far right of the field to bring up the "Connection Editor" window. Filling out the fields in the window will be similar to creating the connection to the ShipCenter database.
-
- Source and Source Line Field Mappings – Allows for the adjustment of where information is read from and written to when a sales document is used to generate a shipment in ShipCenter. A detailed guide on how to set these up can be found here.
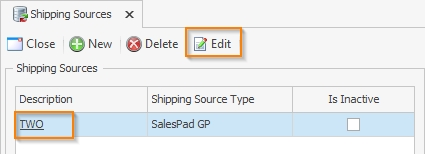
Edit an Existing Shipping Source
An existing shipping source can be edited by selecting it in the grid and clicking the Edit button. Alternatively, you can click on the shipping source’s description hyperlink.
SalesPad Support
Comments