Overview
Bill of Materials (BOM) functionality in SalesPad allows you to create a list of parts or components that go together to create a finished good. Assembly functionality allows you to create an assembly transaction from a BOM. Bills of Materials are built and then used to create Assemblies.
This document covers the search and creation screens for BOMs and Assemblies.
Security
To create and access BOMs, you must enable the following security settings in the Security Editor:
- BOM Components – Enables the BOM Components plugin on a Sales Document. BOM Components show the individual items that make up a BOM. To automatically run the BOM Components plugin when adding a BOM item to a Sales Document, set the Auto Run sub-setting to True.
- BOM Entry – Enables the Bill of Materials Entry screen, where you can create new BOMs or edit existing BOMs.
- Use the sub-settings to enable editing of BOM Entry and to enable C# On Load or Pre Save scripts.
- BOM Lines – Enables the Lines tab on the Bill of Materials Entry screen, which gives you the ability to view, add, and edit components of a BOM.
- BOM Properties – Enables you to view the properties on the Bill of Materials Entry screen header.
- Use the sub-settings to enable editing of properties, to set a Default Bill Status, Default BOM Stock Method, and Default Effective Date.
- BOM Search – Enables you to search for BOMs.
- Sales Document Convert to BOM – Enables the Sales Document Convert to BOM plugin on a Sales Document. Convert to BOM is used to convert the line items of a Sales Document into a single BOM that contains the selected items within it.
To create and access Assemblies, you must enable the following security settings in the Security Editor:
- Assembly Entry – Enables the Assembly Entry screen, where you can create new or edit existing Assemblies.
- Use the sub-settings to enable editing of the properties and to enable C# On Load or Pre Save scripts.
- Assembly Properties – Enables you to view the properties on the Assembly Entry screen header.
- Use the sub-settings to enable users to set a Default Warehouse and edit properties.
- Assembly Search – Enables the Assembly Search screen, which allows searching for Assemblies.
- Assembly Allocation – Enables the Assembly Allocation Plugin for Released Assemblies.
- Use the sub-settings to enable users to view Cost.
- Create Assembly – This Sales Document level plugin will generate an Assembly for each sales line that is a BOM.
- Use the sub-settings to automatically save the Assembly without opening the Assembly Entry Screen and to copy sales line comments to the corresponding assembly notes field.
The BOM User Fields and Assembly User Fields security settings will enable the User Fields tab on the Bill of Materials Entry screen and Assembly Entry screen, respectively. This is where any BOM and Assembly User Defined Field will be displayed. Refer to SalesPad’s User Defined Fields documentation for information on creating and using User Defined Fields (UDF).
Settings
- Assembly Batch Number – Set the default Batch Number for newly created Assemblies.
- Assembly Sales Document Number UDF – When generating Assemblies from a Sales Document, this Assembly level UDF will hold the document ID of the Sales Document that generated the Assembly.
- Assembly Status – Specify to create new Assemblies with a Released, or Not Released status.
- Default Over Allocation – The action to take when over-allocating an Assembly. If Prompt to Over Allocate, the system will allow the user to decide if the Assembly should over-allocate. If Do Not Over Allocate, the system will not allocate the Assembly. If Over Allocate, the system will over-allocate the Assembly.
Usage
Finding and Opening an Existing BOM
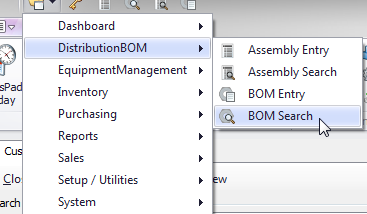
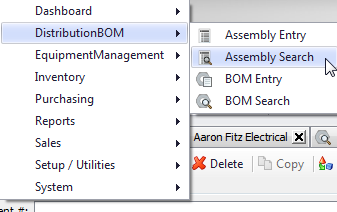
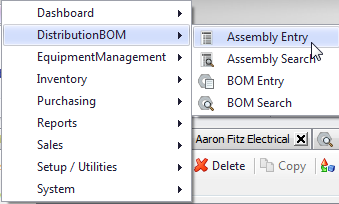
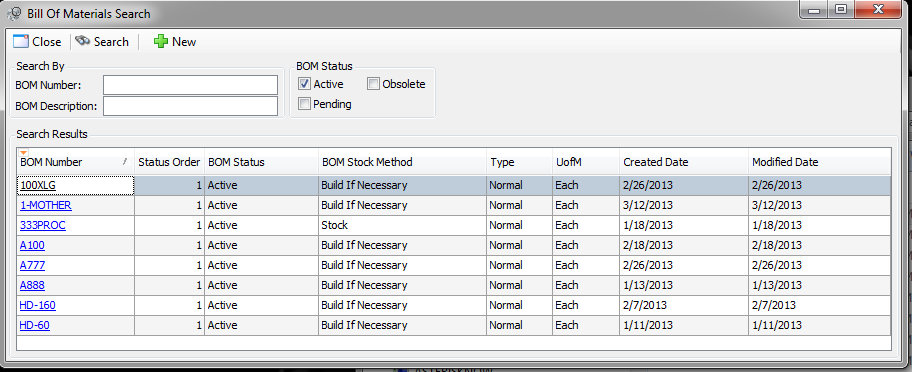
Find and open existing BOMs on the BOM Search tab (Modules > Distribution BOM > BOM Search):
To search for BOMS, enter a full or partial BOM Number. You can narrow the results by selecting checking one or more of the BOM Status options: Active, Pending, or Obsolete. Click Search.

You can further filter results using the Filter line.
To open the desired BOM, click the BOM Number hyperlink or double-click anywhere on the BOM line.
Creating a New BOM
From Entry
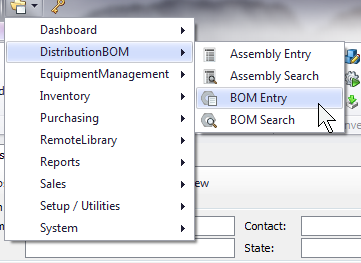
To create new BOMs on the BOM Entry tab, go to (Modules > DistributionBOM > BOM Entry):
From Search
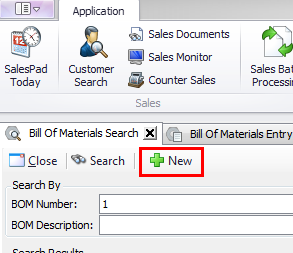
To create a new BOM from the "Bill of Materials Search" screen, click New. A new "BOM Entry" screen will open in a new tab:
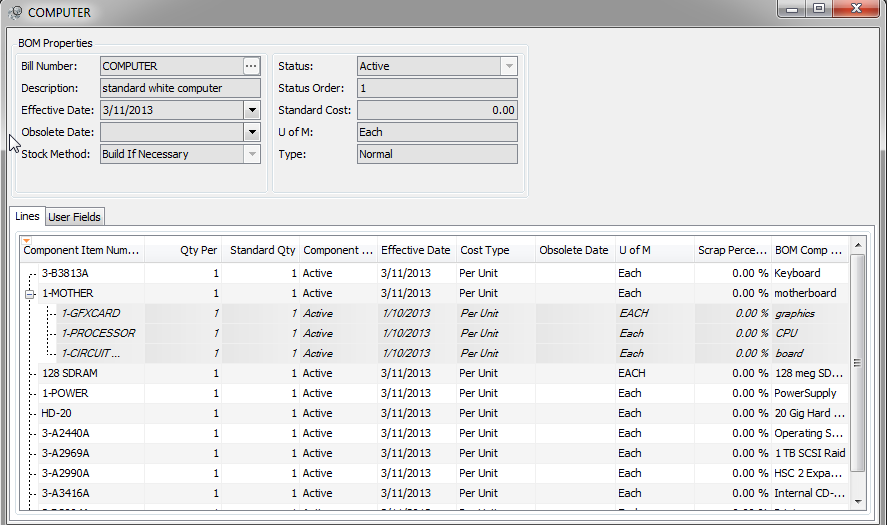
Fill in the following fields: Bill Number, Effective Date, Obsolete Date, Stock Method, and Status.
Note: The Description, Standard Cost, and Unit of Measure (U of M) are populated upon creating a new item or selecting an existing item.
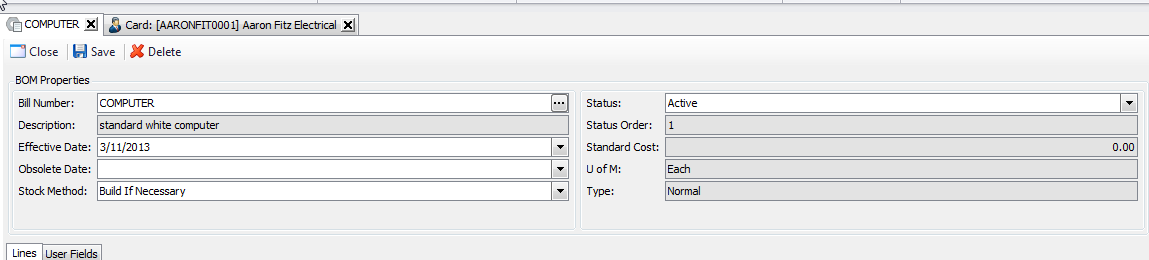
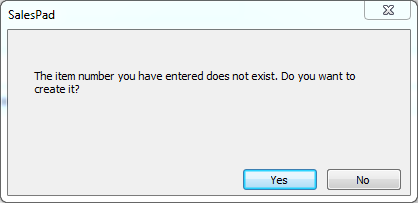
Bill Number – You can enter any series of capital letters, numbers, and characters in this field. The data in this field will ultimately be considered an item number. Once a Bill Number has been entered, SalesPad will perform a lookup to try and associate it with an existing item. If no item is found, you will be prompted to create an item from this Bill Number.
If you need to create a new item, the “Item Maintenance” screen will appear:
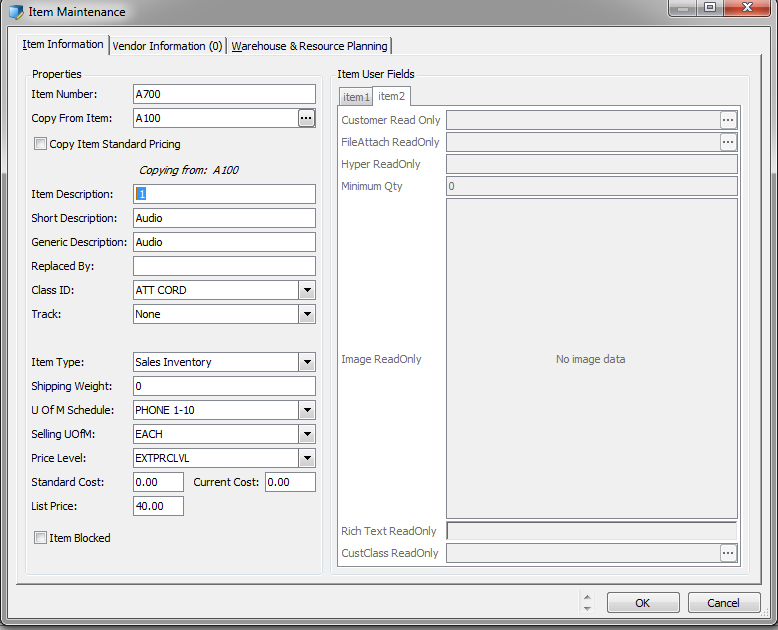
Enter the details of the BOM on this screen, including the Description, Standard Cost, and Unit of Measure (U of M). Set vendors and warehouses on the subsequent tabs and click OK.
If you do not create a new item for this Bill Number, the “Sales Inventory Lookup” screen will appear:
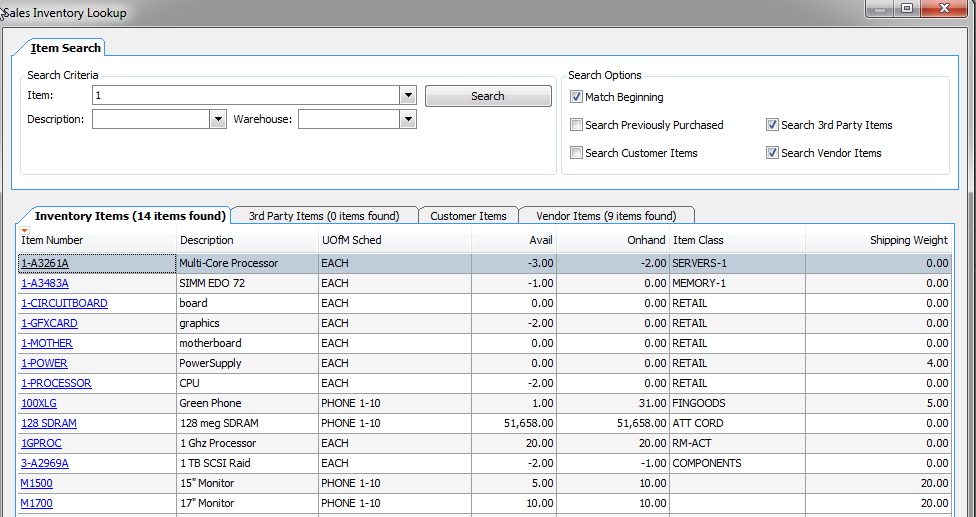
Search existing items and select an item to use as the Bill Number.
After creating or selecting an item, all read-only fields will be filled in on the "Bill of Materials Entry" screen.
- Effective Date – This is the date the BOM becomes available for manufacturing. This date is included in the “View Indented Bill” window and is especially important if you want to use comparison dates for estimating requirements or for planning.
- Obsolete Date – This is the date the BOM will no longer be available for manufacturing the assembly. This date can be overridden by manually setting the Status to “Obsolete.”
- Stock Method – Select whether to use existing stock or to build the Assembly. The Stock Method is used to determine the correct default quantities for the Assembly transactions when the Assembly is used as a component to another bill. You can edit the stock and assemble quantities for each subassembly on the transaction:
- Build If Necessary – Items will be allocated from the available quantities in inventory.
- Stock – Always uses the quantity from inventory. On the transaction, only the Stock Quantity is updated and is extended standard quantity.
- Build – Always build the quantity needed. These items are rarely stocked in inventory. On the Assembly transaction, the Assemble Quantity is the extended standard quantity.
- Status – If you chose a bill status of Pending or Obsolete, all components are automatically changed to Pending or Obsolete for that BOM. You must have at least one Active component to save a BOM with an Active status. You can edit BOMs with either Pending or Active status; however, only Active BOMs can be used on transactions. You can have only one Active and one Pending status; Obsolete status can be unlimited.
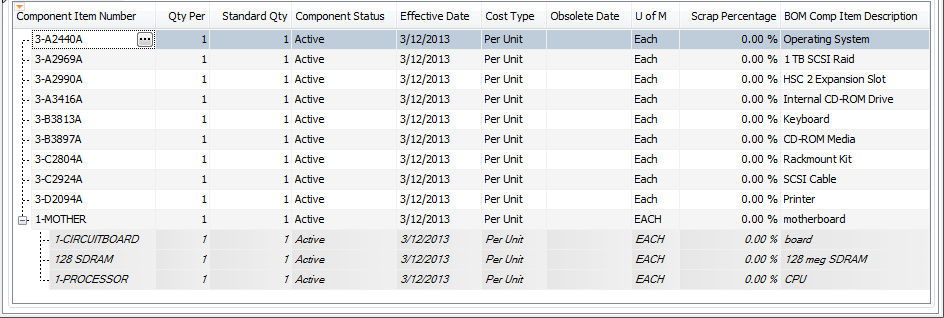
After setting all BOM properties, add Component Items on the Lines tab. Component Items are the items that make up the BOM. Click the New button to add items. A new line will appear in the grid where you can enter an item number or use the ellipsis (…) to search for and select the item.
To delete an item, highlight the line and click Delete.
As needed, update the Qty Per field with the quantity of each line needed for the BOM. Click Save to save the completed BOM.
From an Existing Sales Document
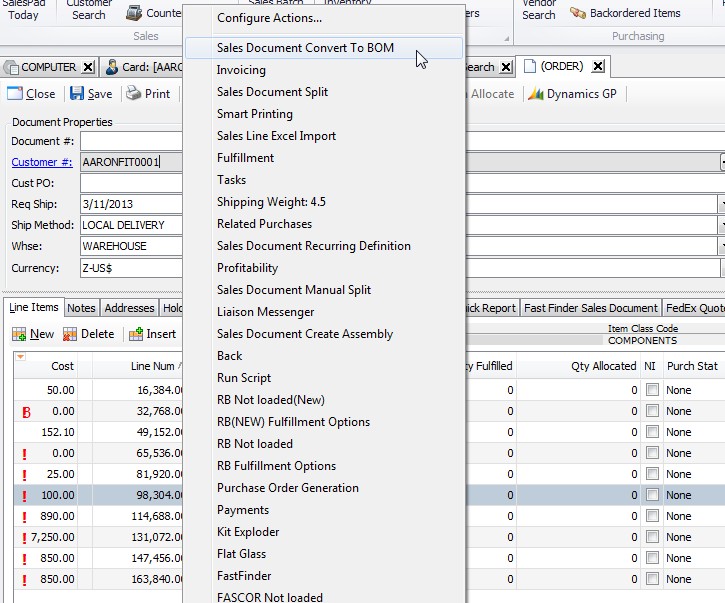
To create a new BOM from an existing Sales Document, open the Sales Document (Sales Document Entry) and select Sales Document Convert to BOM from the Actions ( ) dropdown:
The "Sales Document Convert to BOM" window will appear, displaying all line items from the Sales Document. Select the line items to convert to BOM.
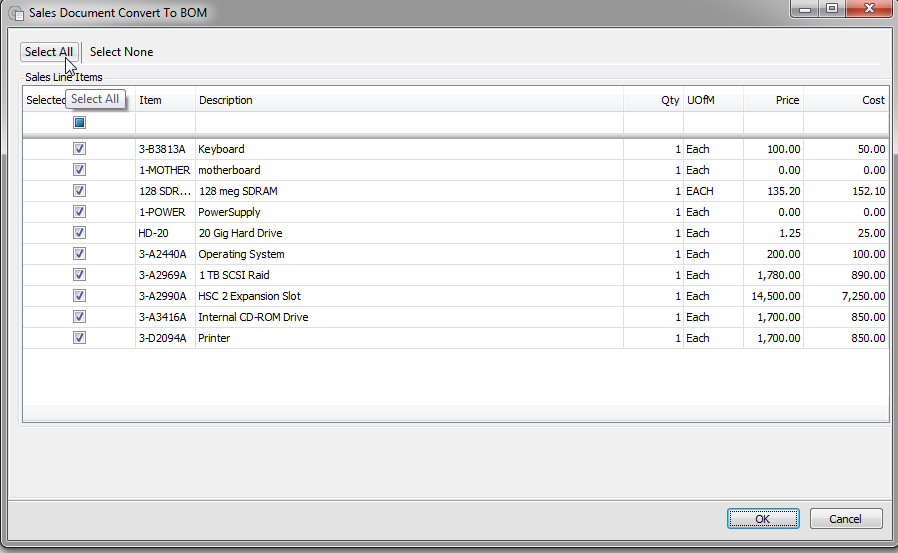
Click Yes on the popup, and the selected line items will be deleted from the Sales Document and added to the BOM:

Next, the “Item Maintenance” popup will appear. Fill in the necessary information for the new BOM.
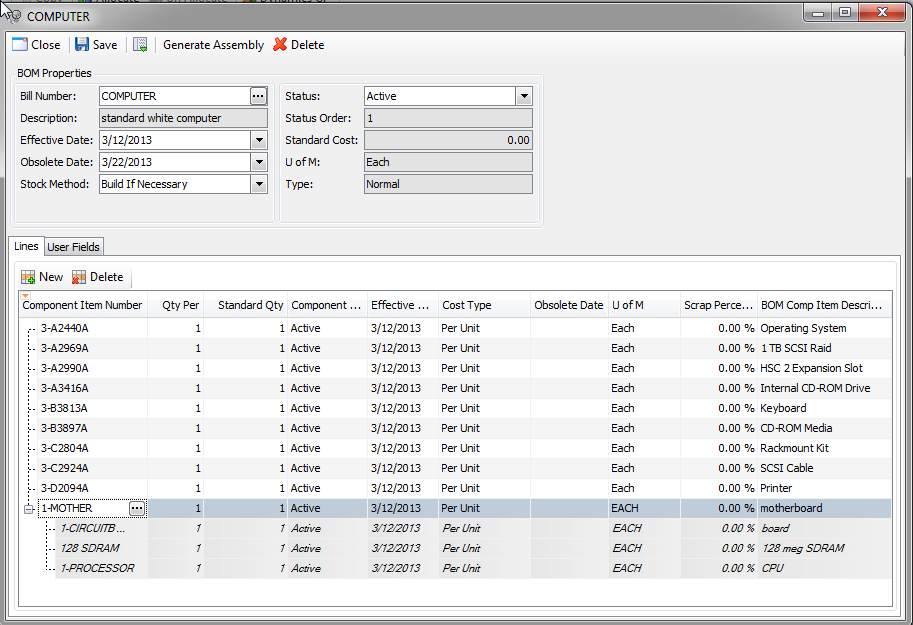
After filling in the details for the new BOM and clicking OK, the “Item Maintenance” popup will close and a new "Bill of Materials Entry" popup will appear. This window will be populated with information entered on the “Item Maintenance” popup and the items selected from the Sales Document.
Click Save to commit the item for use. SalesPad will return to the original Sales Document. The converted items will now display as a single BOM on a Sales Document line.

Viewing BOM Components on the Sales Line
To view the components for a BOM on a Sales Document, open the Sales Document (Sales Document Entry) and select BOM Components from the “ales Line Actions () dropdown:
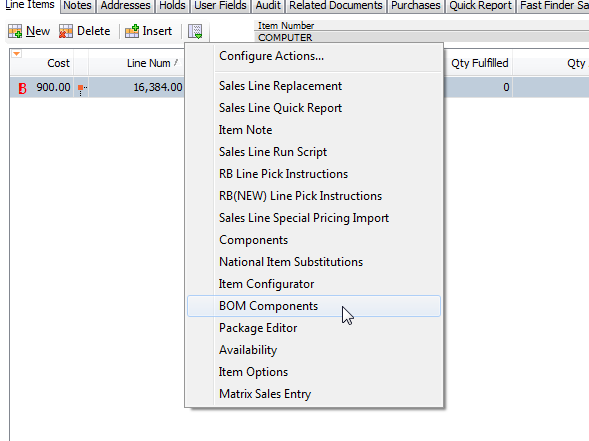
If the sub-setting for the BOM Components is set to True, this popup will run when adding a BOM to the sales line.
Creating an Assembly from a Sales Document
To create an Assembly from a Sales Document, select Create Assembly from the Sales Document Actions () dropdown:
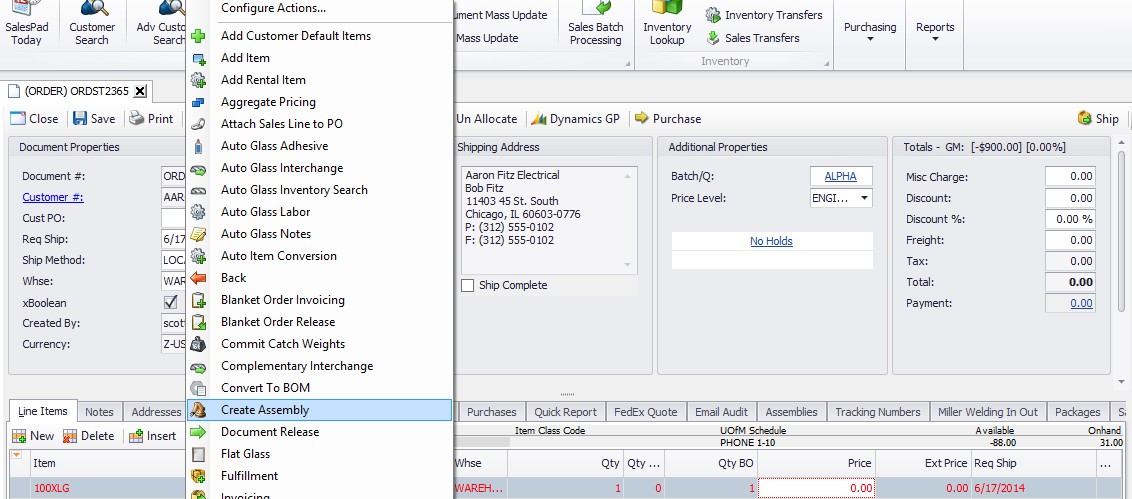
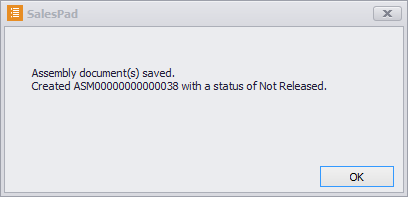
If the Create Assembly Sub-Security: Auto Save is enabled, then Assemblies will be created in the background for each BOM Line item. A message box will display all the Assemblies that were generated.
If the Create Assembly Sub-Security: Auto Save is disabled, then a new Assembly Entry Screen will open for each of the Assemblies, which can be modified by the user before they are saved.
Once the Assemblies are saved, a link will be created between the Assembly and the Sales Line. These Assembly links can be viewed and broken from the Assemblies tab on the Sales Document.

Finding and Opening an Existing Assembly
Find and open an existing Assembly on the Assembly Search tab (Modules > DistributionBOM > Assembly Search):
To search for Assemblies, enter a full or partial Assembly Number in Assembly #. You can narrow the results by checking Released or Not Released under Assembly Status. You can also check Match Beginning, which will show results for only criteria matching the beginning of the Assembly Document Number, or change the Prior Months searched. Click Search.

You can further filter results using the Filter line.
To open the desired Assembly, click the Assembly Doc Number hyperlink or double-click anywhere on the line.
Creating a New Assembly
From Entry
To create a new Assembly on the Assembly Entry tab (Modules > DistributionBOM > Assembly Entry):
From Search
To create a new Assembly from the Assembly Search screen, click New. A new "Assembly Entry” screen will open in a new tab.
On the “Assembly Entry” screen, you will select a Bill of Materials from which to create an Assembly. To do so, click the ellipsis (…) button on the BOM Number field:

The “Bill of Materials Search” popup window will appear:
Search for and select the desired BOM. The Assembly Entry tab will populate with the BOM number and its line items.
Fill in the remaining fields: Batch/Queue (Q), Warehouse, and Status.
- Batch/Q – Enter or select a batch ID to assign to this transaction.
- Status – Transaction statuses are the stages a transaction goes through as you enter it. An example would be if you want to begin entering transactions before the finished good is assembled, but don’t want to allocate the components until the Assembly is complete.
- Not Released – Bill of Materials copies bill components and quantity information onto the transaction, but doesn’t allocate the components in inventory. You can edit the transaction information, but cannot post. Any subassembly at or below the tenth component level will be treated as a stock component on the transaction.
- Released – Bill of Materials allocates the components in inventory. Posting is available and will update inventory quantities and accounts. Transactions may be edited and will appear on the edit list.
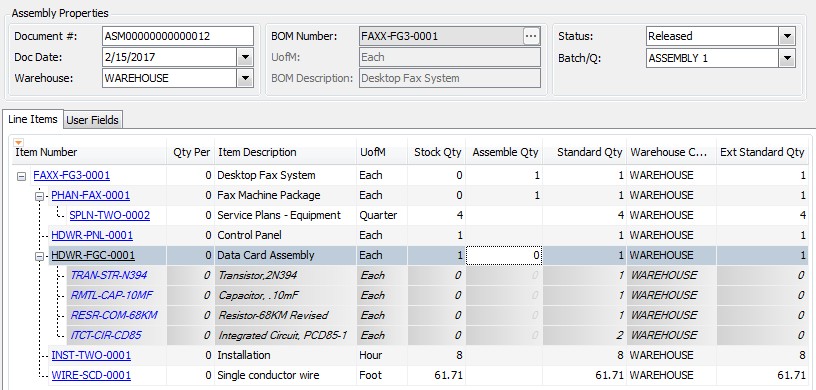
- Assembly Line Level Changes
- Assembly Qty – This is the number of items needing to be assembled and rolls down to each sub-item.
- Stock Qty – This is based on quantity available for BOM items and is not editable on the main item.
- Functional Scenarios – When you have a quantity available, the sub-items are not accessible, but are still viewable. For example:
We need 1 FAXX-FG3-0001, which is rolled down to each sub-item. I have 25 HDWR-FGC-0001 available, so my stock quantity is 1, and my assembly quantity is 0. We still have access to the sub-items for the HDWR-FGC-0001, but cannot change the Stock Qty or Assemble Qty.
If we then need 30 FAXX-FG3-0001s, this will roll down to each item. Because we only have 25 HDWR-FGC-0001 available, there are 5 that need to be assembled, and this quantity is rolled down to those sub-items.
SalesPad Support
Comments