Overview
SalesPad Desktop allows users to add user defined fields (UDFs), customizable to their business needs. Up to 200 UDFs per business object can be added. Unless those fields are mapped to existing Dynamics GP user fields, they will be stored within SalesPad's own tables in the SQL database.
Note: In versions 4.0+, data from certain user fields will be automatically copied to identical user fields on other business objects. For example, if you set up a user defined field on the sales document called xTest and you create another user defined field on the sales line item named xTest, both xTest fields will display the same data when data is saved into one.
- Data stored in Customer UDFs will automatically copy to the same Sales Document UDF.
- Data stored in Customer Address UDFs will automatically copy to the same Sales Document UDF.
- Note: You cannot put the same field on the Customer card, address, and document.
- Data stored in Sales Document UDFs will automatically copy to the same Purchase Order UDF.
- Data stored in Sales Line Items UDFs will automatically copy to the same Purchase Line Items UDF.
- Note: This is true when doing SOP to POP links.
- Data stored in Item Master UDFs will automatically copy to the same Sales Line Item and/or Purchase Line Item UDF on a sales document or purchase order.
- Data stored in Vendor UDFs will automatically copy to the same Purchase Order UDF.
- Data stored in Vendor Address UDFs will automatically copy to the same Purchase Order UDF.
- Note: You cannot put the same field on the Vendor card, address, and document.
- Data stored in Sales Document UDFs will automatically copy to the same Sales Line Items UDF.
- Data stored in Purchase Order UDFs will automatically copy to the same Purchase Line Items UDF.
- Data stored in Prospect UDFs will automatically copy to the same Customer UDF.
- Data stored in Opportunity UDFs will automatically copy to the same Sales Document UDF.
In addition, in SalesPad Desktop version 4.0+, data stored in Vendor UDFs can now be mapped to the GP UDFs.
Note: You must log out and log back in to SalesPad Desktop for security changes to take effect.
Creating a New User Field
Business Objects
From the left-hand column, select the business object where a new UDF will be added.

The following is a list of current business objects as of version 4.6.3.8, with location information indicated in sub-bullets:
- Alternate Item
- Assembly
- Assembly Line
- BOM
- BOM Line
- Cash Receipt
- Field: Cash Receipts > Receipt Details
- Contact
- Field: CRM Contact Card > User Fields tab
- CRM Event
- Customer
- Field: Customer Card > User Fields tab
- Customer Addr
- Columns: Customer Card > Contact Addresses tab Customer Search
- Field: Customer Contact Card > Contact User Fields
- Customer Item Number
- Field: Customer Card > Item Numbers
- Dispatch Driver (Requires dispatch dll)
- Dispatch Route (Requires dispatch dll)
- Dispatch Route Stop (Requires dispatch dll)
- Dispatch Vehicle (Requires dispatch dll)
- Group Pricing
- Group Pricing Item Detail
- Interaction
- Field: Interaction Entry > Interaction Information, Schedule
- Inventory Lot Number
- Column: Inventory Lookup > Serial/Lot Numbers tab
- Inventory Serial Number
- Column: Inventory Lookup > Item Serial/Lot Numbers tab
- Item Master
- Field: Inventory Lookup > Item User Fields tab
- License Plate
- License Plate Detail
- Location
- Opportunity
- Column: Opportunity Search
- Opportunity Line Item
- Package
- Settings
- Package Detail
- Prospect
- Column: Prospect Search
- Field: Prospect Card > Prospect Properties, Related Properties, User Fields tab
- Purchase Line Item
- Column: Purchase orders > Line Items tab
- Purchase Order
- Field: Purchase orders > User Fields tab
- Purchase Receipt
- Column: Receipt Search
- Purchase Receipt Line Item
- Quick Pick Category
- Quick Pick Item
- RMA
- RMA Line
- Sales Document
- Column: Sales Document Search
- Field: Sales documents > User Fields tab
- Sales Line Item
- Column: Sales document > Line Items tab
- Sales Rep
- Column: Sales Person Search
- Field: Sales Person card > User Fields tab
- Sales Territory
- Column: Sales Territory Search
- Field: Sales Territory card > User Fields tab
- Service Transfer
- Service Transfer Line
- System User
- Field: System User card > User Fields tab
- Vendor
- Field: Vendor Card > User Fields tab
- Vendor Addr
- Columns: Vendor Card > Contact Addresses tab Vendor Search
- Field: Vendor Contact Card > Contact User Fields
- Vendor Item
Click the New button from the User Fields column.

The New User Field window will appear. Enter the field name. User field names should start with a prefix letter such as "x" (Example: xUserField) to facilitate finding the field in a sorted list.

Click OK to return to the User Field Editor screen. In the right-hand column, enter the appropriate Field Properties.
Field Properties

- Map To – To map a SalesPad Desktop field to GP user field, select the field from the Map To dropdown. The dropdown contains a list of all of the GP UDFs that exist for the selected business object.
- Screen Label – This is the displayed label for the new field.
- Field Type – Select a field type to suit the data you wish to use. When mapping a field to GP, ensure that the field type and length match that of the GP field to which it is being mapped.
-
Default Value/Blank Value – Information entered here becomes the value saved to the database if no value is entered in the field.
- Note: This field does not actually default values into UDFs. The value is populated for documents that existed prior to the UDFs creation so that they do not have a null value. (To avoid confusion, this field is renamed “Blank Value” in later versions.)
-
Value Options – If the user field should contain a dropdown list of values, enter them here. Separate the values with semicolons.
- Note: Dropdown lists will automatically populate with the first option. Click the X next to a dropdown field to clear its data.
Field Properties Options

Field is Read Only
Check the Field is Read Only box to prevent changes to previously saved user field file attachments, images, and hyperlinks in SalesPad Desktop. You can also check this box to display read-only text. Text, paths, or links entered in the Default Value/Blank Value field in Field Properties will be displayed as Read Only in the user field.
Note: Because Field is Read Only applies to all instances of a user field, but non-default text, images, files, and hyperlinks are only saved for the screen they are entered on (for example, entries on a Customer Bus. Object user field will only apply to the opened customer), save all desired input before converting to Read Only.
Field is a File Attachment
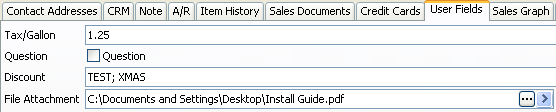
Check the Field is a File Attachment box to include a file attachment, such as a PDF file, on the user field.
Note: The filename and path of the file you will attach cannot be longer than the user field length configured in Field Properties.
To add/change a file attachment, click the ellipsis (…) button at the end of the user field. From the File Explorer window, select the desired file to add it to the user field and click Open. Upon returning to the main screen, the selected file path will now display in the field. Users can click the arrow button next to the ellipsis button to view the attached file.
Field is an Image
Check the Field is an Image box to display an image on the user field.
Note: The filename and path of the image you will attach cannot be longer than the user field length configured in Field Properties.
To have an image to appear in all instances by default, enter the path to the image in the Default Value field in Field Properties.
After closing the User Field Editor, log back into SalesPad Desktop and open the screen where the user field was added.

To add or change and image, double-click within the user field. In the File Explorer window, select the desired image and click Open. The image will now display in the field.
Field is a Hyperlink
Check the Field is a Hyperlink box to display a hyperlink in the user field. For the hyperlink to appear in all instances by default, enter the hyperlink in the Default Value field in Field Properties.
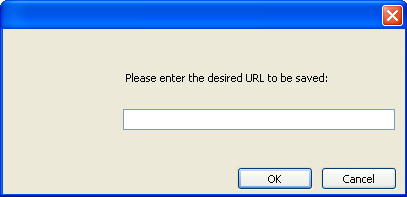
To add/change a hyperlink, click the arrow button at the end of the new user field.
Enter the URL to save in the user field and click OK.
The URL will now display in the field. Clicking on it will open the link in a browser.
Field is a Customer Lookup
If Field is a Customer Lookup is checked, the user field will have an ellipsis button that will open the Customer Lookup screen when clicked.
Field is Required (Returns Only)
If Field is Required (Returns Only) is checked, the user field must be filled in on returns created from a posted invoice.
Field is Rich Text Memo
Check the Field is Rich Text Memo box to enter or paste formatted text (colors, sizes, fonts, etc.) or images into the user field.
Quick Report
Enter the code for a quick report to view it in the user field (refer to SalesPad Quick Reports documentation for more information).
Sales Document Types
On the sales document business object, below the options, you can select which Sales Document Types will display the user field.

Adding the New User Fields
Adding the New User Field to the Layout
After user fields are created, they must be added to the layout so that they will be visible on the selected business object. If the user field applies to a field vs. a column (see the Business Objects section of this documentation), use the following instructions. If the user field applies to a column only, skip this section and use the instructions in the next section, Adding the New User Field to a Grid, to add it to your layout.
In the User Field Editor:
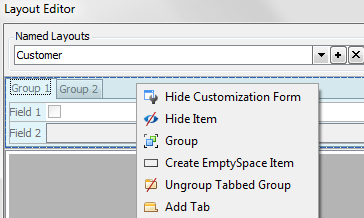
Click the Design Layout button. Select the appropriate business object from the Named Layouts dropdown (some business objects have multiple options, for example Sales Document: Quote Layout, Order Layout, etc.)
Right-click within the blank part of the screen and select Customize Layout.

Drag and drop the new user field to the desired location on the Layout Editor. Make any other desired layout changes and close the Layout Editor. At the prompt, click Yes to save the layout changes. When logging back into SalesPad Desktop, the new user field should be visible under the User Fields tab of the screen it was assigned to (Business Object).
Note: The new user field can also be added to the layout by right-clicking in the User Fields tab of the screen where you added the user field and following the same steps. Save the screen to preserve the newly added field.
Advanced Layout Design – Placing User Fields into Groups and Tabs
Creating a Group:
With the customization window open and fields added to the layout (see previous section), highlight the desired fields to group (shift+click to select more than one field).
Right-click and select Group. The selected fields will be grouped with a default name. Right-click on the name and click Rename to enter a new name for the group. When saved, standard groups appear on the screen in separate squares:

Creating Tabs:
Right-click on a created group and select Create Tabbed Group.

To create true tabs that can be viewed alternately, the next step is to highlight the entire group by right-clicking the area next to the group/tab name (not on the tab) and select Add Tab.
Right-click on the new tab and select Rename to rename the tab. Select the new tab and drag and drop to add fields or move them into the new tab. Repeat these steps for additional tabs.
Note: Groupings can be removed by right-clicking a group and select Ungroup or Ungroup Tabbed Group.
When finished, close the Layout Editor and click Yes to save changes. Remember to click Save and Update Database when closing the User Field Editor.
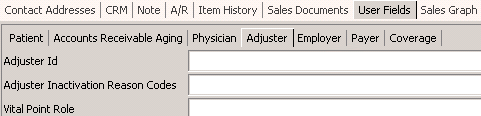
The above is an example of finished tabs in a real environment.
Note: With proper security, the User Field tabs can also be customized. (Allow Screen Layout Customization under Customer Overview, etc.).
For even more layout tips, refer to SalesPad's Customizing Layouts documentation (Customizing Layouts is basically the same functionality as the Layout Editor screen in the User Field Editor).
Adding the New User Field to a Grid
If the new user field applies to a grid/column (for example, the Sales Document Search), follow the steps below to add it to the grid:
Open the screen that uses the business object where the field was first added, then right-click the top of the grid and select the Column Chooser.
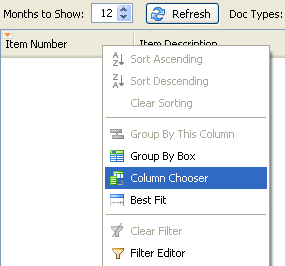
Drag and drop the field to the desired location in the grid. Save the screen to preserve the newly added field.
Editing User Fields
Existing user fields can be edited in much the same way they are added.
To edit a user field, select a business object, and instead of clicking New in the User Fields column, select an existing user field and edit the Field Properties as needed (refer to the Creating a New User Field section in this document). Be sure to click Save and Update Database after making any changes.
Copying User Fields
User fields can be copied within the same or to other business objects.
Select the desired fields to be copied and click Copy. A message box will pop up asking for the business object that you want to copy the field(s) to.

Select the business object from the dropdown and click OK.
Note: You can copy the fields to any business object. You can also make a copy within the same business object.
Make any necessary changes to the copied fields, then click Save and Update Database Table.
Importing User Fields
User fields can also be imported from .xml files.
Click the Import button.

In the File Explorer window, browse to the location of the user defined field’s .xml file and click Open.
On the Select User Fields to Import screen, select the user fields to import by clicking the check box under the Selected column.

Users can multi-select the table and click Toggle Selection to select/unselect multiple fields. If the fields to import are from different tables, it is possible to switch (or remove) the business object filter by clicking the Table Name dropdown.
Once the fields to import have been selected, click Import.
For each imported user field, select the corresponding business object (table), click Save, and click Update Database. If user fields from multiple business objects are imported, you must repeat this step for each business object. Follow the necessary steps under the Adding the New User Fields section of this document to display the imported user fields.
Exporting User Fields
User fields can be exported to .xml files. To export, click the Export button. A window from which users can select the fields to export will appear.

By clicking the dropdown in the top-right corner, users can switch between tables or show all UDFs, regardless of which table they are a part of.
Select the fields to export by checking the check box under the Selected column. The user can multi-select the table and click Toggle Selection to select/unselect multiple fields. The user can also Select All or Select None.
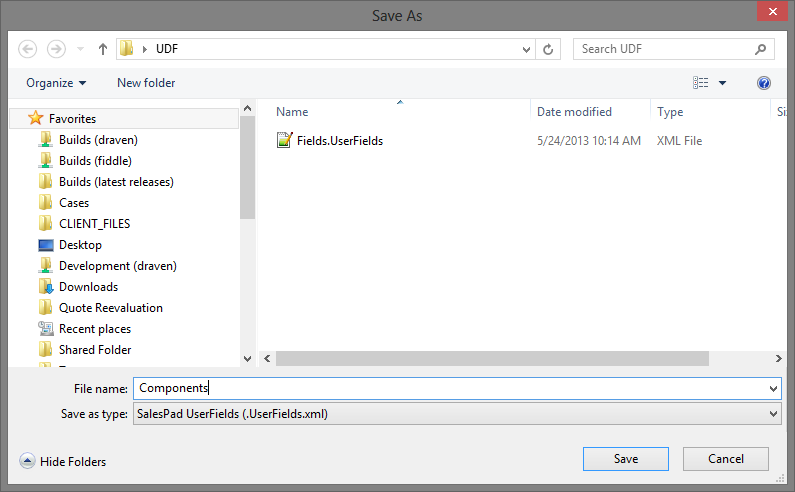
Click Export. This will open up the Save As dialog box, from which users can browse the location and the name of the .xml file that is going to be saved.
Import Data
Information can be imported into user fields from User Field Editor using the Import Data button. This requires that an Excel sheet be populated with the appropriate column names and information. For a slightly more advanced method of importing information into user fields, reference our documentation on Import Manager.
Disabling a User Field
User fields that have been saved cannot be deleted, but they can be disabled instead.
To disable a user field, check the Disabled box next to the user field's name.

Click Save and Update Database. The user field will no longer be active or visible in SalesPad Desktop.
Security
User Field Editor - Grants access to the User Field module.
SalesPad Support
Comments