Overview
SalesPad Mobile has always handled displaying the large amounts of information for business objects by grouping similar data into tabs, such as a Details tab, a Notes tab, or a History tab and so on, that users can switch between to see the relevant information. In versions 1.3.26.X and older, there was very limited control over how these tabs appear with just a few settings to enable or disable specific tabs entirely.
Now with the addition of the Tab Manager in version 1.3.27.1, users have the ability to control the visibility of each tab, and control if the tab appears while in Edit mode. Tabs can also be reordered to make frequently used tabs appear in more convenient places, or to change which tab is first viewed when opening a business object. Filters can also be applied to tabs so that they only appear under specific circumstances. Additionally, multiple UDF tabs can be made with the ability to control which UDFs appear on certain UDF tabs, allowing users to group UDFs together as needed. Specific UDFs can also be hidden or marked as Read Only.
Securities
Several securities were made obsolete and removed with the addition of the Tab Manager and are listed below:
Customers: Can View Customer YTD, Can View AR, Can View Graph, Can View Customer Notes, Can View Customer UDFs, Can Edit Customer UDFs
Contacts: Can View Contact UDFs, Can Edit Contact UDFs
Items: Can View Item Notes, Can View Item UDFs, Can View Price List
Documents: Can View Sales Doc Notes, Can View Sales Doc UDFs, Can Edit Sales Doc UDFs, Can View Sales Line Item UDFs, Can Edit Sales Line Item UDFs
Prospects: Can View Prospect UDFs, Can Edit Prospect UDFs
CRM: Can View CRM Notes, Can View Interactions
PayFabric: Can View Wallets
NOTE: If you are upgrading from a previous version of SalesPad Mobile that did not have the Tab Manager, during the database update, the Tab settings will default to the value stored in the associated removed setting.
Usage

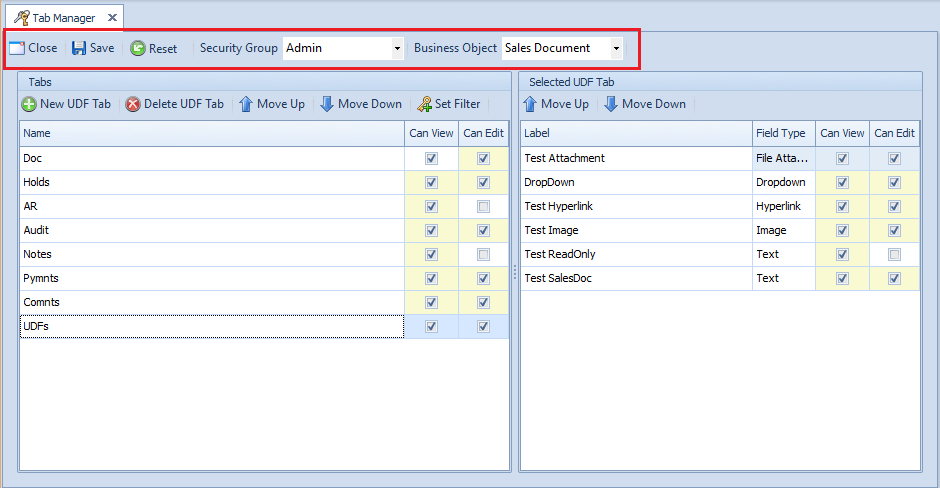
To access the Tab Manager, click Tab Manager in the Setup section of the ribbon along the top of the SalesPad Server. The Tab Manager is broken up into three major sections: Controls ribbon, The Tabs grid, and the Selected UDF Tab grid.
Controls Ribbon

The Controls ribbon houses the high level controls for the Tab Manager.
Close – Closes the Tab Manager. The server will prompt to save if there are any unsaved changes.
Save – Saves the current Tab Layout settings.
Reset – Completely resets all tabs to their default settings. All UDF tabs will be replaced by the single default UDF’s tab per business object.
Security Group – Select which security group to edit. Tab Layout settings are set per security group.
Business Object – Select which business object to edit. The options are Sales Document, Sales Line Item, Item Master, Customer, Customer Addr, Prospect, and CRM Contact.
Tabs

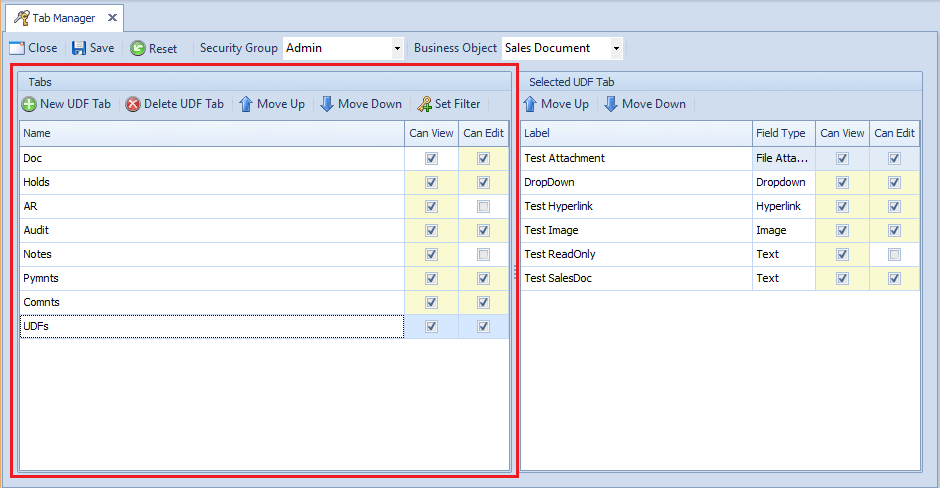
The Tabs grid shows all of the available tabs for the currently selected security group and business object. There are several buttons along the top of the Tabs grid:
New UDF Tab – Creates a new UDF tab. When clicked, a prompt will appear asking for a name for the new UDF tab. When done, the UDF tab will be inserted at the bottom of the tabs and will default to viewable but not editable.
Delete UDF Tab – Deletes the currently selected UDF tab. Only UDF tabs can be deleted. If you want to remove a non-UDF tab, you can uncheck Can View to keep the tab from appearing on mobile devices.
Move Up – Moves the currently selected tab up one position in the list, unless it is already at the top of the list.
Move Down – Moves the currently selected tab down one position in the list, unless it is already at the bottom of the list.

NOTE: The tab at the top of the list will be the first tab seen when first opening that business object. The first four viewable tabs will be displayed in the immediate tab bar of the business object, while all of the remaining viewable tabs will be displayed when the ellipses button (…) is clicked to expand the tab bar.
Set Filter – Opens the Filter Editor (See the Tab Filter Editor section for more information).
In addition to those controls, the default view of the Tabs grid shows each tab in three columns:
Name – Displays the name of the tab.
Can View – If checked, the tab will be viewable on the mobile device.
NOTE: The primary* tab cannot be hidden. Even when enabled, some tabs will not appear in Offline mode.**
Can Edit – If checked, the tab will appear while in Edit mode on the mobile device.
NOTE: Not all tabs support editing,** and therefore the Can Edit feature for those tabs cannot be enabled.
Selected UDF Tab

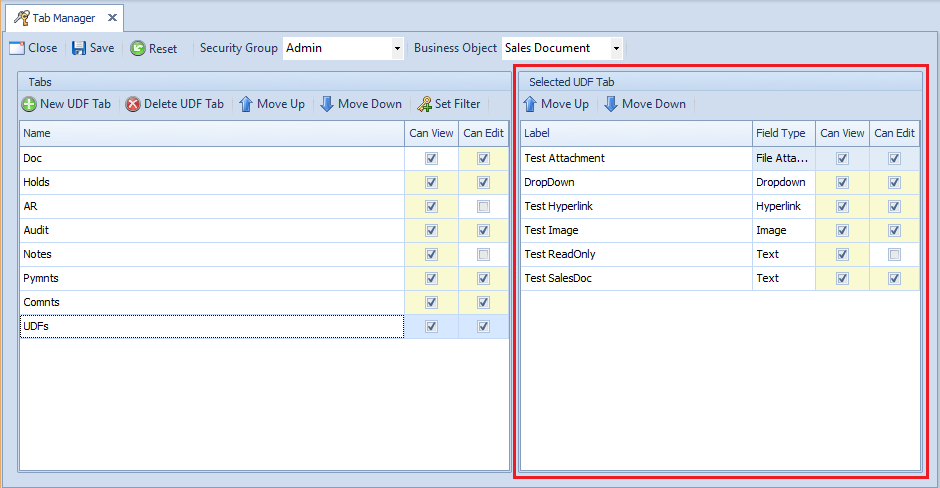
The Selected UDF Tab section will populate with the currently selected business object’s UDFs when a UDF tab is selected in the Tabs grid. There are two buttons contained in this grid:
Move Up – Moves the currently selected UDF up one position in the list, unless it is already at the top of the list.
Move Down – Moves the currently selected UDF down one position in the list, unless it is already at the bottom of the list.
The default view of the selected UDF tab shows each UDF in three columns:
Label – Displays the label of the UDF.
Field Type – Provides the type of the UDF.
Can View – If checked, the UDF will be viewable on the currently selected UDF tab.
NOTE: This can be used to hide a UDF, or it can be used in conjunction with multiple UDF tabs to group UDFs on separate UDF tabs.
Can Edit – If checked, the UDF will be editable when in Edit mode.
NOTE: UDFs marked as Read Only in SalesPad Desktop’s User Field Editor cannot be enabled for editing.
Tab Filter Editor
The Filter Editor allows the user to create filters to only show tabs under specific circumstances. For example, the Pymnts Tab, which handles accepting payments, can have a filter applied on the Doc Date business column, so that the tab only appears for sales documents that are dated within the last three months. Another example is to set up multiple UDF tabs and set filters on each UDF tab on Item Generic Description so that UDF tabs will only appear on items matching that description. This way, if there are UDFs that only make sense for certain items, you will be able to hide them when viewing items they don’t apply for.

Creating or editing a tab filter is done using four key fields:
Column – Select the business column of the currently selected business object to compare against.
Condition – Select the condition of comparison.
NOTE: The data type of the selected business column determines which conditions are available to choose from:
Integers, Decimals, Datetime – Equals, Equals or Greater, Equals or Less, Greater, Less, Not Equal
Text– Equals, Not Equals, In
Boolean (True/False)– Equals, Not Equals
Text/Days/Decimal/Integer/TrueFalse – Enter the value to compare with the selected business column.
NOTE: The data type of the selected business column determines the acceptable value type. For Datetime column types, an integer (negative or positive) representing a number of days is expected. That integer will be added to the current date when the comparison is made. This means, for example, that with an entered value of -10, it will take the current date and subtract 10 days from it, then compare the currently selected business column against that calculated date.
Enabled – If unchecked, the filter will not be used in determining if a tab is viewable.
Selecting Ok will save any changes to the filter. Selecting Cancel will exit out of the Filter Editor, and any changes will be lost.
|
* Primary tabs for each business object are as follows:
|
|
** These tabs do not support Offline mode and will not appear while the mobile app is offline:
|
|
*** The following tabs do not support editing:
|
SalesPad Support
Comments
Brad Smith
Not seeing Tab Manager in the Setup section of the ribbon. Where could it be hiding?