Overview
Equipment Management allows users to track sales and service history for specific serialized inventory. Setup and use are made simple by using existing and established SalesPad functionality. A number of Equipment Management plugins are designed to ease processes for assigning equipment, creating rental orders, and adding or updating rental items.
Equipment Contract
The following settings are applicable Equipment Contract settings:

- Equipment contract Item Number UDF – Item Master User Defined Field for storing the Contract Item Number to be added to a Sales Document. The item has no default value.
- Restrict Equipment Contract Start and End Dates – When True, new Equipment Contract will always use the first day of the month for the Contract Begin Date, and the last day of the month for the Contract End Date.
- Sales Line Serial Numbers – Sales Line UDF that stores the serial numbers that are being billed. Create as text length MAX. This item has no default value.
Equipment Management
The following settings are applicable Equipment Management settings:

- Autogenerated Serial Number Format (optional) – Specify the format for a serial number (ex:{0:yyyyMMdd}_{1:0000}). If a format is used, SalesPad will auto-generate a serial number using the specified format when new equipment is added. This functionality is not item specific but is used across all items. The following setup section discusses entering UDFs under the remaining settings.
- Equipment Type - Semicolon delimited list of allowed equipment types.
- Field Service Document IDs – Enter the sales document IDs used for equipment management.
- Remember Service Doc IDs – When enabled, the last service doc type selected from an equipment card will be the default when opening subsequent equipment cards.
Equipment Rental
The following settings in the settings module are applicable to Equipment Rental:
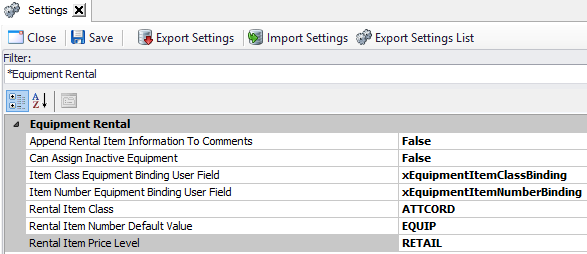
- Append Rental Item Information to Comments – Add equipment item information to the sales line comments field when creating rental items.
- Can Assign Inactive Equipment – Allows equipment marked Inactive to be assigned or reassigned. Defaults to False.
- Item Class Equipment Binding User Field – Defines an item master user field that can be used to specify which equipment item classes will be used with the respective rental item.
- Item Number Equipment Binding User Field – Defines an item master user field that can be used to specify which equipment item numbers will be used with the respective rental item.
- Rental Item Class – Defines the class of equipment for the item.
- Rental Item Number Default Value – Default service item number for equipment rental items (If the rental item number UDF is blank for any equipment, this value will be used).
- Rental Item Price Level – Defines a price level on equipment items that replaces rental item price levels (UofM must match service item UofM).
Setup
Service Document IDs
By using unique document IDs for service orders and invoices, separate workflow and rules can be used. You can create a specific service order and invoice document ID in GP and copy the document ID into the Field Service Document IDs field in settings as a semicolon, delimited list.
Service Document ID Layouts
The service document ID layout can be customized to display the equipment serial number, item number, equipment description, and third party billing.

Third Party Billing
This is an optional step and is only applicable if warranty billing is required. If set up properly, the third party billing field allows the order to be placed to the end user and the invoice to be created under the manufacturer.
Pre-Save Script
The following sales document pre-save script can be loaded in the security editor under equipment management invoicing so the equipment items are automatically assigned to a customer. This script will need to be edited to match your setup and document IDs. The items that may need to be modified are in red below:
if(sd.val_Sales_Doc_ID.Equals(" ORD ", StringComparison.CurrentCultureIgnoreCase) && sd.val_Sales_Doc_Type.Equals(" ORDER ", StringComparison.CurrentCultureIgnoreCase))
{
foreach (SalesPad.Bus.SalesLineItem sl in sd.LineItems)
{
if (sl.ItemMaster.IsSerialTracked)
{
foreach(SalesPad.Bus.SalesLineLotNum ful in sl.LotNums)
{
SalesPad.Bus.Equipment eq = new SalesPad.Bus.Equipment(sl.val_Item_Number, ful.val_Serial_Lot_Number);
eq.val_Assigned_To_Customer_Num = sd.val_Customer_Num; eq.val_Assigned_To_Customer_Num_Address_Code = sd.val_Ship_To_Address_Code;
EquipmentAudit.SaveAuditLogging(eq, String.Format("Equipment assigned to customer {0} / {1}", sd.val_Customer_Num, sd.val_Customer_Name));
eq.Save();
}
}
}
}
return"";
Usage
Equipment Search/Equipment Lookup
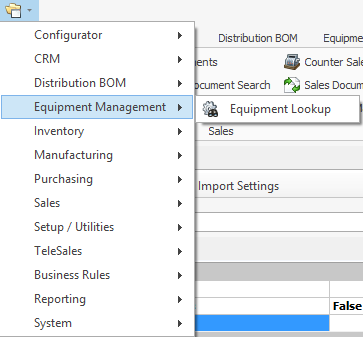
Click on the Modules dropdown and select Equipment Management > Equipment Lookup.
This opens the equipment search screen where you can search for equipment by serial number, bin, item type, item number, item class, location, customer number, or customer name. Searches sold, assigned, customer and inventoried serial number records. It can also create new, non-inventoried serial numbers for customer equipment.

Enter search criteria. Click the equipment number (serial num) links to navigate to a specific equipment card, the item number to open the equipment item in inventory lookup to view its properties (see the SalesPad Inventory Lookup document for more information), or the customer number to open a customer’s Customer Card.

Adding New Equipment
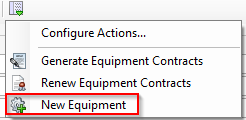
Click the Actions dropdown ( ) and select New Equipment to add a new equipment record:
This will bring up the new equipment menu.
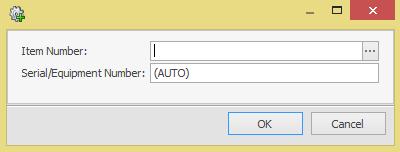
Enter or select an item number, enter a serial/equipment number, and click Create. The equipment card for the newly added equipment will open.
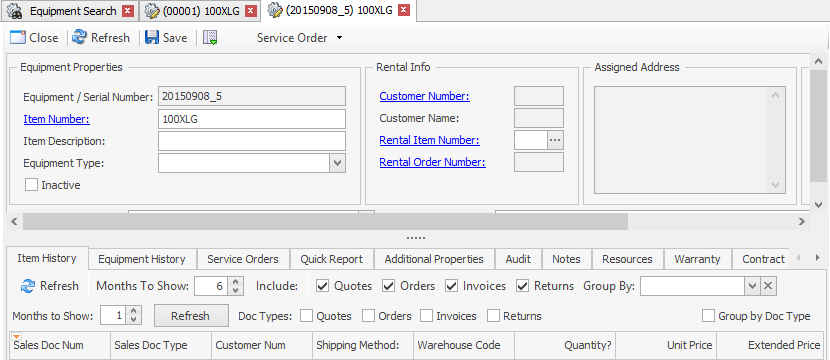
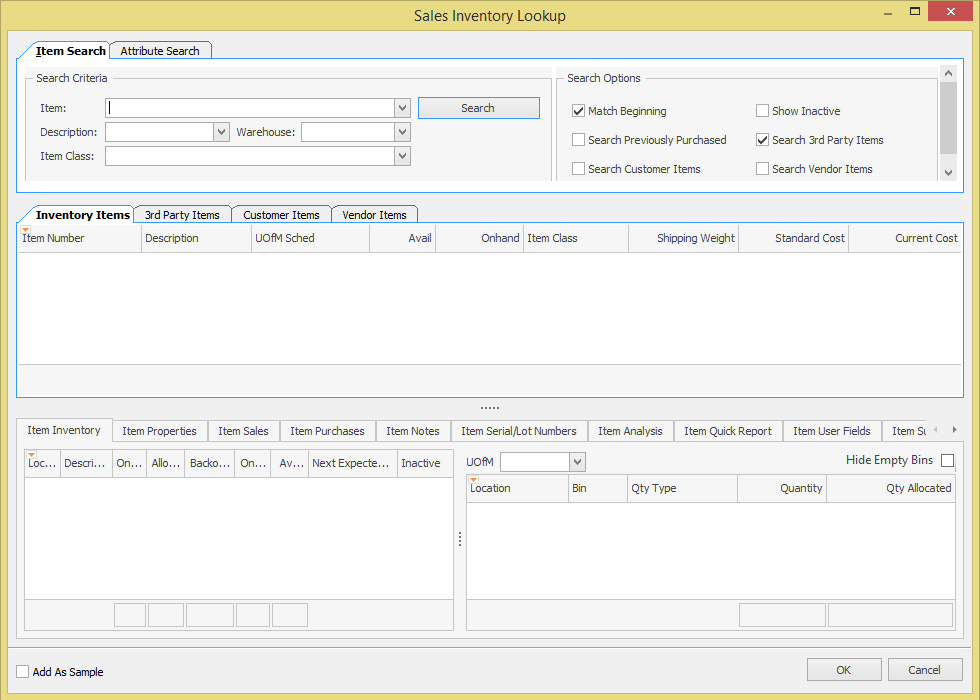
Clicking the ellipses will bring up the Sales Inventory Lookup.
Equipment Search/Equipment Lookup
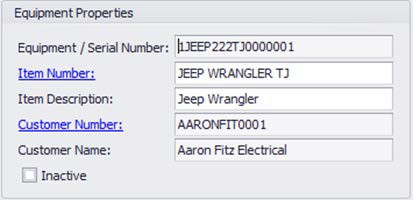
Maintain the equipment fields and view equipment sales history, service history, equipment quick reports and item sales via the equipment card.
To assign equipment to a customer, click the Actions dropdown () next to Print and select Assign To Customer.
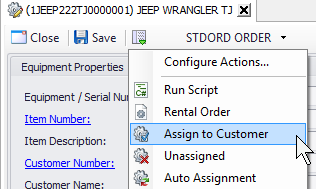
The customer lookup screen will appear.
Find and select the customer and the correct address ID. The assignment can be seen from the Actions ( ) dropdown (Assign Equipment to Customer plugin), or with proper setup, on the header next to the Actions menu (refer to the SalesPad Plugins – Configure Actions document for setup information):
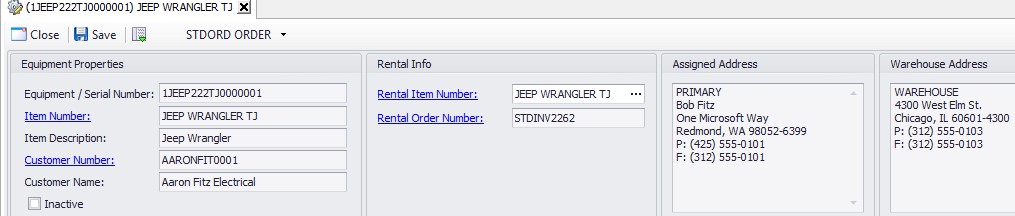
Note: The Auto-Assignment plugin can be run to set the equipment assigned address based on the current inventory location, or fulfilled status for that serialized item. This plugin can be set to auto run when opening the equipment card to ensure that the location of the serialized item is always current. New in 4.1 versions, the item number and item description of existing equipment can be edited on the equipment card (with proper security under equipment properties), and equipment not in use can be marked as inactive:
To reactivate inactive equipment, the Allow Serial Number Reactivation security sub-setting under equipment properties must be set to True in the security editor. If an equipment properties script is set up in the security editor, click Run Script (or the alternate name entered into the Button Text field in security) on the Actions () dropdown menu to run the script.
Equipment Card Tabs
Some images may contain tabs that do not exist on the release version of the equipment card. The Item History tab displays a history of all sales documents the equipment item is on:

The Equipment History tab displays a history of all serial numbers sold for the equipment item:

The Service Orders tab displays all service orders and service invoices the equipment item is on:

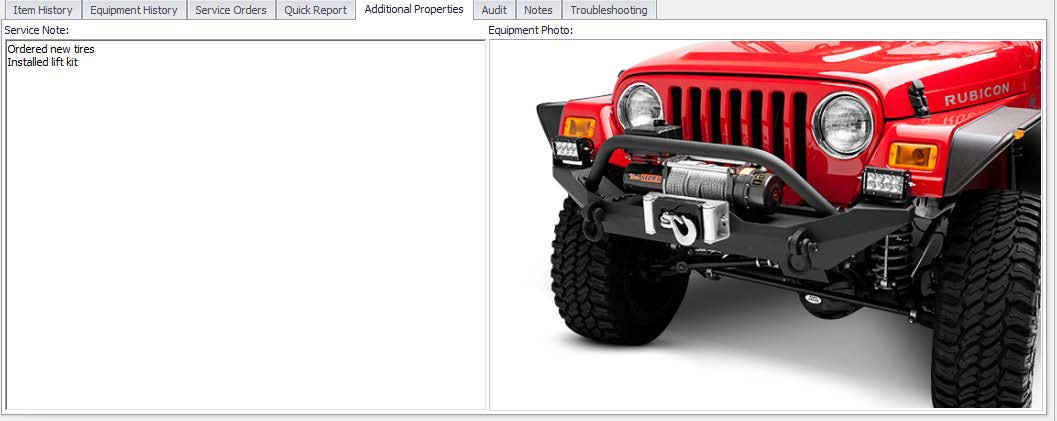
The Additional Properties tab (formerly User Fields) displays additional equipment user fields, which will contain additional service equipment properties:
The Quick Reports tab displays any quick reports set up for equipment. The name of the tab may change according to the title of the quick report.
Audit – This tab audits all assignments, un-assignments, reassignments, and rental order creation.
Notes – This tab allows users to input date and time stamped notes for that serialized item.
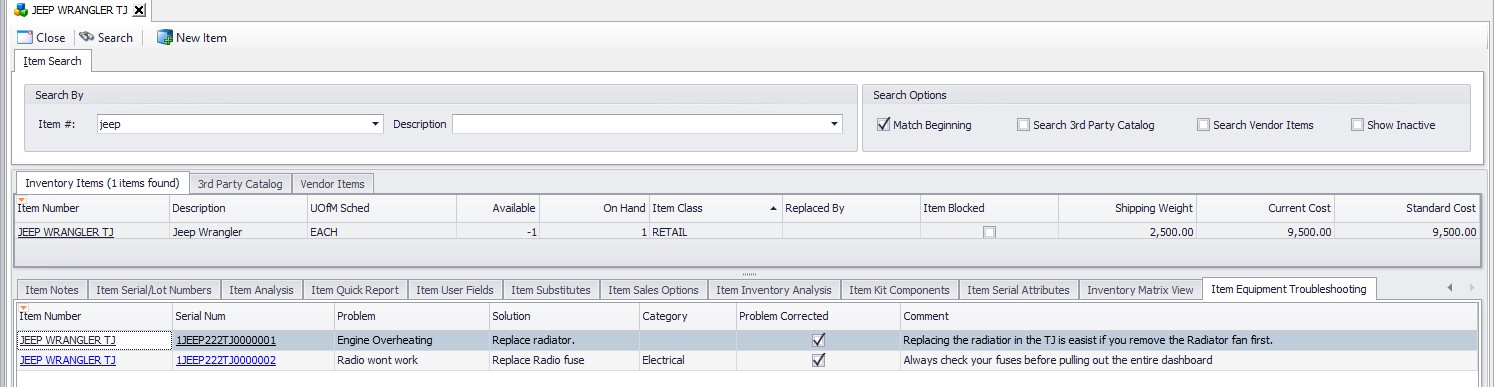
Troubleshooting – This tab is used to record and diagnose problems and solutions for that serialized item.
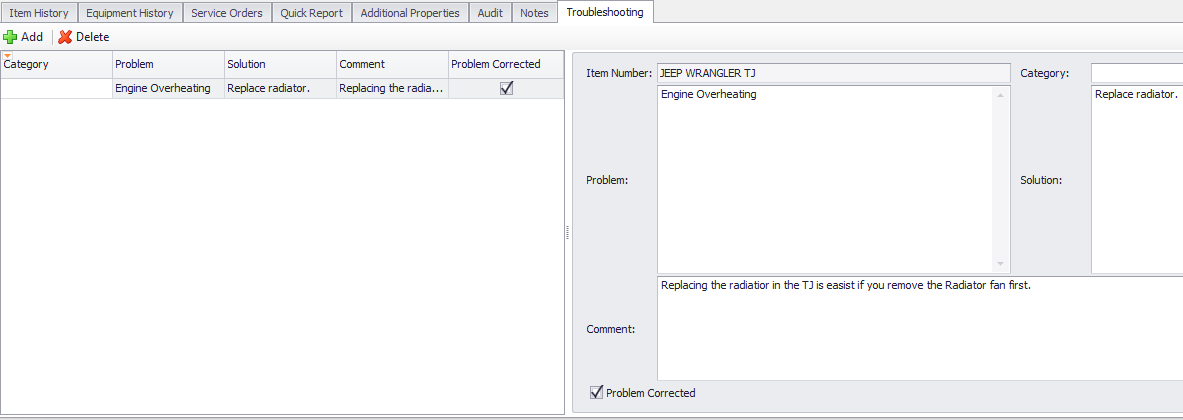
All problems that are marked as Corrected will be shown on the inventory lookup for that inventory item.
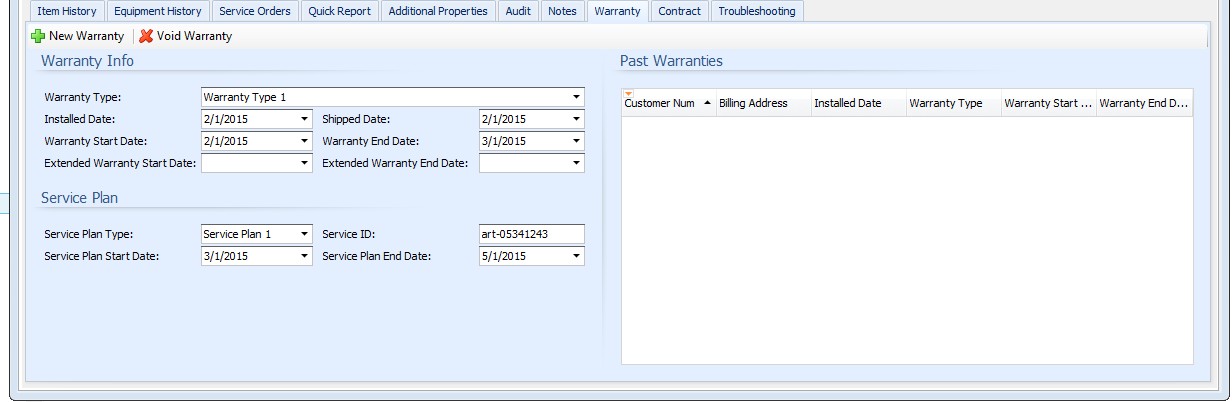
Equipment Warranties
The Warranty tab is used to maintain warranty information for the equipment. When an equipment has a warranty that is active, the Equipment Card will display the Warranty Status on the Banner at the top of the Card. Past Warranties for the Equipment are shown in the grid.
Equipment Contracts Setup
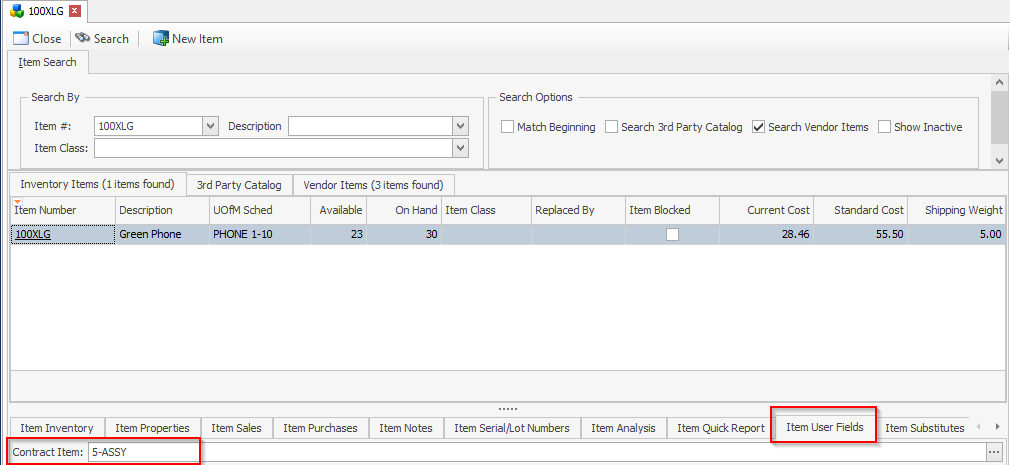
This Item Master UDF holds the Item Number that will be used on generated Equipment Contract Documents for that Equipment Item. From the Item Card, with the xContractItem UDF, we can specify that for all Serialized 100XLG’s, when generating a contract line, the Contract Item 5-ASSY will be added to the Sales Document.
Equipment Contract Renewal
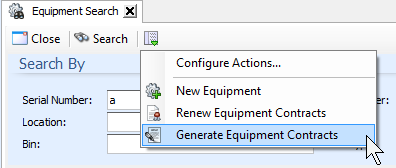
Equipment Contracts can be renewed from the Equipment Search Screen.
Select Renew Equipment Contracts to renew existing Equipment Contracts based on the Equipment Search results.

Contract Renewal Consideration
The contracts that are considered for Contract Renewal must expire on or before the Contract End Date specified on the Renew Equipment Contracts plugin.
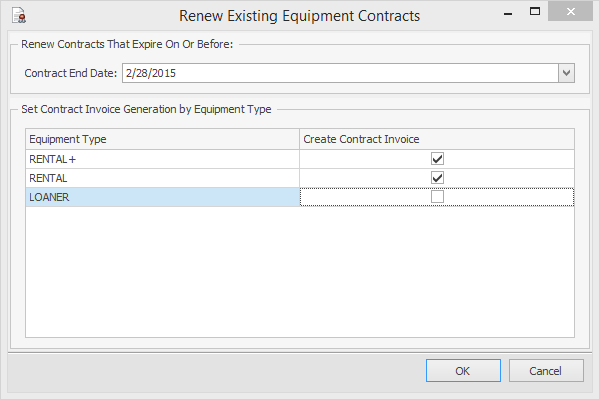
The plugin will consider Equipment with an Equipment Type that is specified in the Security: Renew Equipment Contracts > Valid Equipment Types for Contracts.
The plugin will not consider Equipment Contracts if the Equipment already has a Pending Contract. The newly created Equipment Contracts will have the Contract Status: Pending. One Contract Renewal Sales Document will be generated per Customer in the Equipment Search, if the Create Contract Invoice checkbox is set. If unchecked, it will generate a Contract only, and not an Invoice. The Sales Lines on this Renewal Document will be grouped by the Setting: Equipment Contract Item Number UDF, and the Line Quantity will be set based on the total sum of the Contract Length of all considered Equipment Contracts.
Equipment Contract Generation
Equipment Contracts can be generated from the Equipment Search Screen.
Select Generate Equipment Contracts to generate new Equipment Contracts based on the Equipment Search results.
Contract Generation Consideration
The plugin will consider generating Equipment Contracts for all Equipment’s that have an Active Equipment Warranty. This Active Warranty must expire on or before the Warranty Expiration Date specified on the Generate Equipment Contracts plugin.

The plugin will consider Equipment with an Equipment Type that is specified in the Security: Renew Equipment Contracts > Valid Equipment Types for Contracts. The plugin will not consider Equipment Contracts if the Equipment already has an Active or Pending Contract.
The newly created Equipment Contracts will have the Contract Status: Pending.
Once Contract Sales Document will be generated per Customer in the Equipment Search, if the Create Contract Invoice checkbox is set. If unchecked, it will generate a Contract only, and not an Invoice. The Sales Lines on this Renewal Document will be grouped by the Setting: Equipment Contract Item Number UDF, and the Line Quantity will be set based on the total sum of the Contract Length of all considered Equipment Contracts. The Contract Length of the newly generated Equipment Contracts can be set for each Equipment Type.
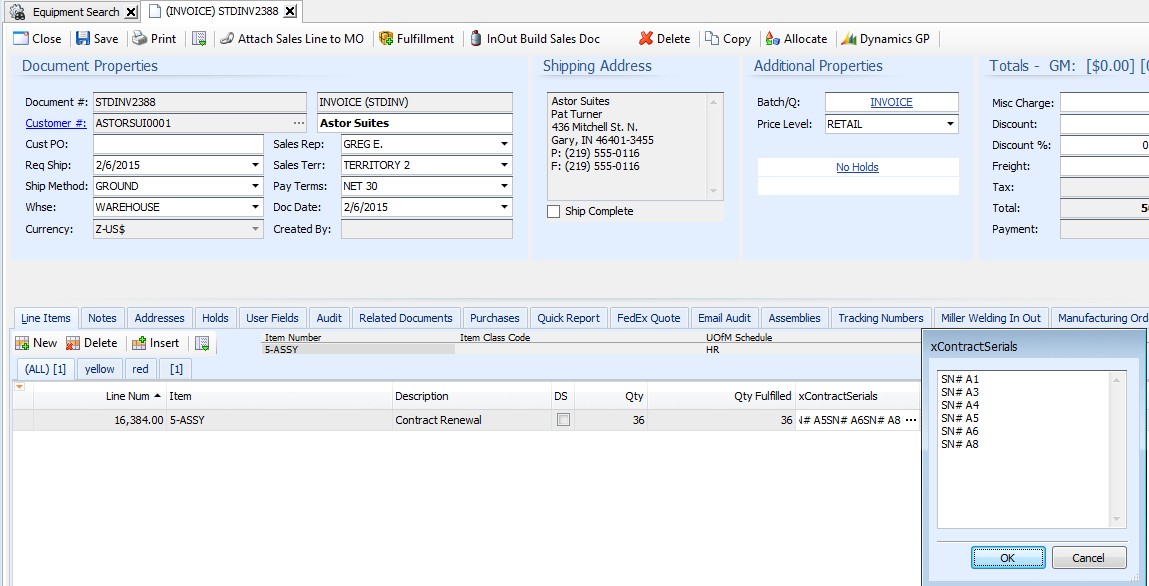
After Equipment Contract Generation and Renewal, two log windows are shown. One that displays Contract generation at the Equipment Level, and one that displays Equipment Contract Document generation at the Customer Level. If the Securities > Generate Equipment Contracts > Sales Line Serial Numbers or Generate Equipment Contracts > Sales Line Serial Numbers are populated with an existing Sales Line UDF, the Equipment Serials that contributed to that Equipment Contract Sales Line will be saved into that Sales Line UDF.
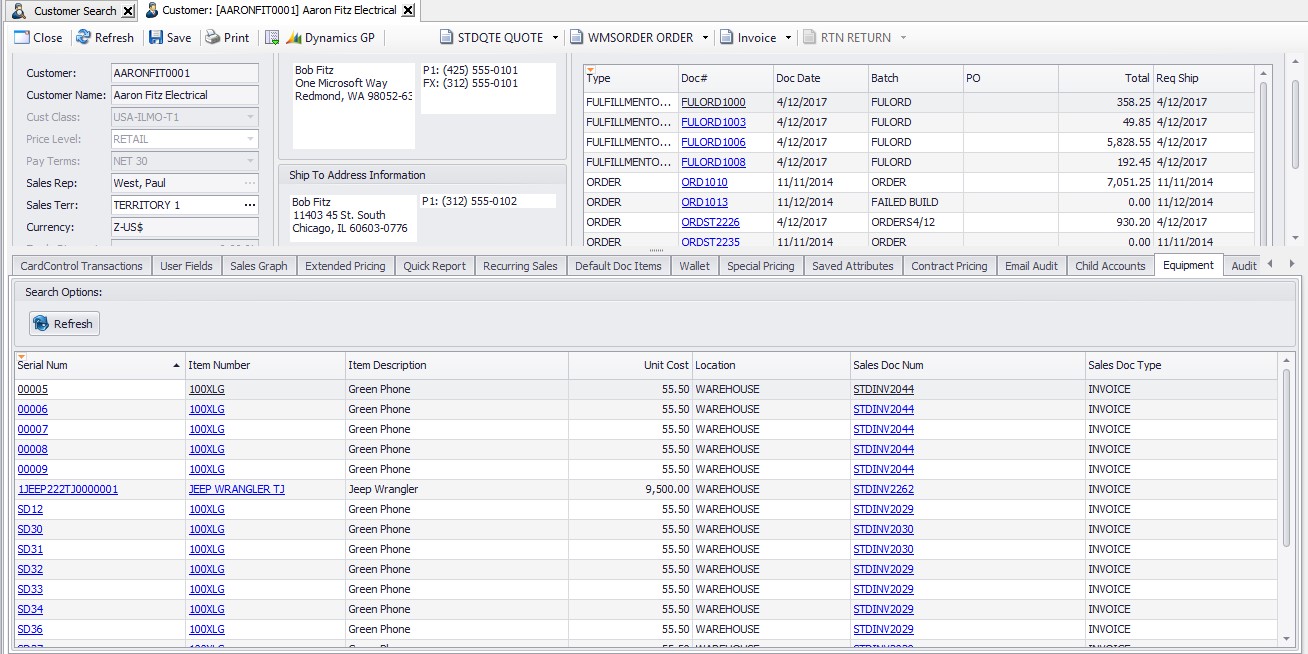
Customer Equipment Tab
All equipment assigned to a customer can be viewed on the Customer Card Equipment tab:
Right-click on a piece of equipment to open a dropdown menu with options to create a service document:
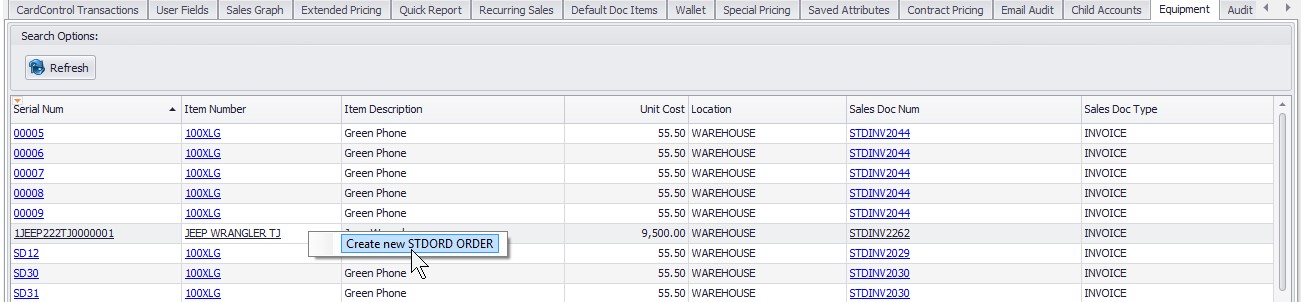
You can also create a service order from the customer card by selecting the proper order type.
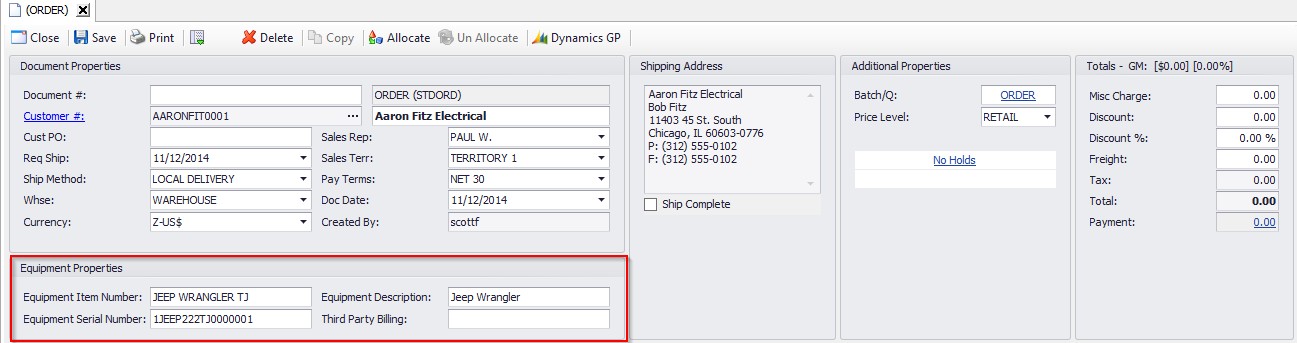
Service Orders
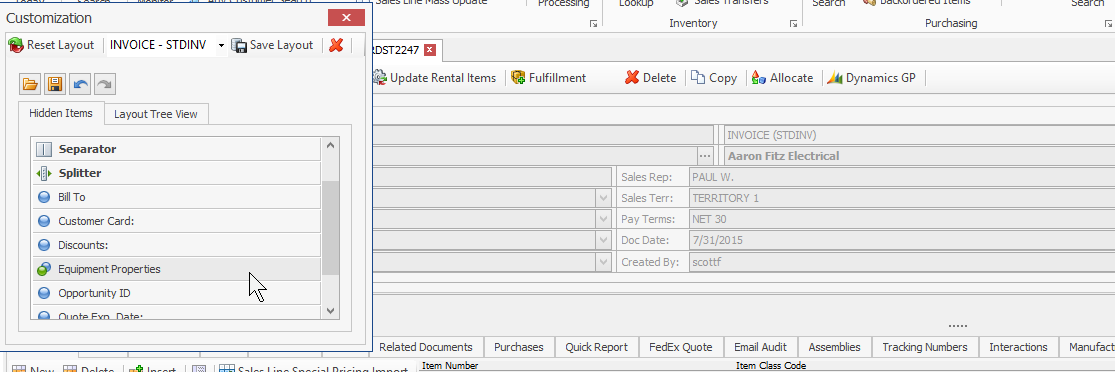
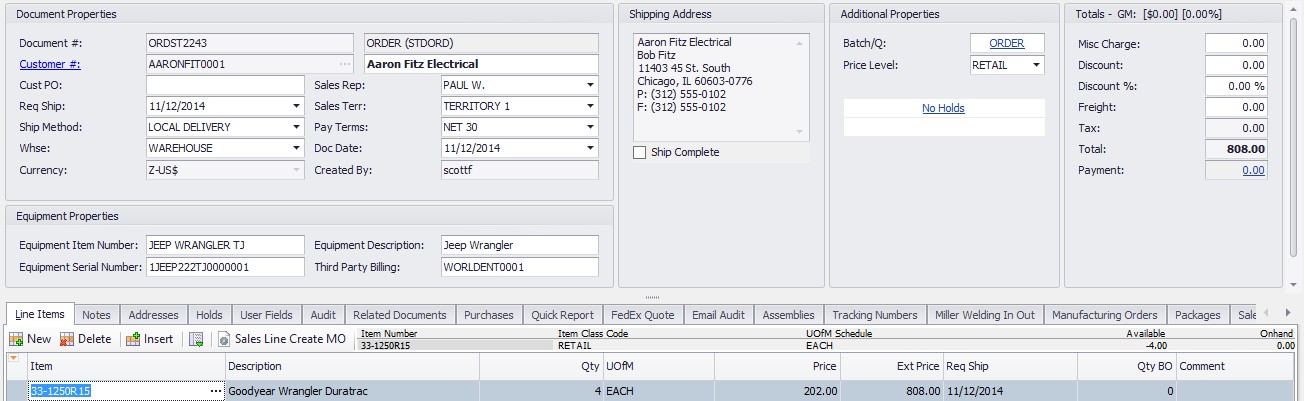
Aside from any layout changes that have been set up, a service order will look very similar to a regular sales document. The Equipment Properties Group is hidden on documents by default.
To add this to a report header, right-click and customize the header, the group is in the Hidden Items menu. (The sub security Sales Document Properties > Allow Screen Layout Customization will need to be set to True.)
Once the service order is ready, if using the third party billing functionality, select Invoicing from the Actions ( ) dropdown menu to transfer it to an invoice. The invoice will be generated for the customer number entered in the Third Party Billing field.
Migrate an Old Equipment Setup to a New Equipment Setup
To migrate an old equipment setup to a new equipment setup, navigate to Setup/Utilities > Equipment Migration Tool. Click Generate Migration Script.
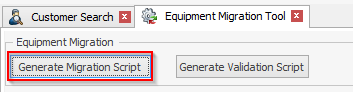
This will create a script for you to run in SQL. After you've run the script, click the Generate Validation Script button and copy/paste to run in SQL and verify the changes.
Note: Always do this in a test environment before doing it in a live environment.
Security
Click the Actions dropdown and select Security Editor.
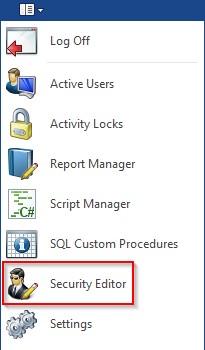
Filter to "*Equipment" and enable the following securities:

- Add New Equipment – Plugin that allows a user to create new equipment serial items
- Customer Equipment – Enables the Equipment tab on the Customer Card
- Equipment Audit – Enables the audit on the equipment card that tracks assignments and unassignments.
- Equipment Create CRM Task – Allows a user to create a CRM task directly from the equipment card for the customer that is currently assigned to that equipment.
- Equipment Lookup – Enables the Equipment Lookup/Equipment Search module
- Equipment Maintenance – Enables access to equipment cards
- On Load Script – C# Script that executes when loading the equipment card
- Pre Save Script – C# Script that executes before the save of an equipment card
- Equipment Management Add Rental Item (Beta) – Plugin that adds rental service item(s) bound to equipment to the sales document.
- Equipment Management Additional Properties – Enables the additional properties tab on the equipment card. This tab holds all user defined fields for the equipment.
- Equipment Management Assign Equipment to Customer – Enables the assign equipment to customer plugin on the equipment card
- Allow Reassign – Allows a user to reassign equipment that is already assigned.
- Quiet Mode – Hides all popups, unless they are related to an error or require a response.
- Equipment Management Create Rental Order – Enables the creation of rental orders on the equipment card
- Equipment Management Equipment History – Enables the equipment history tab on the equipment card
- Equipment Management Invoicing – Enables the invoicing plugin on a service order for third party invoicing.
- Post Transfer Script – C# Script that executes when a user clicks the transfer button, after the document has been transferred.
- Pre Transfer Script – C# Script that executes when a user clicks the transfer button, before the document has been transferred.
- Equipment Management Item History – Enables the item history tab on the equipment card
- Can Export Grid – Allows a user to export the item history grid to Excel
- Equipment Management Quick Report – Enables the quick report tab on the equipment card
- Multi Quick Reports Path – The full path of the quick reports folder when using multiple quick reports
- Multiple Reports – When enabled, allows the use of multiple quick reports on the equipment card
- Quick Report – The path and name of the quick report when using a single report.
- Equipment Management Service Orders – Enables the service orders tab on the equipment card
- Equipment Management Unassign Equipment – Unassigns equipment that is assigned to a customer.
- On Unassign Script – C# Script that executes when a user clicks the unassign button, after the equipment has been unassigned. If no customer is unassigned the script will not run.
- Equipment Management Update Rental Items (Beta) – Assigns any new rental items, unassigns any deleted/removed rental items
- Prompt on Reassign – Asks the user whether or not they want to reassign items that have already been assigned (requires Reassigning to be enabled).
- Quiet Mode – Hides all popups, unless they are related to an error or require a response.
- Can Reassign Assigned Equipment – Allows the user to reassign equipment that is already assigned to a customer (will be audited as unassign/assign).
- Equipment Notes – Enables the notes tab on the equipment card
- Append Date Time to Notes – Adds a date/time stamp to notes added with the add note button.
- Can Add Note – Allows a user to add notes
- Can Edit Entire Note – Allows a user to edit any part of the note.
- Equipment Properties – Enables the equipment properties section on the equipment card
- Allow Item Description Changes – Allows the user to change the item description for a piece of equipment.
- Allow Item Number Changes – Allows the user to change the item number of a piece of equipment.
- Run Equipment Properties Script (versions 4.0.1522+) – Enables users to run a script on the equipment card by selecting it from the Actions dropdown.
- Sub-settings – Enter the name of the action under “Button Text” (default is “Run Script”), and enter the script to run in the Run Equipment Properties Script field.
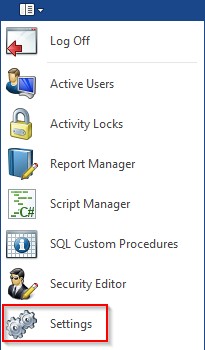
Settings
Click on the Actions dropdown and select Settings.
Enable Settings that are applicable to Equipment Contract, Management, and Rental:
Settings are divided by Contract, Management, and Rental.
SalesPad Support
Comments