Settings
To allow for printing attached PDF documents when printing reports:
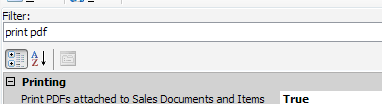
- Go to Modules > Settings
- Filter to “print pdf” and set Print PDFs attached to Sales Documents and Items to True
Usage
PRINTING
To print a document in SalesPad with PDF attachments:
- Create a user defined field with a PDF attachment
Note: You should have a user defined field on Item Master and Sales Line Item with the same name (example: uf_ItemAttachment). Refer to the SalesPad User Defined Fields document for instructions on creating user defined fields.
- Create a sales document
- Click the Print button on the sales document. The Print Sales Document Report menu appears
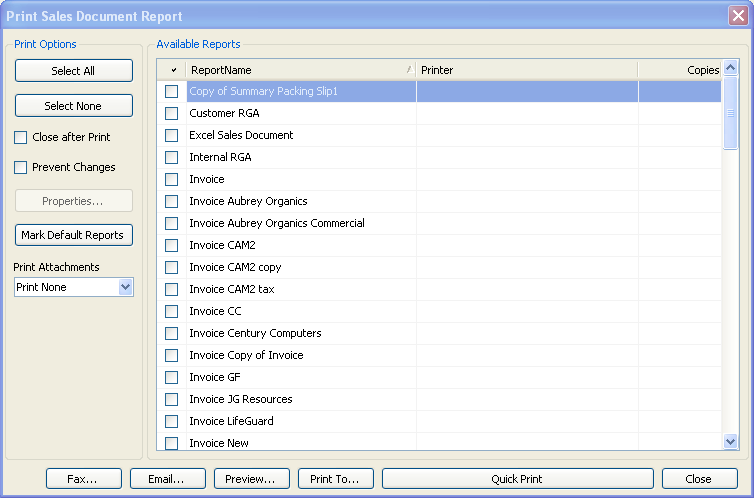
- In the Print Options column, select the appropriate option from the Print Attachments drop-- down:
- Print All – Prints all attached PDFs
- Print None – Will not print any attached PDFs
- Report Controlled – Prints only the PDFs referenced in a custom script within the designed report
- Click the Quick Print button
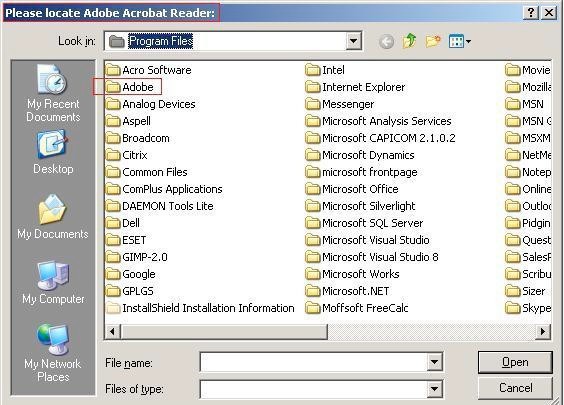
- The first time you set up the PDF attachment print functionality, you must locate the installation .exe for Adobe™ Acrobat Reader on the screen that appears. Select this file and click Open
The sales document and attached PDFs will print.
Note: After the initial path for Adobe™ Acrobat Reader is set, it cannot be changed, except by changing the system registry.
EMAILING
To email a document in SalesPad with PDF attachments (email configuration required),
- At the Print Sales Document Report window (steps 1--3 under Printing) after you select a report and whether attachments will be sent, click the Email button. The Send Email screen appears
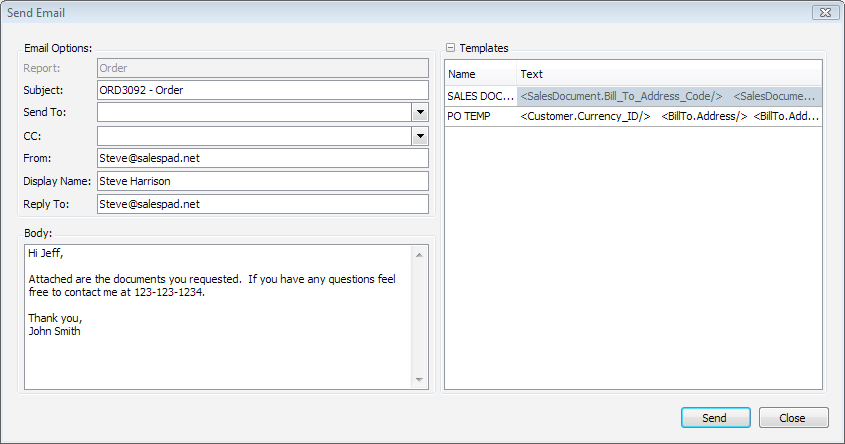
- On the Send Email screen, enter the email sending options
- The Subject line defaults to the document number and document type. You can change this manually
- Send To and CC fields pull email addresses listed on the customer/vendor cards
- Enter the From email address*, Display Name, and Reply To fields. This information will persist after the first time.
- Select the template to use from the right hand column or manually enter the body (Refer to the SalesPad Emailing and Email Templates document for template setup instructions)
- Click the Send button to send the email with PDF attachments
Note: The From email address must match the global address pointed to by the company email server set up in the Sales Email Confirmation settings in SalesPad’s Settings module. (Refer to the linked SalesPad knowledge base article).
SalesPad Support
Comments