Overview
Designed for use by companies that have walk-in customers but do not need a full point of sale terminal system, the Counter Sales function is a quick order entry system that allows for order entry, useful for walk-in customers or off-site sales. Please reference the Security and Settings sections at the end of this document before working with Counter Sales.
Usage
To get started, click on the Modules dropdown and select Sales > Counter Sales.
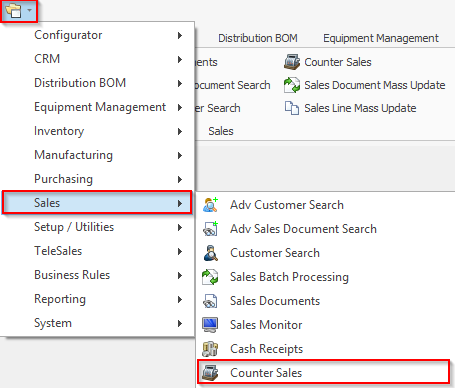
This will open the Counter Sales screen.
Action Toolbar
The following is a brief overview of each of the buttons found on the Action Toolbar for Counter Sales:

Close – This will close Counter Sales.
Search – This will do a universal search through the module.
Save – This will save all of the actions in the module.
Actions Dropdown – Will open a list of actions that you can take from the module.
Clear – Will erase data from the Counter Sales menu.
Detailed View – You can view the full order from the standard sales document screen on the Check Out tab.
Document Type Dropdown – Will change document types based on what you select.
New Customer – Creates a New Customer.
New Sales Line – Creates a New Sales Line.
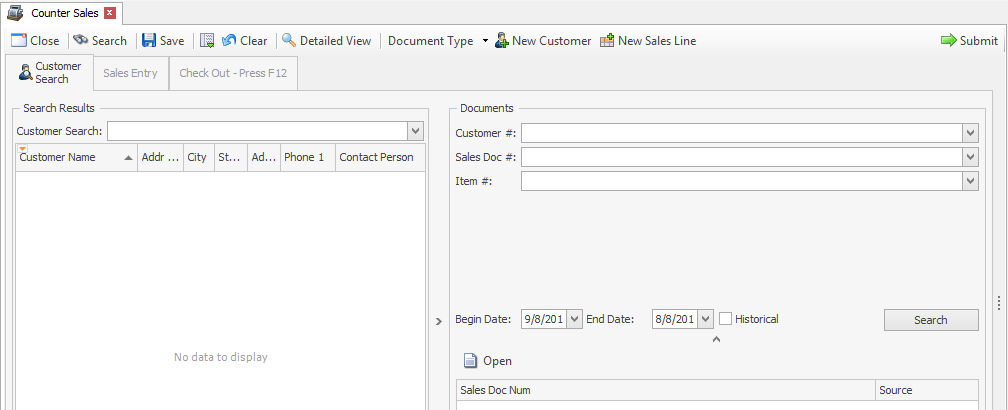
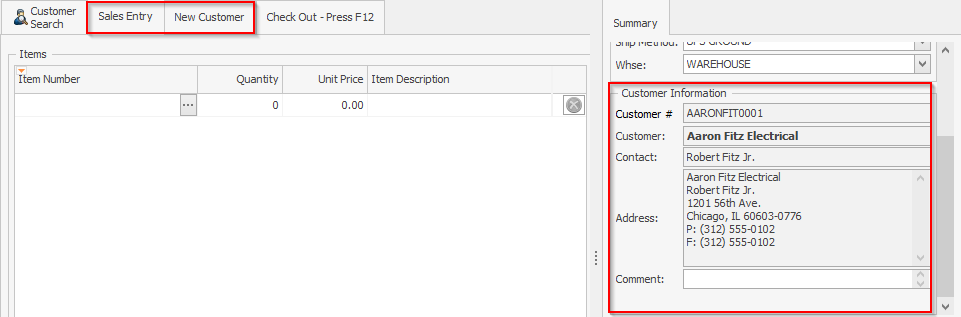
Customer Search
The Customer Search tab in Counter Sales works similarly to the original SalesPad Customer Search.
Enter a search term and hit the enter key, then select a Document Type from the dropdown menu.
Double-click on the customer name or single-click on the Address Code you wish to use.
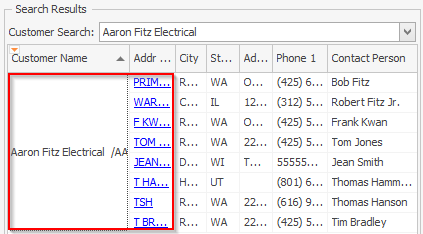
Note: Select a customer before the other Counter Sales. You must select a customer before the Sales Entry tab becomes available.
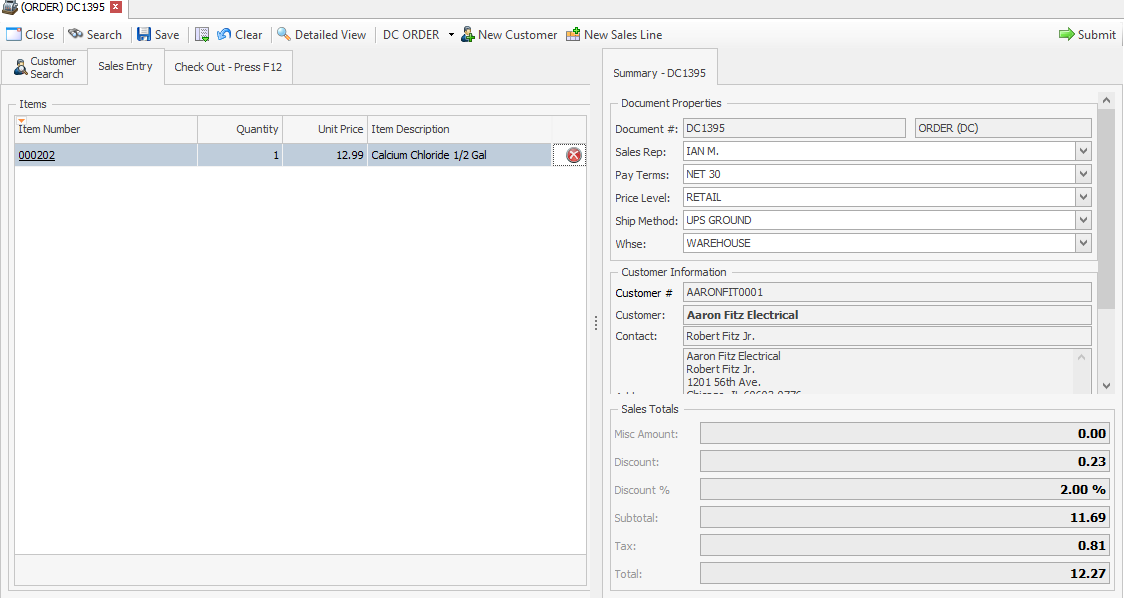
The Sales Entry screen will appear as follows:
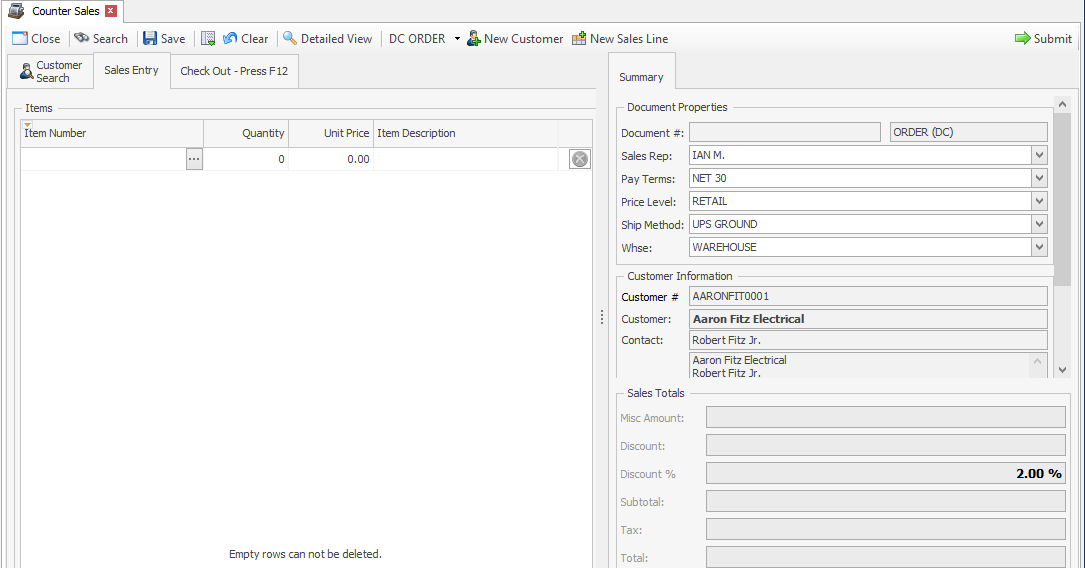
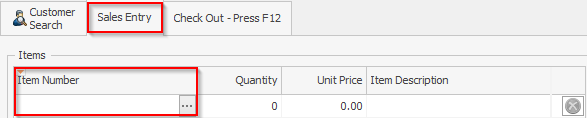
Sales Entry
The Sales Entry tab in Counter Sales is a quick order entry window.
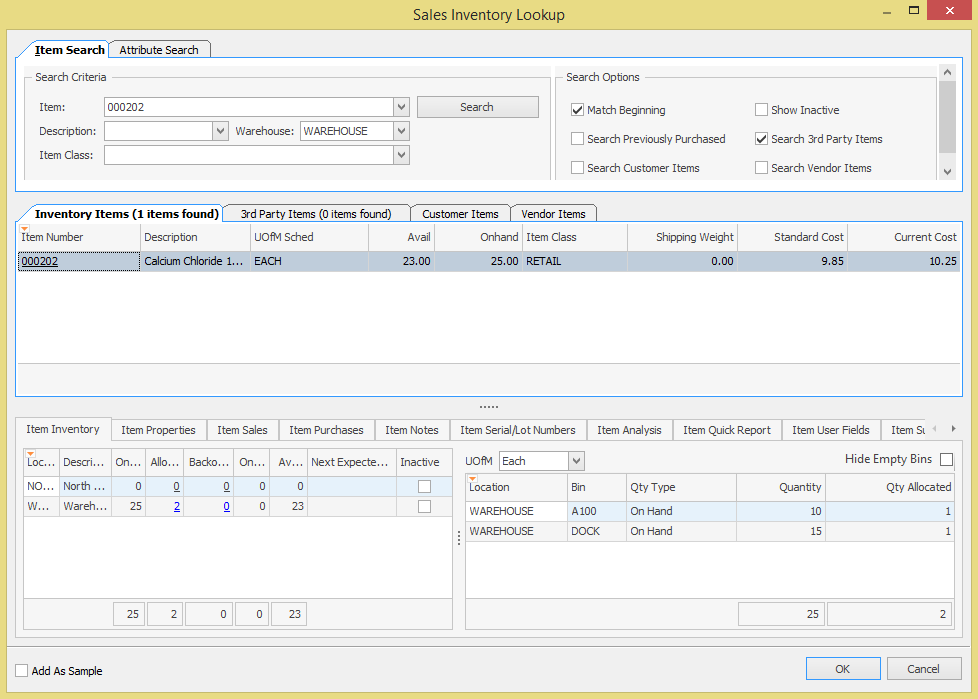
Click the ellipsis (...) to search for an item on the sales inventory lookup screen.
Click OK when you have selected an item. The order will appear.
Add more items if necessary and check Sales Totals.
Check Out
The Check Out tab in Counter Sales is for taking payments.
Enter credit card information to process payments by a cash or check amount. Choose a payment type tab (PayFabric, Manual, Cash/Check, Gift Certificate, or Square). The change amount will be calculated for a cash payment.

PayFabric
When using PayFabric to process a sale with Counter Sales, refer to our Using PayFabric in SalesPad and Using EMV Terminals (Chip-and-PIN) Devices in SalesPad documentation for the card acceptance process, based on your payment processor setup.

Square
When using Square to process a sale with Counter Sales, refer to our Using Square in SalesPad and Square Terminal Checkout documentation for the card acceptance process, based on your payment processor setup.

Cash/Check
When taking a payment using Cash/Check follow these steps:
- Fill in the Check # field
-
Click Save.
The check will appear in the window below:


Click Submit.
Note: You can remove the payment by selecting Remove Payment.
Gift Certificate
Gift Certificates must be set up in Dynamics GP and in SalesPad before they can be applied. Please see Dynamics GP documentation or consult your GP partner for more information. After one is set up in GP, follow these steps in SalesPad:
Pre-Counter Sales Setup in SalesPad:
- Create an order.
- Enter the Item Number for the Gift Certificate
- Enter the quantity that you created into the QTY column.
- Select Ship > Select all > Create Shipment.
- Post the Invoice.
Within Counter Sales:
- Complete steps regarding Counter Sales mentioned in this documentation.
- Enter the Gift Certificate #.
- Enter the Amount on the certificate.
- Click Save.
- Complete the order using the CardControl, manual processing, or cash/check instructions from above.
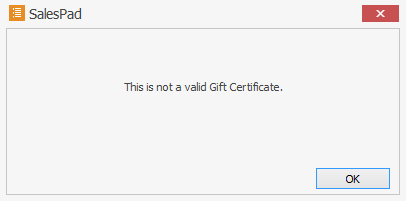
Note: If you do not have a Gift Certificate setup, you will run into this error:
Store, Drawers, and Walk-in Customers
Stores and Drawers can be set up through the Store Setup screen. The main purpose for using Stores and Drawers is for Counter Sales transactions, however, they also apply to normal Sales Entry transactions. Stores and Drawers can be assigned to individual users.
Store Setup
Click the Module dropdown and select Setup/Utilities > Store Setup.
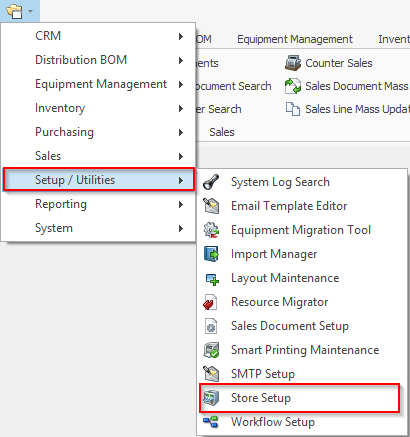
This will bring you to the Store Setup.
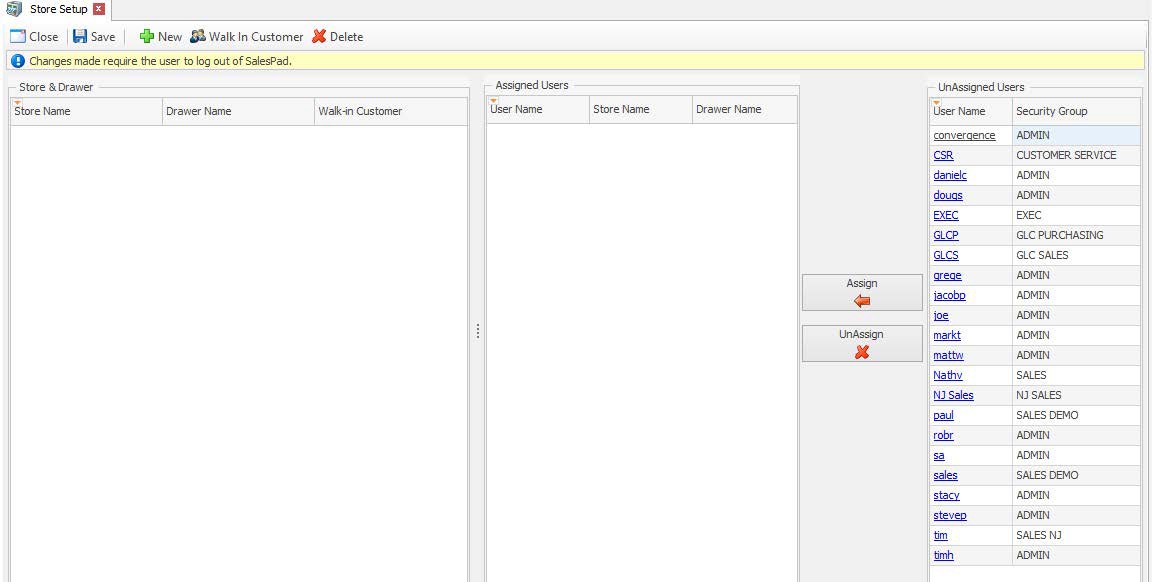
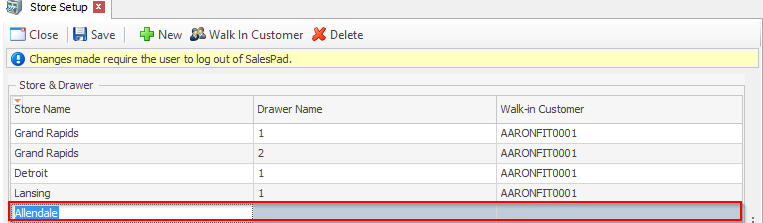
Enter each Store and Drawer by clicking the New button.

Type in the Store Name, Drawer Name, and select your customer.
Click Save, then select users that you want to assign to a Store and/or Drawer from the UnAssigned Users panel.
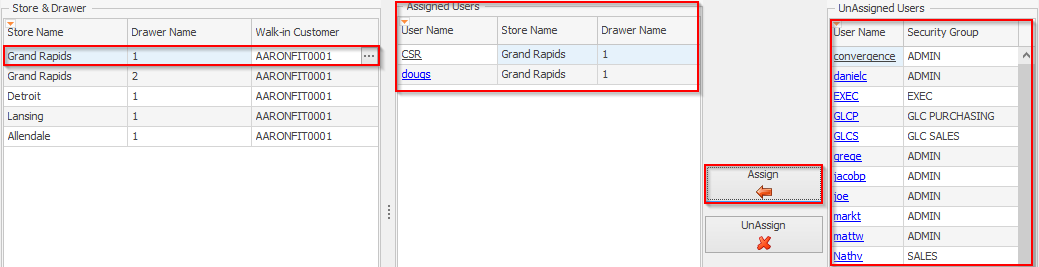
You can unassign users by selecting the users and clicking UnAssign.
In order for the changes to take effect, you must log out once you have your Store and Drawers set up and assigned.
Note: You can not delete a Store or Drawer if there are users assigned to it; they must be UnAssigned first.
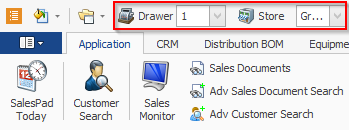
Store and Drawer Quick Access
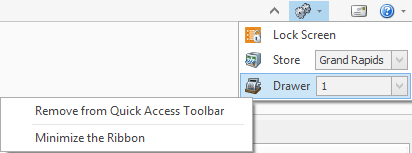
To view and/or change which is the active Store and Drawer, click the dropdown in the upper right-hand corner.
You can right click on the Store or Drawer controls and Add to Quick Access Toolbar.
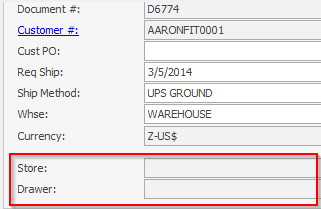
On a sales document, you can add Store and Drawer fields. These are optional properties fields and are hidden by default. To add these fields, first open a sales document.
Right-click and select Customize Layout.
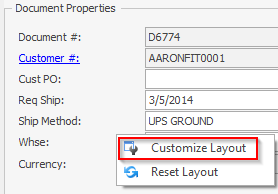
Drag either Store or Drawer and place where desired.
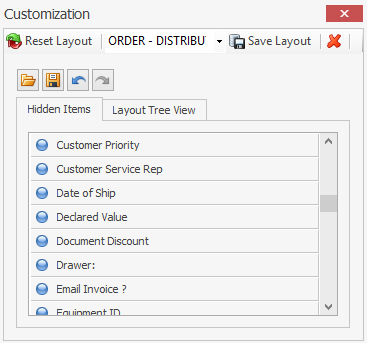
Click Save.
Payment Processors PayFabric and Square both offer enhanced Store and Drawer integration and setup:
- PayFabric - Using an EMV Terminal in SalesPad
- Square - Using Square Terminal in SalesPad
Walk-in Customer Setup
You can select or multi-select your Stores and/or Drawers when assigning a Walk-in Customer.
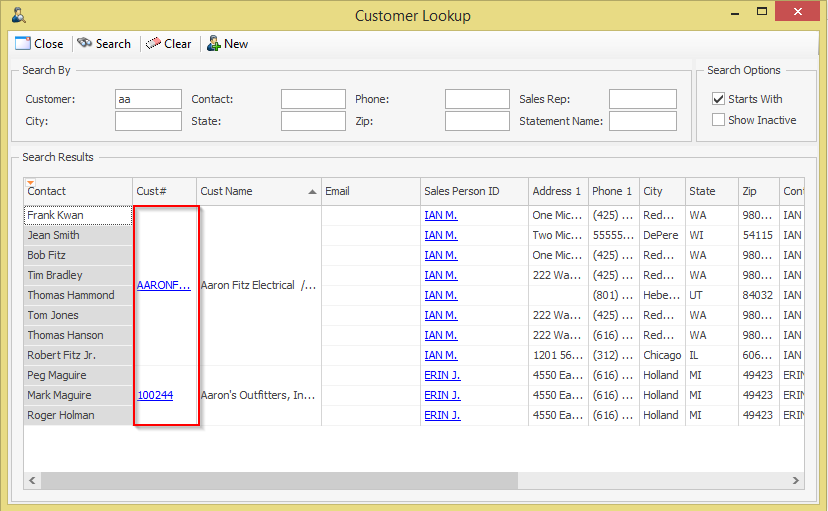
Click the Walk In Customer button or the ellipsis (...) and the customer lookup screen will appear.
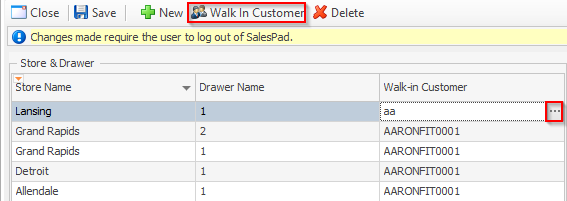
Find your customer and select them.
Walk-in Customer Usage
Counter Sales will direct you to the Sales Entry tab. You can then enter your document and either check out or create a new customer. Once you process or clear your order you will be brought directly back to the Sales Entry tab, which will continue to use the Walk-In Customer.
Exchange Process
The Exchange process is done by creating negative quantity invoices from a posted invoice. This allows for creating an exchange (Invoice) for a product instead of just a return. In all scenarios the Create Exchange form will create an Invoice with negative quantities, allowing the user to add a replacement item or additional items to an Invoice.
Users may also manually create Invoices with negative quantities. If the items are Lot, Serial, or Bin tracked we now have the ability to create return fulfillments through the Sales Fulfillment plugin. When created through the Exchange process the fulfillment from the posted Invoice will be transferred to the new Invoice.
Usage Setup
Click the Modules dropdown and select Setup / Utilities > Sales Document Setup.
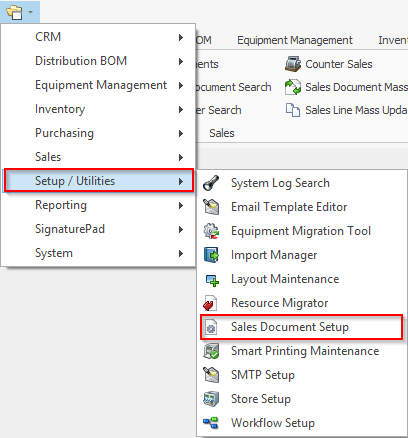
In the "Sales Document Setup" screen, there is an Exchange Doc ID that needs to be set before you can create an Exchange.
Exchange Doc
From the Sales Document Setup screen, choose what Invoice document ID will be used when creating an Exchange from a posted invoice.

Sales Document Entry
From Sales Document Entry there will be an Exchange option in addition to the Return option. From normal Sales Document Entry, on a posted Invoice, the Return button will have a dropdown option for creating an Exchange.

Counter Sales
From Counter Sales you can search for a posted Invoice and double-click the document to open the Exchange or Return form.
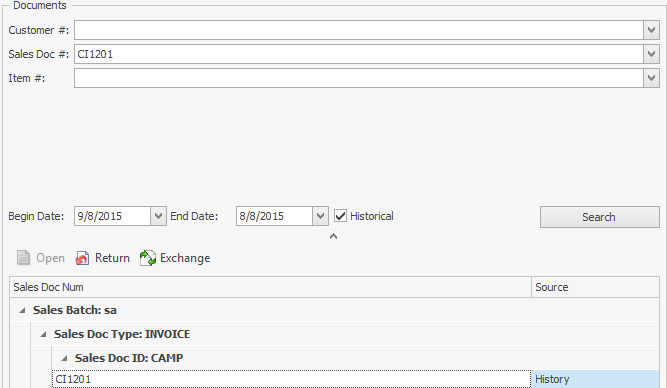
Note: If no Exchange Document ID is set up then it will default to a Return.
Create Return/Exchange Form
The Create Return and/or Exchange has a check box that allows you to change between the different types.
Complete this form for either the return or exchange.
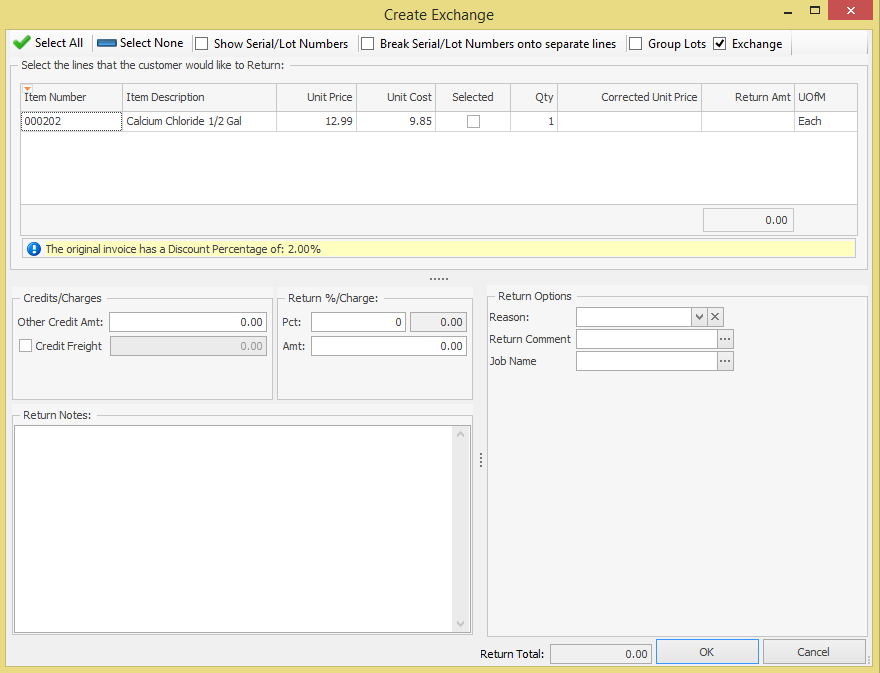
Click OK.
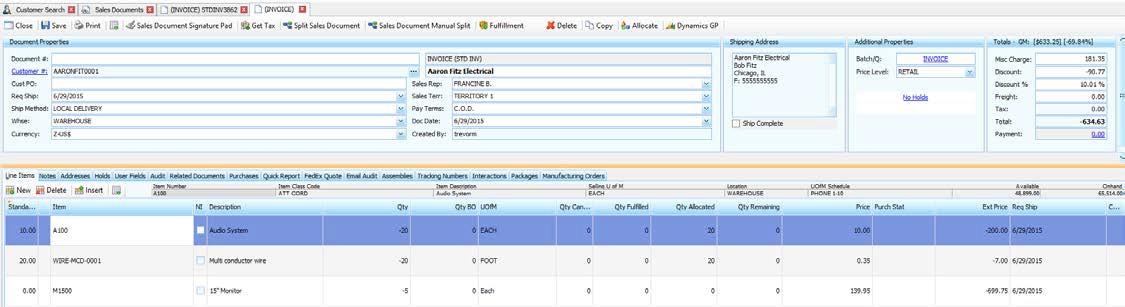
Exchange Document Example
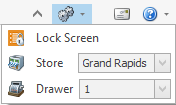
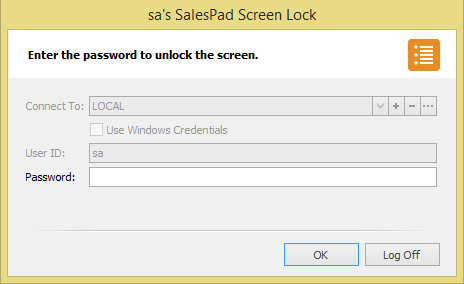
Lock Screen
The Lock Screen functionality allows users to lock SalesPad without the need to log out completely. They can re-enter their password to unlock the screen. There is also the option to log out from the Lock Screen. If a user logs in using the Use Windows Credentials check box, they will be unable to use the Lock Screen functionality.
Usage
Click Lock Screen.

Type in your password and hit OK. Or click Log Off to exit SalesPad.
You can also add the lock screen to the Quick Access toolbar. Right-click on the Lock Screen control and then click Add to Quick Access Toolbar if desired.
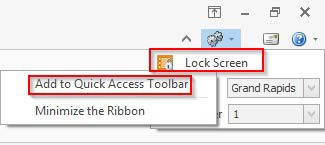
You will be able to view the Lock Screen in the toolbar.

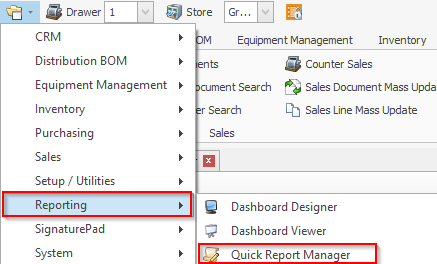
End of Day Quick Report
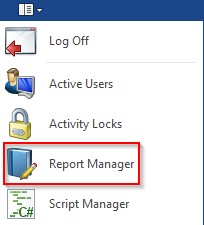
Enable security for the End of Day Quick Report, then click the Actions dropdown and select Report Manager.
Find End of Day report and select it.

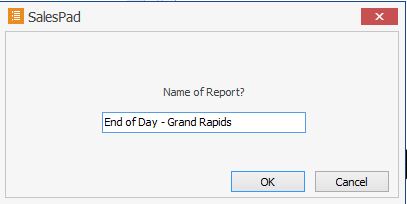
Click Copy on the Action Toolbar. Copy the base End of Day report in the Report Manager, change the name of the report, and click OK.
Open the Quick Report Manager.
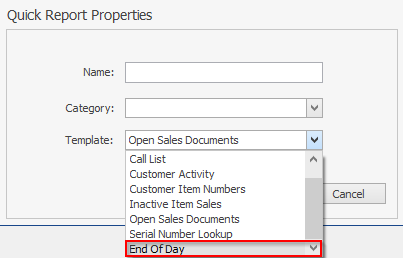
Click New on the Action Toolbar. Fill out the Quick Report Properties fields and select End of Day from the template.
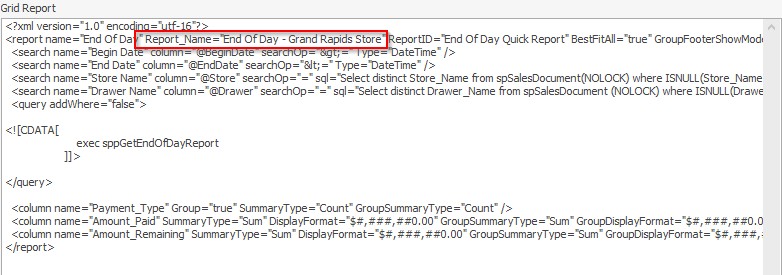
Click OK, then click Design from the Action Toolbar and change the Report Name tag to point to the name of the newly copied report name from Report Manager. This allows you to design and print the report tied to that Quick Report.
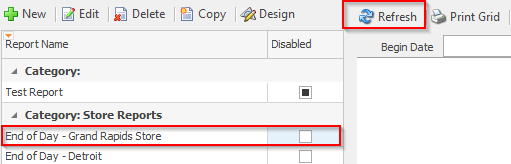
Double-click the report and hit Refresh.
Note: The designer here needs some data to design the report.
Click on Design on the right side and design your report. Changes made will save to the report you have selected in the Report Name panel.
Print Report will print the assigned report.
Note: If you cannot design or preview from the Report Manager, you need to go to the Quick Report Manager. You cannot design the report if it still points to the Base Report.
The Base Quick Report SQL Stored Procedure can call spcpGetEndOfDayReport, which supports the new CardControl 3.0 fields, Machine Name, and Session ID.
Security
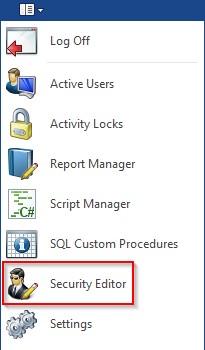
Open the Main Menu and select Security Editor.
Filter to Counter Sales and enable the following Securities and sub-securities:
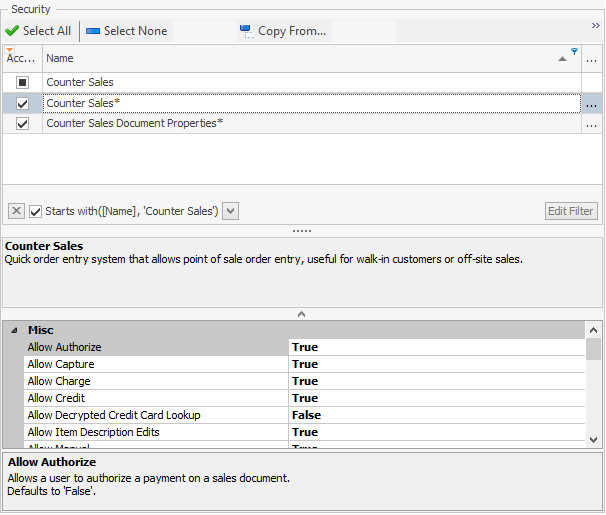
Counter Sales – Quick order entry system that allows point of sales order entry, useful for walk-in customers or off-site sales.
- Misc.
- Allow Authorize – Allows a user to authorize a payment on a sales document. Defaults to False.
- Allow Capture – Allows a user to capture a payment on a sales document. Defaults to False.
- Allow Charge – Allows a user to charge a payment on a sales document. Defaults to False.
- Allow Credit – Allows a user to credit a payment on a sales document. Defaults to False.
- Allow Decrypted Credit Card Lookup – Allows a user to look up a full credit card number. Defaults to False.
- Allow Item Description Edits – Allows the user to edit item descriptions. Defaults to True.
- Allow Manual – Allows a user to manually charge a payment on a sales document. Defaults to False.
- Allow Void – Allows a user to void a payment on a sales documents. Defaults to False.
- Allowed Payment Option – Options for the allowable payments. Defaults to an empty string.
- Auto Reduce Cash Payment - When saving a cash payment for a value greater than the document total, the amount saved will be reduced automatically to match the sales document on account. When set to False, the user will be prompted to change the amount before the payment can be saved. Defaults to True.
- AutoRun Popup Plugins Enabled – Determines what popup plugins will automatically be run when a new sales line item is added. Defaults to an empty string.
- Can Change Doc Number – Allows a user to manually enter Document Numbers. Defaults to False.
- Can Change Misc. Charge – Allows the user to change the Misc. Charge amount. Defaults to False.
- Can Change Price – When set to False, the user cannot change the price of the line items. Defaults to True.
- Can Change Trade Discount – Allows the user to change the trade discount (Amount or %). Defaults to False.
- Can Only Use Walk-In Customer – When True band Walk-in Customer is setup, the user can no longer create new customers and can only use the Walk-in Customers. Defaults to False.
- Can Process Return or Exchange – Allows the user to be able to process Returns and Exchanges. Defaults to False.
- Default Checkbook ID – The default checkbook ID to use. Defaults to an empty string.
- Include Historical Invoices – Allows the user to view Historical Invoice. Defaults to False.
- Show Cost – Shows the cost of the item. Defaults to False.
- Visible Batches – Documents in the selected batches will be the only documents visible when searching for documents. Defaults to an empty string.
- Visible IDs – Enter the names of the IDs that are visible using a semicolon delimited list. Defaults to N/A.
- Scripts
- Customer Search Post Process Script – C# script to execute before leaving the Customer Search tab in Counter Sales. Defaults to an empty string.
- On Row Change Script – C# script that executes when a sales line has been changed. Defaults to an empty string.
- Pre Check Out Script – C# script to execute before checking out in Counter Sales. Defaults to an empty string.
- Pre Submit Script – C# script to execute before submitting the transaction in Counter Sales.
- Sales Entry Post Process Script – C# script to execute before leaving the Sales Entry tab in Counter Sales.
-
Counter Sales Document Properties – Enables different properties on Counter Sales Document.
- Allow Screen Layout Customization - Turns on the ability to customize the document header by Doc ID. Defaults to False.
- Can Change Currency – Allows a user to change the document currency. Defaults to True.
- Can Change Doc Number - Allows the user to manually enter document numbers.
- Can Change Document Date – Allows a user to change a document date. Defaults to True.
- Can Change Freight Amount – Allows a user to change the document freight amount. Defaults to True.
- Can Change Miscellaneous Charge – Allows a user to change the document miscellaneous charge. Defaults to True.
- Can Change Payment Terms – Allows a user to change the payment terms. Defaults to False.
- Can Change Price Level – Allows a user to change the price level. Defaults to False.
- Can Change Sales Rep – Allows a user to change the sales representative. Defaults to True.
- Can Forward Documents – Allows a user to forward documents. Defaults to False.
- Can Use Eligible Discount Only – Enables certain discounts to be used. Defaults to N/A.
- Show Gross Margin – Shows the gross margin of the order. Defaults to False.
- Trade Discount Enabled – Enables or disables the trade discount. Defaults to True.
There are a few extra Securities that are compulsory when using Counter Sales:
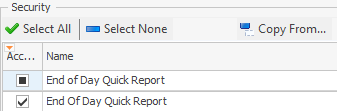
End of Day Quick Report – Quick report summarizing all of the transactions from the day.
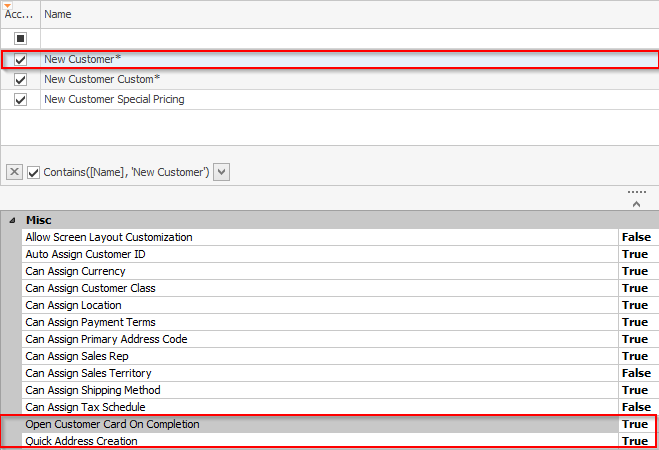
New Customer – Enables the ability to create new customers.
- Open Customer Card On Completion – Open the customer card when the customer is created. Defaults to True.
- Quick Address Creation – When enabled, the new customer screen allows the user to also create a customer address. Defaults to True.
Note: This expands the new customer to include the address, which is needed when creating new documents.
- Misc.
- Allow Authorize – Allows a user to authorize a payment on a sales document. Defaults to False.
- Allow Capture – Allows a user to capture a payment on a sales document. Defaults to False.
- Allow Charge – Allows a user to charge a payment on a sales document. Defaults to False.
- Allow Credit – Allows a user to credit a payment on a sales document. Defaults to False.
- Allow Decrypted Credit Card Lookup – Allows a user to look up a full credit card number. Defaults to False.
- Allow Manual – Allows a user to manually charge a payment on a sales document. Defaults to False.
- Allow Overcharge – Allows a user to make a payment greater than the document total. Defaults to True.
- Allow Void – Allows a user to void a payment on a sales document. Defaults to False.
- Allow Payment Options – Options for the allowable payments. When set to Deposits, this will only apply to Orders. Defaults to Payments.
- Default Checkbook ID – The default checkbook ID to use. Defaults to an empty string.
- Scripts
- Manual Post Payment Script – C# script that executes after a manual credit card payment is saved. Defaults to an empty string.
- Manual Pre Payment Script – C# script that executes after the New Payment button is pressed, before the manual Credit Card payment fields load. Defaults to an empty string.
Note: For more information on PayFabric or Square Security Settings, please refer to those modules' documentation for specific details:
- Square - Square Integration Security and Settings
- PayFabric - PayFabric Security and Settings
Save any changes. You must log out and log back in for security changes to take effect.
Settings
Can Change Drawer – Group or Users that have access to change the current active Drawer. Defaults to an empty string.
Can Change Layout Path – If set to True, the location stored in Security under each group will be used to store layouts (instead of the local APPDATA folder). If a layout does not exist for a particular control, the local layout will be used. Defaults to False.
Can Change Store – Groups or Users that have access to change the current active Store. Defaults to an empty string.
Can Lock Screen – Groups or Users that have access to use the Lock Screen functionality. Defaults to an empty string.
SalesPad Support
Comments