Overview
Unlike Dynamics GP, which can accept payments from credit cards but not cash or checks, SalesPad has the ability to accept cash or check payments. This document covers setup and use of cash and check payments, as well as usage for cash or check deposits.
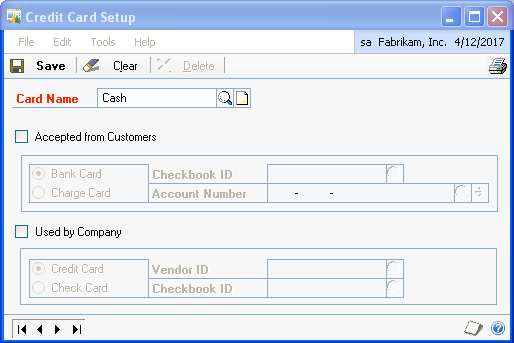
The cash/check payment workaround setup below uses a GP credit card named Cash.
Note: Cash and check payments will appear as credit card payments (card name Cash). Refer to the SalesPad Credit Card Processing Setup and Credit Card Payments document for more information.
Note: Compatibility for this feature may require upgrading to a build newer than 4.0.471.
Setup
To enable cash and check payment functionality in SalesPad:
- Go to Modules > Settings
- On the Filter line type, “cash”
- Next to the line Enable Cash and Check Payments on Orders, select True from the dropdown
- Click Save
- Go to Modules > Security Editor
- Pre-4.1 versions: Make sure Sales Document Payments is enabled
Note: Sub-settings Allowed Payment Options and Default Checkbook ID are applicable to cash and check payments. Refer to the SalesPad Security Settings Guide for more information
4.1 and later versions: Sales Document CardControl Payments must be enabled in the Security Editor to access the Payments window. Allowed Payment Options and Default Checkbook ID are applicable to cash and check payments, but all other sub-settings under Sales Document CardControl Payments can be disabled if credit card payments should not be made. Refer to the SalesPad Security Settings Guide for more information
The cash/check function should now be enabled.
Note: SalesPad also supports multi-facility by using a smart field, sf_CreditCardProcessorName. This requires a trigger to be set up to populate the smart field with the facility ID, which will be added to the end of a credit card as a suffix.
To make cash and check payment functionality work with GP:
- Go to Microsoft Dynamics GP dropdown > Tools > Setup > Company > Credit Cards
- Add a credit card named “Cash”

- Set the appropriate Checkbook ID
- Click Save
Usage
- Open or create an order or invoice
- On the header, go to Actions dropdown (
 ) > Payments (versions prior to 4.1 only) or click the amount hyperlink in the Payment field:

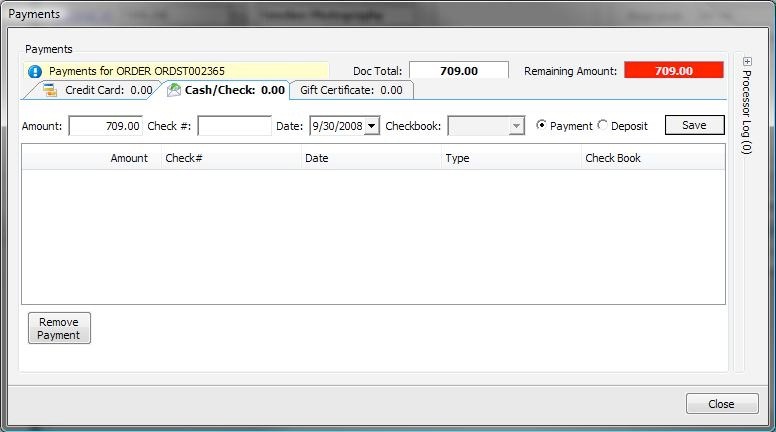
The "Payments" window will appear - Click on the Cash/Check tab

- Enter amount of payment to apply (you may also apply a deposit here by selecting Deposit)
- If the payment is a check, enter the check number. Leave Check # blank to record a cash payment
- Select a date
- Click Save. The payment will be saved and display in the grid
Note: If you are applying payment to an invoice (not available on an order), you can select a check book name from the Checkbook dropdown. Default Checkbook ID must first be set under Sales Document Payments in Modules > Security Editor.
PAYMENT VS. DEPOSIT
Payments can be made on orders and invoices; deposits can only be made on orders. A deposit will immediately create a GL transaction creating a cash receipt. Payments will not create the receipt until the invoice is posted.
For more payment usage information, refer to the SalesPad Credit Card Processing Setup and Credit Card Payments document.
SalesPad Support
Comments