Please note that Business Rules and Sales Document Promotions are no longer sold or supported. Existing customers with the Business Rules .dll will still receive limited support, but this support may require developer time at additional cost.
Overview
Business Rules is a tool that allows you to create, delete, or update records for any Business Object in SalesPad, by specifying certain actions (e.g. before saving a sales document) and conditions (e.g. if the document has backorder items).
Business Rules can be used in a myriad of ways. For example, administrators can set up rules to determine special pricing based on values on the Sales Document and/or Sales Line Items. Another example could be setting up promotions such as “buy 1 get 1 free” or “additional freight charge if you buy less than 10 items.”
Business Rules is not limited to Sales Documents and can be applied to almost any Business Object in SalesPad (Customer, Vendor, Purchase Order, Item Price, Item Master, etc.).
Please note that Business Rules is a beta feature.
Attention: Business Rules is a very powerful tool as it allows you to manipulate virtually any object in SalesPad. For this reason, you must be very careful when setting up your rules, as you can potentially damage important data in SalesPad (and Dynamics GP). Always test your rules thoroughly in a TEST environment before deploying them into your live database.
Note: A separate dll is necessary to run Business Rules. Please contact your Sales Representative if you are interested in obtaining this dll.
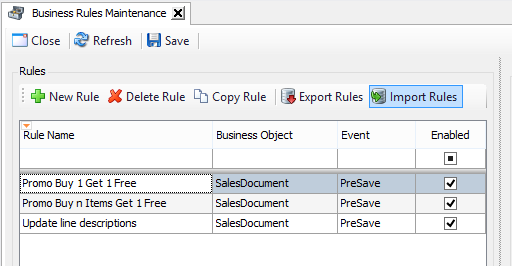
Business Rules Maintenance
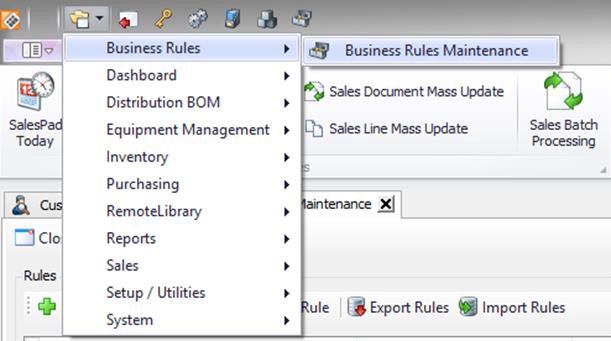
Business Rules Maintenance form can be access from the menu under Business Rules.
A Business Rule is structured as follows:
- Rule Business Object
- The object and the event that triggers the rule evaluation.
- Conditions
- One or more Business Objects that will be evaluated when the event from the Rule Business Object is triggered.
- Effects
- One or more Business Objects that define the effects that are applied when conditions are met.
- Effect Parameters
- The list of field names and values for the effect(s) Business Objects.
Rule Setup
Setting up Business Rules highly depends on the business objects that are applied and the structure of the conditions. This section will explain the basics steps to create a simple rule. Please refer to the section “Examples of Business Rules” for other examples.
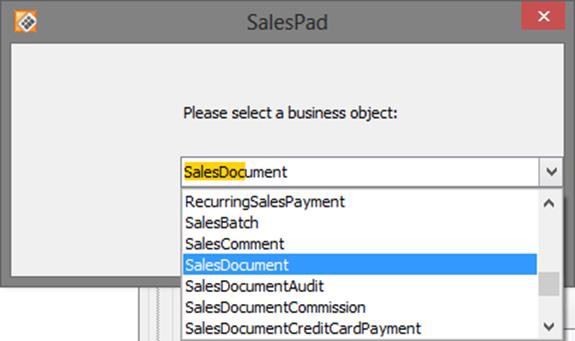
Click New Rule and select the Business Object from the ones available from the input box.
Give the rule a name and choose the appropriate event.
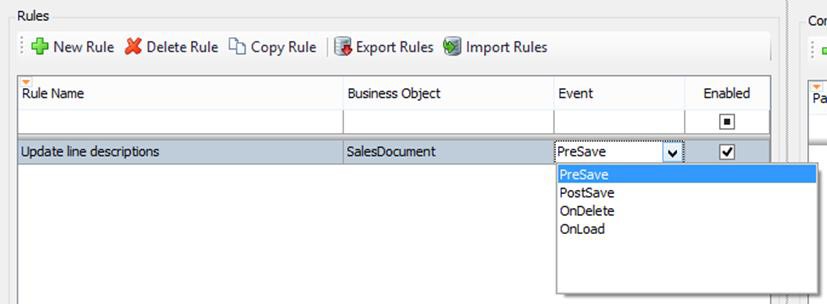
The event (and the Business Object) determines when the rule is evaluated. In this example, the rule will be evaluated when any sales document is being saved.
Click New Condition to begin building the rules. A condition is defined by the following characteristics:
- Property Name
- Field Name
- Operator
- Value
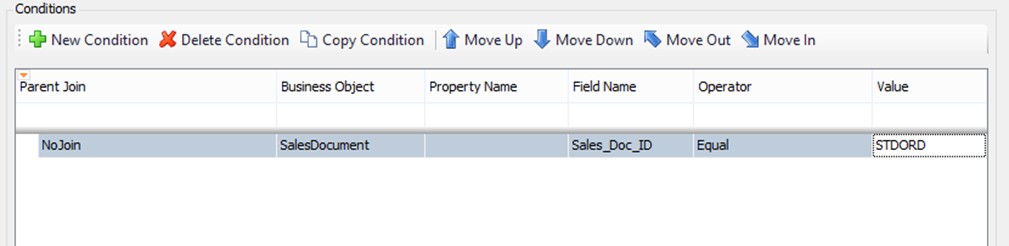
In this example, the Property Name is left empty: this means that the current condition will be applied to a Business Object of the same type as the rule (SalesDocument).
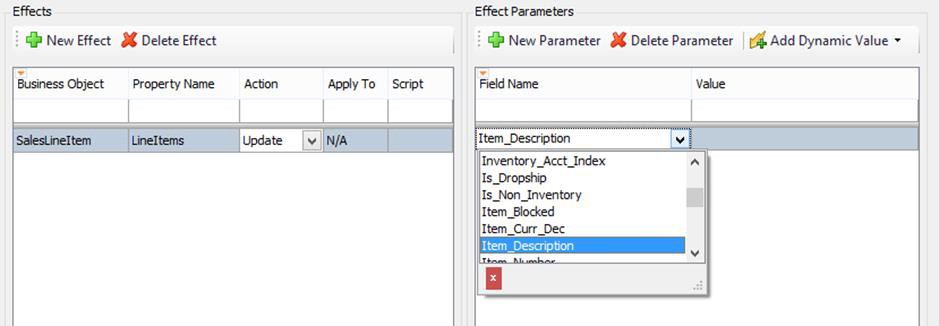
Select a Field Name by clicking the dropdown. Note that the dropdown includes all the fields available for the current Business Object; this includes User Defined Fields, where applicable.
Choose the appropriate operator and set the value according to your needs.
In this example, the condition can be translated to: “The condition is true if the value in the field ‘Sales_Doc_ID’ is equal to ‘STDORD’, for the business object ‘SalesDocument’.”
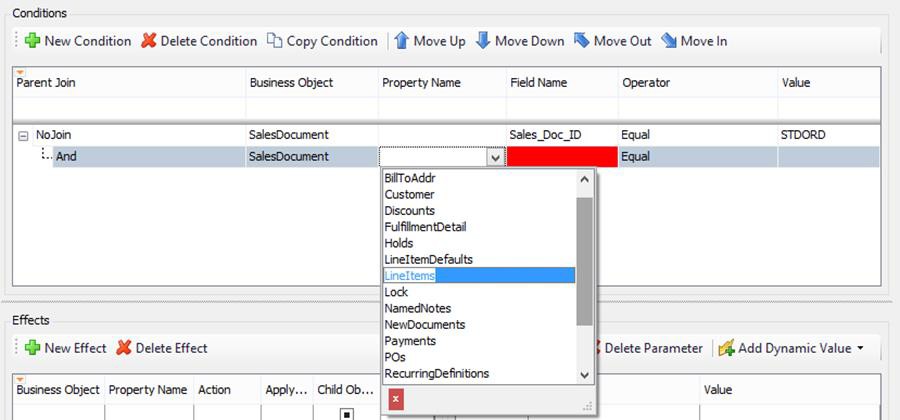
Click again on New Condition to add another condition to the rule. This time we are going to use Property Name.
Each Business Object has several properties, depending on what the object represents. For instance, SalesDocument has LineItems (of type SalesLineItem) as one of its properties. SalesDocument also has Customer, Discounts, TrackingNumber, Payments, etc.
There are properties that share the same Business Object type; for example, both LineItems and LineItemDefaults are a type of SalesLineItem.
Select LineItems as the Property Name, then choose Quantity for Field Name, with Operator set to ‘Greater Than Or Equal’ and a Value of ‘5’.
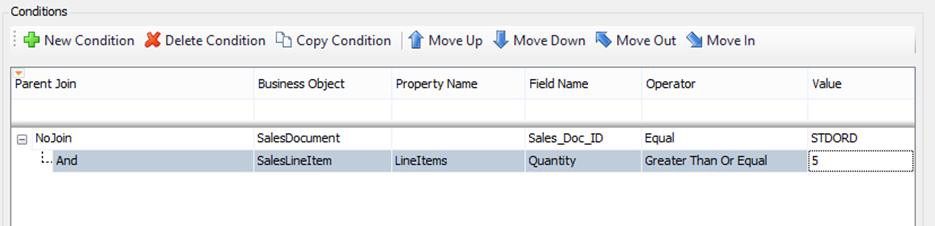
The conditions above, as a whole, can now be translated into: “Conditions are met if the value in the field ‘Sales_Doc_ID’ is equal to ‘STDORD’ for the business object ‘SalesDocument’, AND the Line Items have a quantity of 5 or more.”
Note: The order and the structure of conditions are very important, as they give different meanings to the condition. See the Structure of Conditions section for more details.
Click New Effect to add an effect. Like for Conditions, Effects are specified by Property Names. In our example we would like to update the item description: under Property Name choose LineItems (the Business Object will automatically change to SalesLineItem).
Select the appropriate Action (in our example we will use Update). There are four possible actions that can be applied to effects:
- Create: creates a new object of the type specified in the Business Object field.
- Update: update objects of the type specified in the Business Object field.
- The effect will be applied only to objects that meet the conditions. For instance, in our example, only items with quantity of 5 or more will be applied the effect Update (if the document is type of ‘STDORD’).
- If Conditions did not have LineItems but only SalesDocument, then the effect will be applied to all line items in the document.
- Delete: delete objects of the type specified in the Business Object field.
- As for Update, the effect is applied only to objects that return ‘true’ in the conditions.
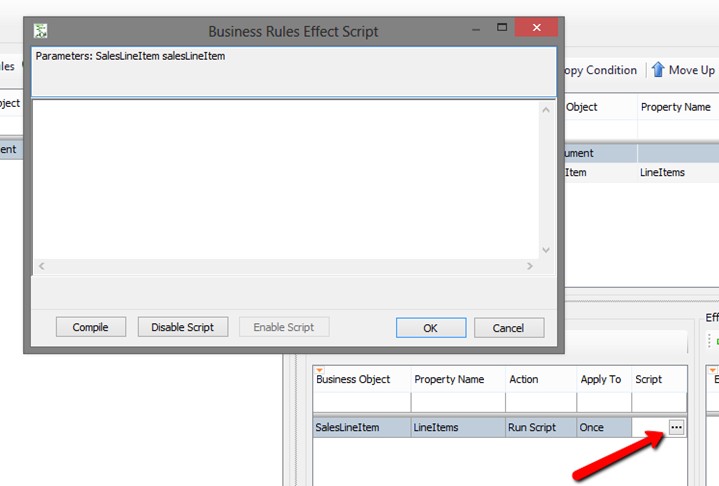
- Run Script: allows users to run a C# script
- The column Script will become visible if this option is selected.
- By clicking the ellipsis, the SalesPad Script Editor form will pop up.
- Parameters for the script depend on the business object.
 The “Apply To” option is used for actions ‘Create’ and ‘Run Script’ only.
“Apply To” selection:
- “Once”: this will create one new line item if there is at least one item with quantity 5 or more.
- All Referring Conditions’: this will create as many new line items as the number of items that have quantity 5 or more.
In our example we will update the item description to line items. Click the dropdown to select the desired Field Name.
The list of fields depends on the Business Object of the selected Effect.
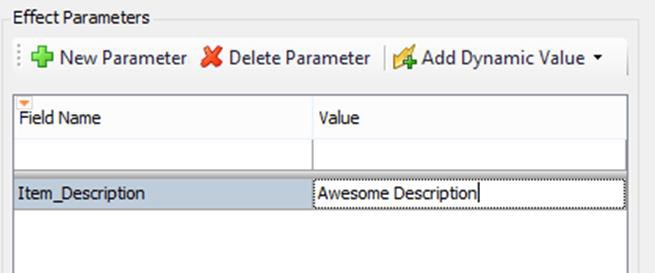
Add a value of your choice.
Add Dynamic Value allows you to use values that change according to the environment. For example, we could add ‘Username’ (this will place the string ‘{username}’ in the Value field), and the system will replace the tag with the user name when applying the effect.
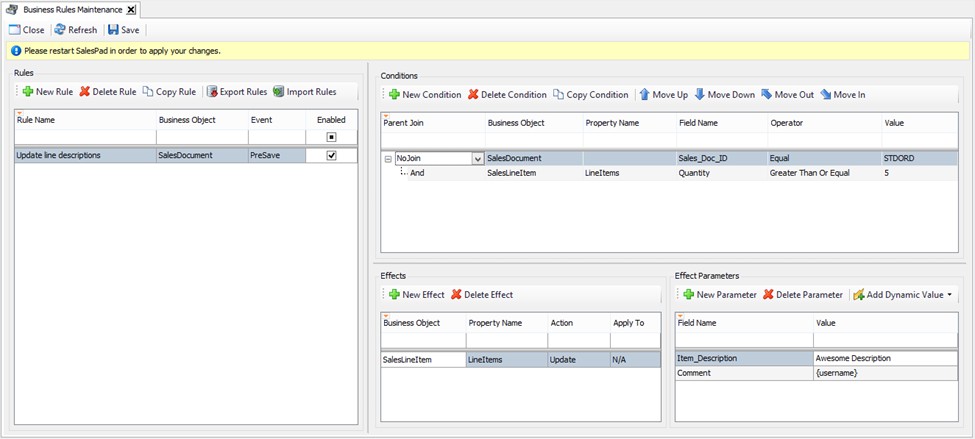
Now that the rule is complete, click Save.
Note: Changing parameters, or adding/deleting Conditions and/or effect will NOT require the user to restart SalesPad.
To test this rule, open up a customer card of your choice and create a new sales document of type ‘STDORD’ (since this is one of the conditions).
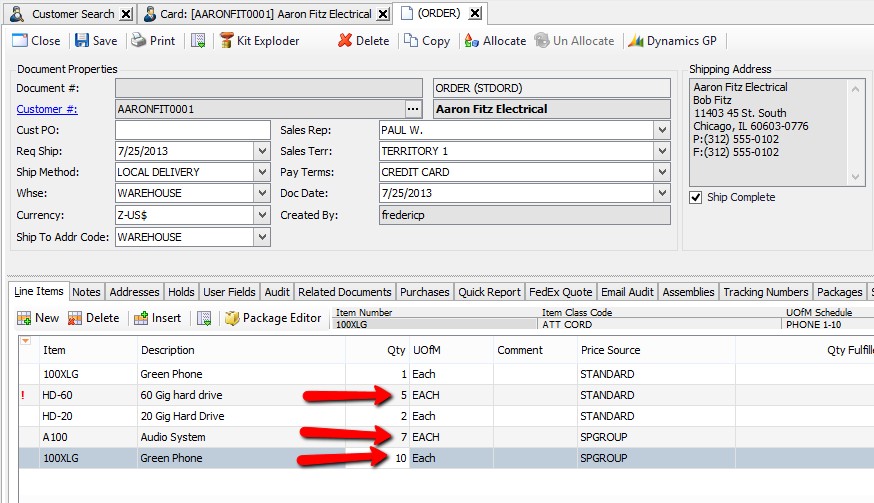
Based on the rule conditions, you should expect a new description for the three line items with quantity greater than or equal to 5, and the comment to be your user name (for the same items).
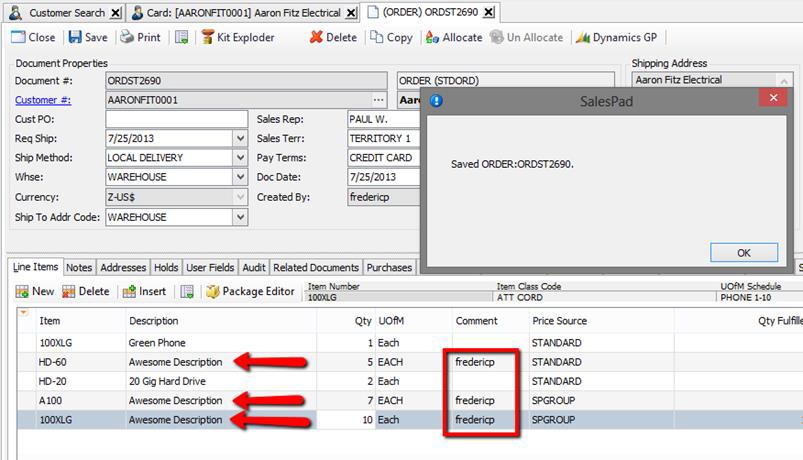
When the document is saved, the conditions are evaluated and, if met, the effects are applied.
Structure of Conditions
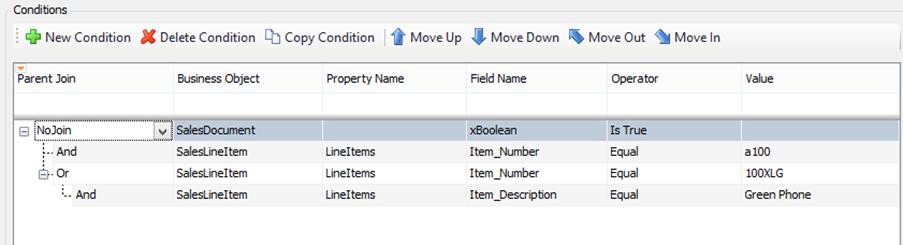 Conditions are saved in a tree-like structure that represents logical expressions.
The example above can be written as the following logical expression:
xBoolean = ‘true’ AND Item_Number = ‘A100’ OR ( Item_Number = ‘100XLG’ AND Item_Description = ‘Green Phone’ )
The order of conditions matters: in this case ‘100XLG’ with ‘Green Phone’ (wrapped around parentheses) will be evaluated first.
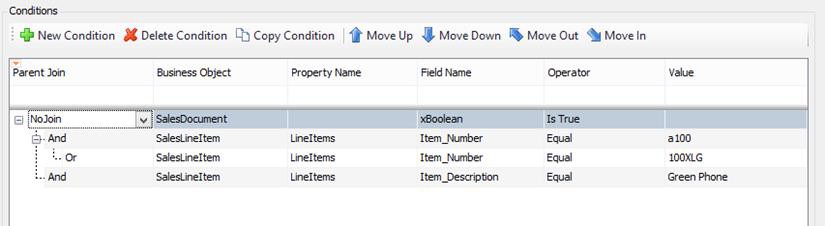
xBoolean = ‘true’ AND ( Item_Number = ‘A100’ OR Item_Number = ‘100XLG’ ) AND Item_Description = ‘Green Phone’ In this case, ‘A100’ with ‘100XLG’ will be evaluated first.
Conditions can be moved around by using the “Move” buttons.
Note: Some restrictions are applied. For example, the top condition cannot be moved. Properties available in the drop-down depend on the “parent” conditions.
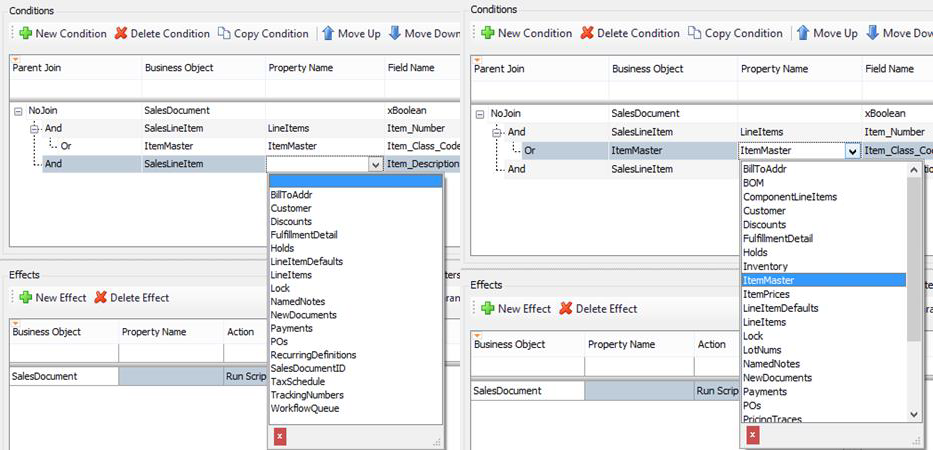
For instance, in picture above, on the left-hand side you notice that the highlighted condition is a child of a SalesDocument; therefore the dropdown will only have properties of the SalesDocument business object.
In the picture on the right, the selected condition is a child of SalesLineItem; this means that in the drop down you find properties of SalesDocument and SalesLineItem (as a matter of fact, the selected condition has ItemMaster as property).
Because properties depend on the “parent” conditions, you are not allow to move conditions “in” or “out” if the action would break the parent-child relationship.
In this example we cannot move out the ItemMaster condition because ItemMaster is not a property of SalesDocument. If instead of ItemMaster we had SalesLineItem, then we would have been able to move out the condition.

Business Rules can be exported to .xml files. Follow the steps below to export rules.

Click the Export button. This will pop up up a small window from which the user can select the fields to export.
The window will show a list of available rules. The list can be filtered by Business Object using the dropdown on the top right-hand part of the screen.
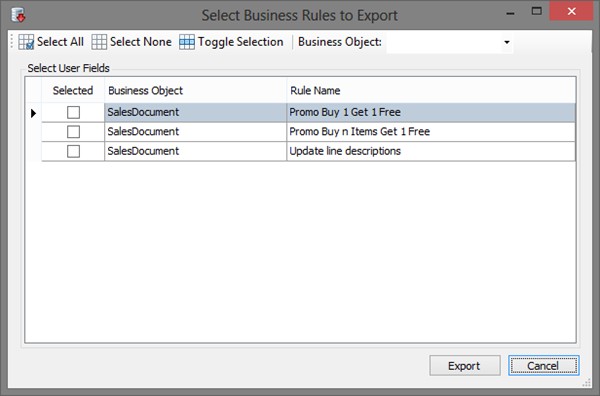
Select the rules to export by checking the box under the Selected column. The user can multi-select the table and click Toggle Selection to select/unselect multiple fields. The user has also the option to Select All or Select None.
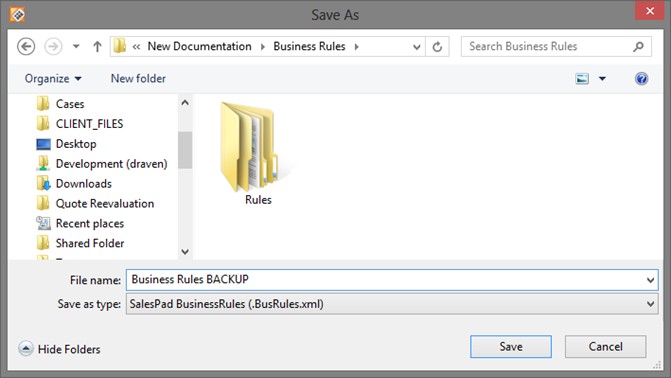
Click Export. This will open up the Save As dialog box from which the user can browse the location and the give the name of the .XML file that is going to be saved.
Importing Business Rules
Business Rules can also be imported from .xml files. Follow the steps below to import rules.
Click the Import button.
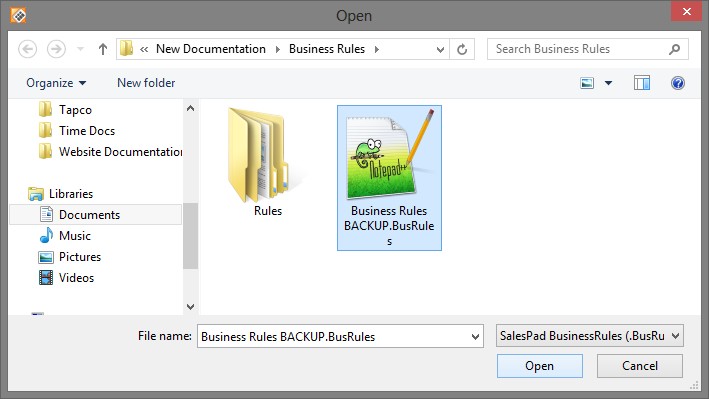
In the dialog box that appears, browse to the location of the rule’s .xml file and click Open.
The Select Business Rules to Import screen appears. Select the rules to import by clicking the check box under the Selected column.
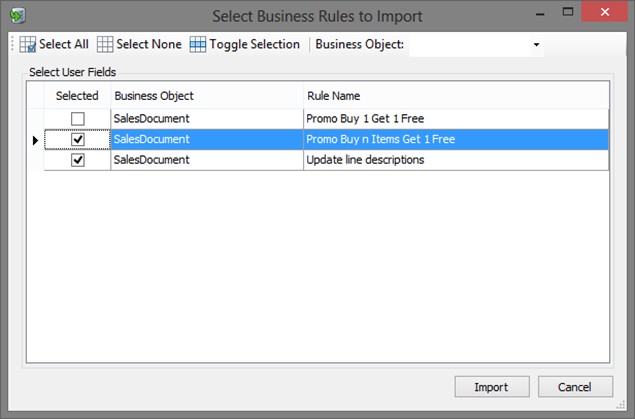
You can multi-select the grid view and click Toggle Selection to select/unselect multiple fields. You also have the option to Select All or Select None.
Once the fields to import have been selected, click Import. You will return to the Business Rules Maintenance form. The rules should now be part in the table.
Note: Imported rules are NOT saved automatically. You must click Save in order to save them. Because you are adding new rules, you will be required to restart SalesPad.
Examples of Business Rules
Rule 1
Name: “Promo buy 1 get 1 free”
Description: If the customer is buying a specific item (A100), it will get another item (HD-60) for free. The promotion can be applied once per customer.
Note: This rule requires a User Defined Field at the Customer level. First import the UDF and then the Business Rule.
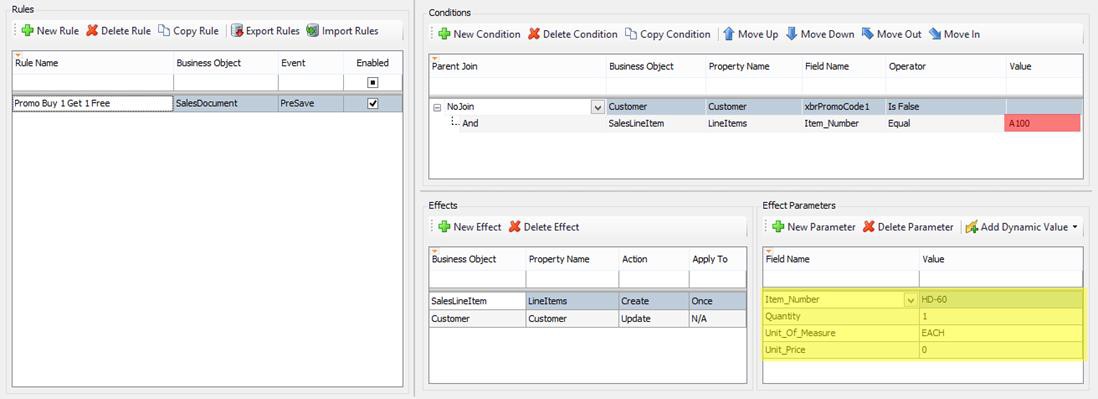
The part highlighted in orange shows you the item of the promotion. The part highlighted in yellow shows you the item that would be given for free. Note: other fields (such as description) can be added according to your needs.
Rule 2
Name: “Promo Buy n Items Get 1 Free”
Description: if the customer is buying a certain number (10 or more) of specific items (A100, 100XLG, and 256 SDRAM), it will get another item (HD-60) for free. The promotion can be applied once per customer.
Note: This rule requires a User Defined Field at the Customer level (included in the zip file). First import the UDF and then the Business Rule.
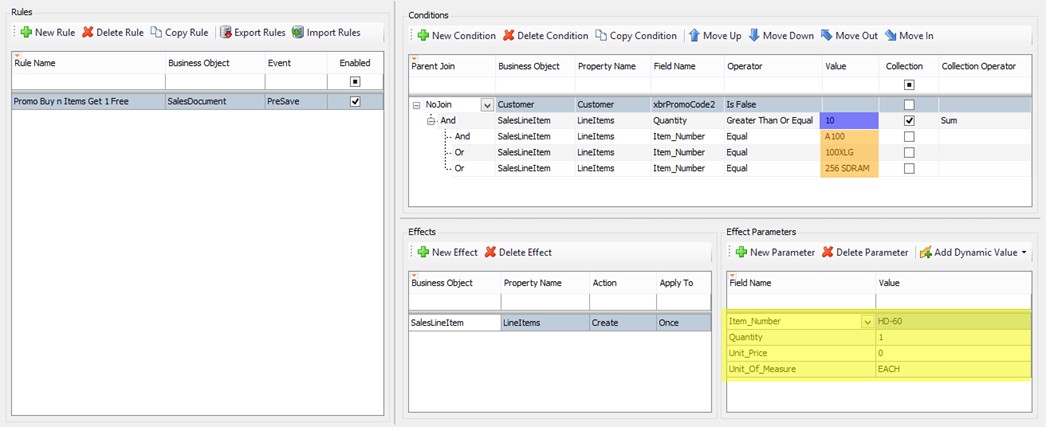
The part highlighted in blue defines the quantity criteria of the promotion. Note that “Collection” is checked and “Collection Operator” is ‘Sum’; this means that the quantity of 10 will be counted on the children conditions (in this case all Item_Number).
The part highlighted in orange is the list of items that are part of the promotion.
Note: The first condition has a “Parent Join” of ‘And’, whereas all the subsequent ones are ‘Or’. The part highlighted in yellow shows you the item that would be given for free.
Security
In order to create and maintain business rules, you must enable Business Rules Maintenance in the Security Editor. This is only for administrators and it is not required for the functionality to work. Rules will be applied to all users whether or not they have access to the maintenance form.
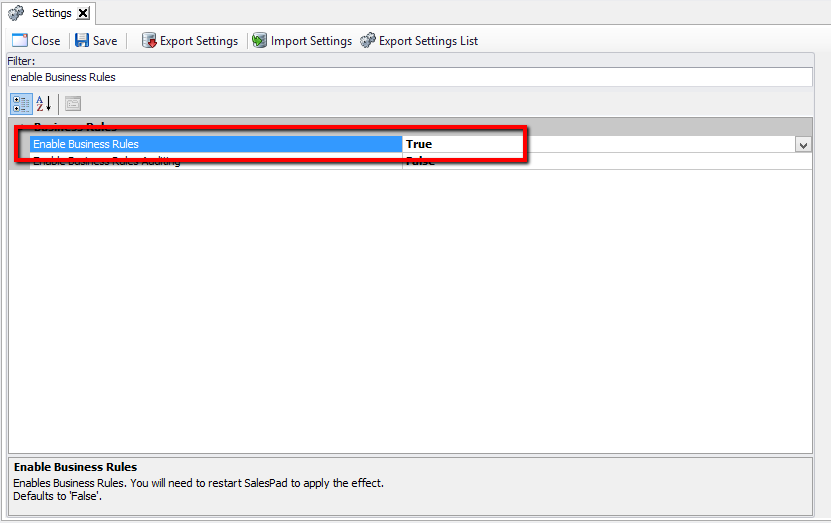
In order to run Business Rules, you must turn on “Enable Business Rules” in SalesPad Security Settings.
Note: This action requires you to log out and log back in.
SalesPad Support
Comments