Overview
The Workflow function allows users to create logic/rules to automatically stage, flag, or move documents through the system, based on business needs. Workflow Setup allows users to create a sequence of queues (equivalent to batches in Microsoft Dynamics GP) for different document types to move through, allowing for different types of orders to be processed differently, and making it easy for users to manage documents, keeping track of a document’s status and taking action based on its position.
A collection of rule conditions, such as evaluation of a customer's credit or aging, item availability, or the total margin on the sales document, can be applied at each step as needed. Custom workflow rules to meet more specific business needs can also be created.
Security
In order to set up Workflow, both Workflow Setup and Workflow Rule Setup must be enabled in the Security Editor (Modules > Security Editor):
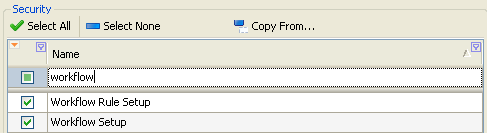
Save any changes. You must log out and log back in to SalesPad for Security changes to take effect.
Setup
Add Workflow Queues
Note: Queues created in SalesPad automatically create batches with the same name in Dynamics GP if the batch does not already exist (the new batch is created in GP once a document is placed in the queue). However, existing GP batches do not automatically display as queues in SalesPad; queues must be created in SalesPad.
- Go to Modules > Workflow Setup
- From the left column, select the Sales Document Type (predefined in Dynamics™ GP) that you will create queues for (you will repeat the process for each document type that will have a workflow applied)
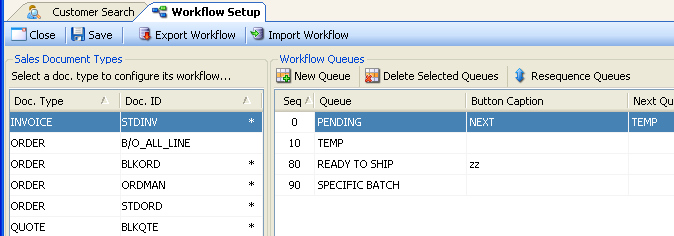
- Click the New Queue button under Workflow Queues. A new line will appear.
- Best Practice: Start with a “New Order” or “Pending” queue as a temporary queue that new documents will be placed. This gives new documents a place where they can continue to be modified before moving to a queue where actions will be taken on them.
- Enter the following information in the new fields:
- Sequence
- A sequence is automatically generated when you click New Queue and represents the sequence order in which the queues are displayed on the Sales Monitor (Refer to: the SalesPad Sales Monitor document).
- It is recommended that the sequence be the same order as the actual movement-order of the queues.
- If you have renumbered the sequences to 1, 2, 3, etc., the “Resequence Queues” button will set the numbers back to Base 10, allowing available space to adjust.
- Queue
- The name of the new queue.
- Note: Use a name that is 15 characters or less; a longer queue name will truncate to 15 characters once saved.
- Button Caption
- On the sales document, the name of the button that releases the document to the next queue.
- If you add “&” before a letter in the button caption, Alt+ the next letter will be a hotkey to move the document to the next queue (Example: “&Release”, Alt+R forwards the document; “Rel&ease”, Alt+E forwards the document).
- Note: You must enter a button caption or the button will not appear on a sales document. Without a button, documents in the queue cannot be manually forwarded. Only leave this field
- Sequence
blank for an Auto-Forwarding queue (see the Auto-Forwarding Workflow Queues section at the end of this document) or for the final queue in a workflow sequence.
-
- Next Queue(s)
- The name of the queue to follow the new queue.
- If you add more than one queue name here, separated by semi-colons, the user will be prompted upon release to choose a Queue to move the document into (if it passes rule evaluations).
- Once the first queue is completed, you should enter this Queue name or names into a new line to create that Queue.
- For the final queue in a sequence, you will not need to enter a name under Next Queue(s).
- Plugin (Optional)
- Will trigger built-in plugin functionality when a specific plugin is selected from the drop-down list. For more information, refer to SalesPad’s individual documents on each plugin.
- One plugin can be triggered per queue—to trigger more than one plugin with a single manual- forward, use an Auto-Forwarding Queue (see the Auto-Forwarding Workflow Queues section at the end of this document).
- Next Queue(s)
- If checked, documents will be printed after reaching the specified queue. A print dialogue will pop up for the user at this stage in the workflow.
-
Note: To print automatically, use the Smart Printing plugin.
- Evaluation
o If checked, any Workflow Rules will be evaluated and applied as needed when the document reaches the specified queue (See “Add Workflow Rules” below to configure Workflow Rules).
-
- Force
- Allows a previously removed Dynamics GP hold to be reapplied.
- Dynamics GP alone does not allow placing a hold on a document that has previously had a hold applied and then removed. SalesPad’s Force option forces the reapplication of a hold on such an item, so rules can be reevaluated. If the conditions are still met, the appropriate person can reassess the document.
- R/O
o Documents in queues with the R/O box checked will be Read Only.
- Click “Save” to save your changes and repeat the process for additional queues.

Note: The order that functions are executed is as follows: “Print,” “Plugin,” “Evaluation,” “Force.”
For example, if a queue applies the plugin “Split Sales Document” (Refer to: Splitting a Sales Document) and the Print box is also checked, the document will print before being split. It is possible to set up workflow so a print will occur after the split without manually forwarding to another queue, by using an auto-forwarding queue (see the “Auto-Forwarding Workflow Queues” section at the end of this document).
Important Note: Do NOT leave blank lines under “Workflow Queues,” and do not create duplicate queues. Errors will occur if blank lines and/or duplicates exist.
Add Workflow Rules

In Modules > Workflow Setup,
- From the left column, select the “Sales Document Type” to apply the rule to
- Click the “New Rule” button under Workflow Rules. A new field will appear.
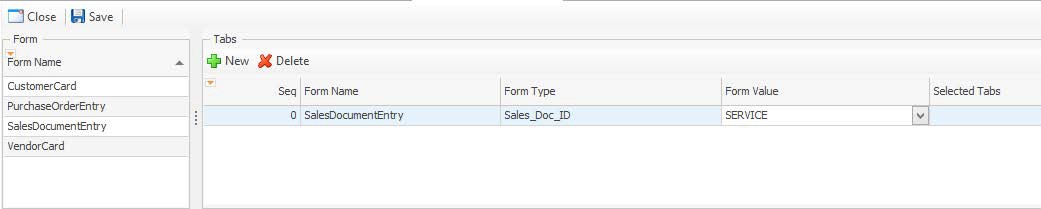
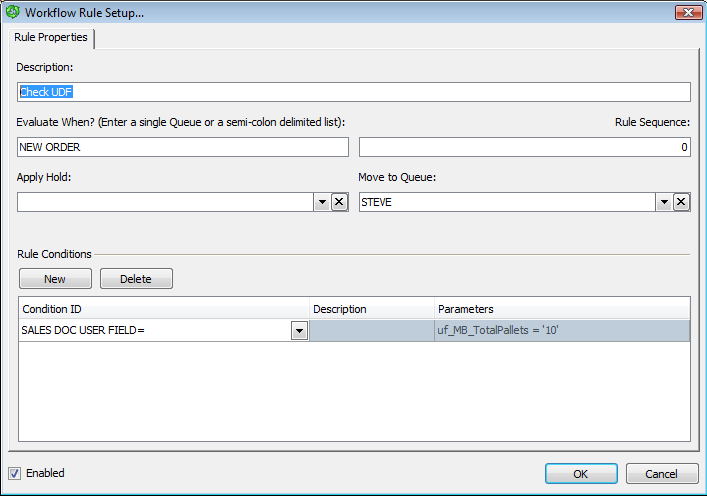
- Double-click the new field under Description. The Workflow Rule Setup screen appears:
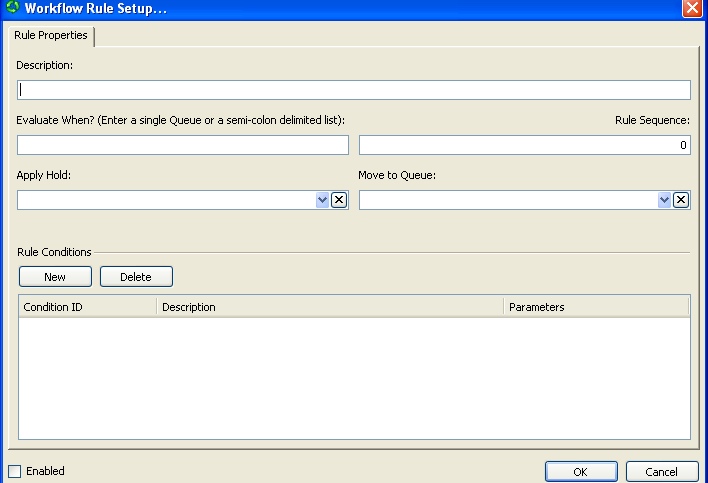
- Enter the following information on the screen:
- Description – A brief description of the new rule.
- Evaluate When – A queue or list of queues (separated by semicolons) where documents will be evaluated for the rule. This information transfers to the “Eval When In Queue” field under Workflow Rules on the Workflow Setup main screen.
-
Rule Sequence – A sequence is automatically generated, but can be changed. This information transfers to the “Seq” field.
- If more than one rule applies, the rule with the lowest sequence number will be used.
- On the main screen, the “Resequence Rules” button can be used to set the numbers back to Base 10, allowing available space to adjust order.
-
Apply Hold – Allows a Dynamics GP hold to be applied; select a hold to apply from the drop-down.
- Use the “X” button to remove a hold.
- Move to Queue – The queue to move the document to if the rule applies; select an existing queue from the drop-down.
-
Rule Conditions – Select “New” to choose when the rule will be applied.
- Select a “Condition ID” from the drop-down.
- When you tab off or click the Description field, the description of the rule condition will appear.
- Some rule conditions require “Parameters.” These will either say something in curly brackets in the description:
Example
- Condition ID: EXPENSIVE ITEM
- Description: “When any line on the order is at least {dollars}.”
- In this case, enter the dollar amount in the Parameters field.
Example
- Condition ID: LINE MARGIN%
- Description: “When any line on the document has a Margin % between {low pct} and {high pct}”
- In this case, enter the low percent and the high percent, separated by a comma (ex: 0.10)
- Multiple parameters can be entered using a semi-colon (ex: -9,999,25;200,300 applies where line margin percent is between -9999 and 25 percent -or- between 200 and 300 percent)
OR
Example
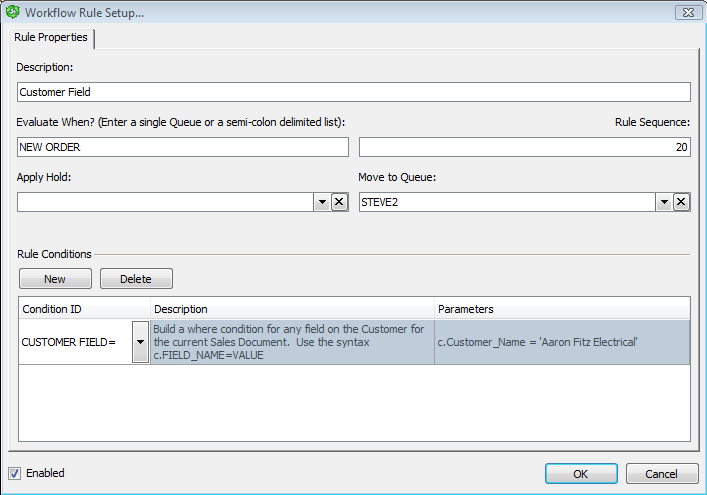
- Condition ID: CUSTOMER FIELD=
- Description: “Build a where condition for any field on the Customer for the current Sales Document. Use the syntax c.FIELD_NAME=VALUE”
- In this case, enter the field name and value with the instructed syntax in the Parameters field. The rule condition will apply if, on the document, the entered field has the entered value. (ex: For c.Customer_Name=”Aaron Fitz Electrical,’”the rule condition will apply if the Customer Name field says Aaron Fitz Electrical.)
For more examples, see the “Workflow Rule Examples” section of this document.
Note: If you place more than one condition in a rule, they are treated as being joined by the "AND" operator (both conditions must be matched or the rule will not be effective). To get the equivalent of an "OR" operator, you must create more than one rule.
Example Rule Setup:
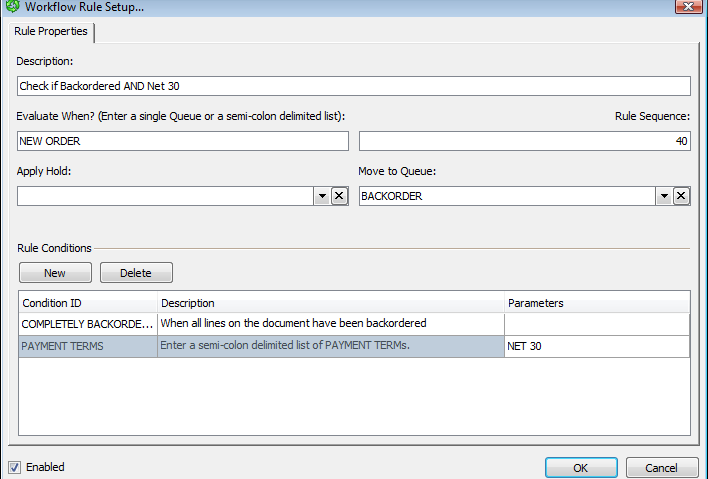
- When all needed fields are completed, click “OK.” You will return to the Workflow Setup screen, where the new rule will appear in the “Workflow Rules” grid.
- To enable the newly created rule, make sure the “Enabled” box under Workflow Rules is checked. A rule with this box unchecked will not be evaluated
- Click “Save” to save your changes
Some fields can be edited from the main screen, or click on a Rule description hyperlink to re-open the Workflow Rule Setup screen for editing.
Important Note: Do NOT leave blank lines under Workflow Rules, and do not create duplicate rules. Errors will occur if blank lines and/or duplicates exist.
Custom Workflow Rules Conditions
Users can add custom rule conditions to their workflow to further fit their needs. There are two components that must be added for every custom rule added to the system. The first is a condition added to the "spcpEvalWfRuleCondition" SQL stored procedure and the second is an entry in the "spWorkflowCondition" table.
To setup:
- Create a condition to add to the “IF” statement in the “spcpEvalWfRuleCondition” procedure. This will essentially be an additional condition that will set the @conditionWasMatched parameter.
Example
end else if (@wfConditionID = 'ZERO QUANTITY LINE') begin
if ( (select count(*) from SOP10200 as sd (nolock) where SOPNUMBE = @sopnumbe and SOPTYPE=@soptype and sd.QUANTITY<=0) > 0) begin
set @conditionWasMatched=1 end
The above condition will set the “@conditionWasMatched” parameter if there is a line on the order with 0 or less quantity.
- Once the condition is created, insert it into the “spcpEvalWfRuleCondition” procedure.
After the new condition is applied to the procedure, add a corresponding record to the “spWorkflowCondition” table. This entry will contain the name of the new condition, description, parameter type (string, int…), and sample parameters.
Example
select 'ZERO QUANTITY LINE', 'IF ANY LINE HAS A QUANTITY OF ZERO OR LESS THEN RULE EVALUATES TRUE', 'NONE', null
After inserting this line, you should see the rule condition in the drop-down under Condition ID on the Workflow Rule Setup screen:
Using Workflow
To use the Workflow you have set up:
- Create a new sales document (of a type that Workflow has been set up for).
- Save the document when it is completed.
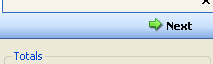
- To move the document to the next queue, click the button associated with the workflow in the upper right corner of the Order screen (Example: “Next”):
Note: Manually changing the queue from the Additional Properties section on a sales document does not trigger workflow actions. (See the “Document Transfer” section of the document “Editable/Read-Only Queues.”)
- A window will appear, confirming that you want to move the document. Click “Yes.”
- Another screen will appear, stating the queue the document will be moved to, and, if a workflow rule applies, the action being taken.
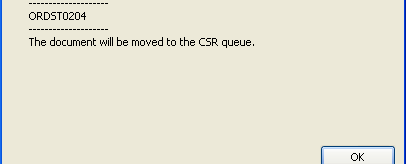

- Click “OK.” The sales document will close and move to the next queue.
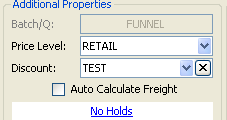
Note: A sales document’s current queue is always visible under “Additional Properties” in the Batch/Q field:
Workflow can also be used with Sales Batch Processing. Refer to SalesPad’s Sales Batch Processing or Sales Batch Line Processing documentation for more information.
Note: When you transfer a document to an invoice in Sales Batch Processing, the workflow will skip the first step automatically, allowing it to auto-run a rule. If a document is transferred using the “Ship” button on a single document, it will go to the first expected batch/queue.
Workflow Rule Examples
Rule for User Defined Fields (UDF)s
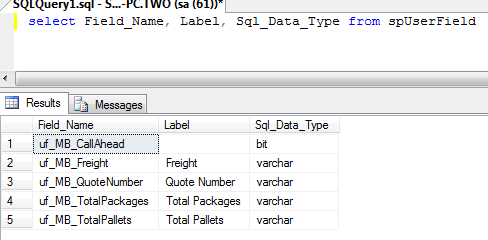
Use this SQL query to get a list of fields available on your setup. The parameters should use the field name, not the display name.
select Field_Name, Label, Sql_Data_Type from spUserField
Example: Create Two Rules Evaluating a User Defined Field for Printing or Emailing an Invoice
- Create a True/False (check box) user field (field name “uf_EmailInvoice” for this example) on both the Customer Business Object and the Sales Document Business Object, to indicate whether the customer’s invoices should be emailed to them rather than printed.
Note: Refer to SalesPad’s User Defined Fields document for information on creating user defined fields.
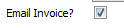 On the Customer Card and sales documents, the user defined field will look like this:
When the box is checked on the Customer Card, the check will copy to the matching user field on all of the customer’s future sales documents.
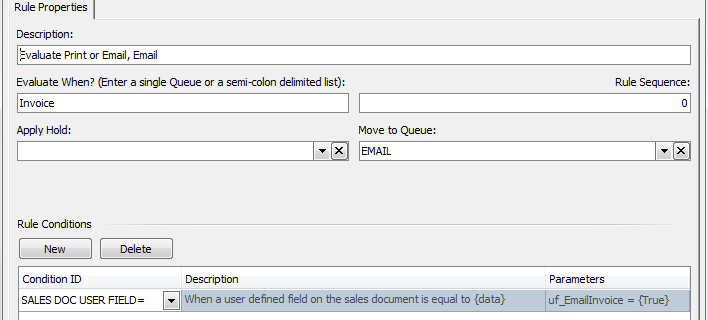
- Then create two workflow rules on the Invoice queue (or other existing queue where invoices or other documents that should be printed/emailed are sent) – one rule that will send documents with the Email Invoice box checked to an Email queue, and one rule that will send documents with the Email Invoice box unchecked to a Print queue, as shown below:
Email Rule
Print Rule
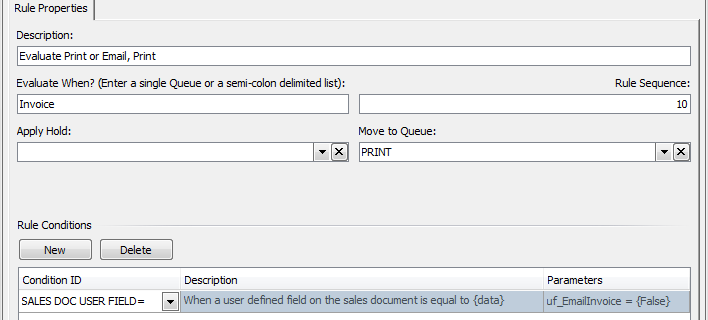
When the document is moved to, or saved to, the “Invoice” queue, the workflow rule will evaluate the “uf_EmailInvoice” sales document user defined field, and if “True” (checked) will move the document to the EMAIL queue to be emailed, and if “False” (unchecked), will move the document to the “Print” queue to be printed.
- Users overseeing those queues can either print or email the documents manually, or these queues can be set up to print/email automatically with Smart Printing, as configured below:

With this Smart Printing setup, invoices in the “Print” queue will automatically be printed to the specified printer. Invoices in the “Email” queue will automatically be emailed to the email specified on the customer’s shipping address. For more information on setting up Smart Printing, refer to SalesPad’s Smart Printing document.
Rule for Document Fields
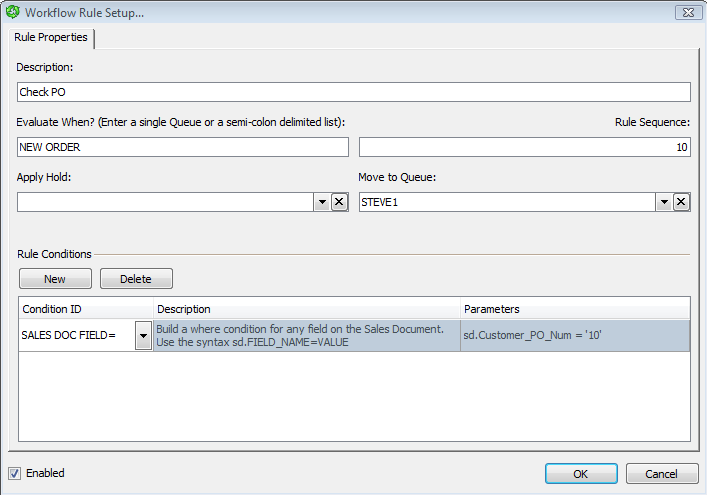
Available Sales Document Fields:
| Sales_Doc_Type |
Sales_Person_ID |
USRTAB09 |
Discount |
ReadOnly |
| Sales_Doc_ID |
Payment_Terms |
USERDEF1 |
On_Account |
Message |
| Actual_Ship_Date |
Comments |
USRDEF03 |
Shipping_Method |
USRDAT01 |
| Source |
User_Def_Date1 |
USRDEF05 |
Warehouse_Code |
USRTAB01 |
| Customer_Num |
User_Def_List1 |
Sales_Doc_Num |
Sales_Territory |
USRTAB03 |
| Bill_To_Address_Code |
User_Def_List3 |
Doc_Date |
Master_Num |
USERDEF2 |
| Ship_To_Name |
User_Def_2 |
Fulfillment_Date |
Notes |
USRDEF04 |
| Address_Line_1 |
User_Def_4 |
Sales_Batch |
User_Def_Date2 |
|
| Address_Line_3 |
Prev_Sales_Doc_Type |
Customer_Name |
User_Def_List2 |
|
| State |
Quote_Num |
Ship_To_Address_Code |
User_Def_1 |
|
| Country |
Currency_ID |
Contact_Person |
User_Def_3 |
|
| Phone_2 |
Packingslip_Num |
Address_Line_2 |
User_Def_5 |
|
| Fax |
Ship_Complete |
City |
Prev_Sales_Doc_Num |
|
| Customer_PO_Num |
Currency_Dec |
Zip |
Invoice_Num |
|
| Req_Ship_Date |
Created_By |
Phone_1 |
Pickticket_Num |
|
| Freight |
EnteredBatch |
Phone_3 |
Blind_Ship |
|
| Misc_Charge |
Alert |
Price_Level |
Auto_Calc_Freight |
|
| Total |
Forwardable |
Status |
Created_On |
|
| Deposits |
Comment_ID |
Subtotal |
Email |
|
| Tax_Schedule |
USRDAT02 |
Tax |
BatchHours |
Rule for Customer Field
Available Customer Fields:
| Customer_Num |
Comment_1 |
Year_Avg_Days |
| Customer_Name |
Comment_2 |
Total_Amt_NSF_Checks_YTD |
| Customer_Class |
IntegrationSource |
Num_NSF_Checks_YTD |
| Corporate_Customer_Num |
Inactive |
Tax_Schedule |
| Short_Name |
On_Hold |
Ship_Complete |
| Statement_Name |
Customer_Note |
Email_To |
| Primary_Addr_Code |
Currency_ID |
Email_CC |
| Primary_Bill_To_Addr_Code |
Currency_Dec |
Email_BCC |
| Primary_Ship_To_Addr_Code |
Last_Aged |
Message |
| Statement_To_Addr_Code |
Balance |
|
| Sales_Person_ID |
Unapplied_Amount |
|
| Sales_Territory |
Customer_Credit_Limit |
|
| Payment_Terms |
Last_Pay_Date |
|
| Shipping_Method |
Last_Pay_Amt |
|
| Price_Level |
First_Invoice_Date |
|
| User_Def_1 |
Last_Invoice_Date |
|
| User_Def_2 |
Last_Invoice_Amt |
|
| Tax_Exempt_1 |
Last_Stmt_Date |
|
| Tax_Exempt_2 |
Last_Stmt_Amt |
|
| Tax_Registration_Num |
Life_Avg_Days |
Rule for Item Field
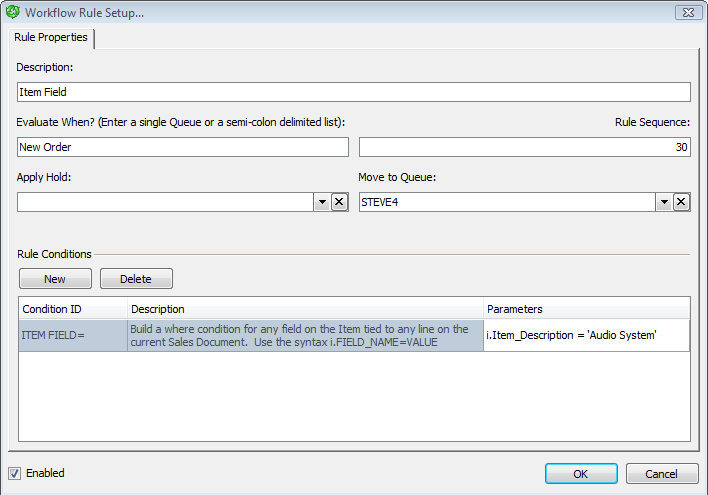
Available Field Items
| ABC_Code |
Item_Type |
USCATVLS_4 |
| Allow_Backorders |
List_Price |
USCATVLS_5 |
| Alternate_Item1 |
Location |
USCATVLS_6 |
| Alternate_Item2 |
Lot_Type |
Valuation_Method |
| Country_Origin |
Modified_date |
Warranty_Days |
| Created_Date |
Note |
|
| Current_Cost |
Note_Index |
|
| Item_Class_Code |
Price_Group |
|
| Item_Code |
Price_Level |
|
| Item_Curr_Dec |
Price_Method |
|
| Item_Description |
Purchase_item_Tax_Schedu |
|
| Item_Generic_Description |
Purchase_Tax_Option |
|
| Item_Number |
Selling_U_of_M |
|
| Item_Planning_Type |
Standard_Cost |
|
| Item_Qty_Dec |
Tax_Commodity_Code |
|
| Item_Shipping_Weight |
UOfM_Schedule |
|
| Item_Short_Name |
USCATVLS_1 |
|
| Item_Tax_Schedule_ID |
USCATVLS_2 |
|
| Item_Tracking_Option |
USCATVLS_3 |
Autoforwarding Workflow Queues
Overview
Note: Auto-forwarding workflow queues are considered advanced functionality.
Auto-forwarding workflow queues can be added as a step in a workflow, an additional stopping point for documents that can be used to check additional workflow rules or open more process plugins without another manual-forwarding step (otherwise, only one of each of these could be applied).
Setup
To set up an auto-forwarding queue, rename an existing queue, or set up a new queue, named to include a + at the end. Examples include “Print+” and “Release+.”
Example Usage
The most common auto-forwarding scenario involves inserting an auto-forwarding queue between two regular queues. The “Print+” example is frequently used to invoke the Print dialog as a document makes its way through workflow. In the image below, the “Print+” queue is between the “Pending” and “Warehouse” queues:
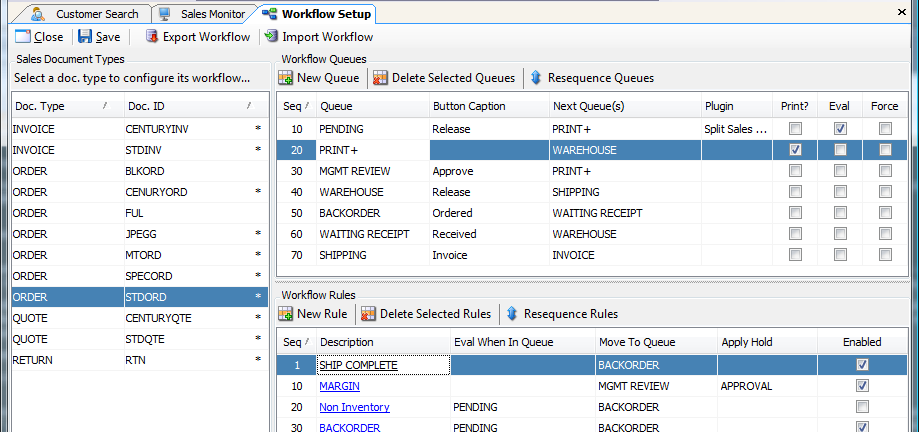
As documents are released from the “Pending” queue, they are first evaluated based on applicable rules. If none of the rules apply, that would route the documents to queues such as “Backorder” or “Mgmt Review,” the documents will be forwarded to the “Print+” queue to be printed. Once printed, the documents will move automatically to “Warehouse” without requiring user intervention. If rules block the documents from moving further in the workflow, they will not be printed and will move to the designated queues.
Important Note: If the user cancels out of the print dialog, this also cancels the auto-forward process, so the document will remain in the “Print+” queue. The easiest solution is to add a button caption for each auto forwarding queue which will allow users to forward the document even if the print is canceled.
Another function of auto-forwarding queues is to use a series of auto-forwarding queues to launch multiple release plugins in sequence, such as Sales Fulfillment, Attach Sales Line to PO, and Document Release. The series of auto-forwarding queues could be used in conjunction with rules that apply only to certain queues to create branching workflow logic without burdening the user with manual steps.
Kayako Admin
Comments