Table of Contents
Overview
Business object workflow is used to create custom workflows for supported business objects in SalesPad Desktop. Users can add rules, conditions, and actions that govern how business objects are handled in workflow. This document will go over general workflow configuration and functionality.
Security Editor
To access the Security Editor, go to Modules -> System -> Security Editor, filter to "Workflow" and make sure all of the following security options are enabled for the group(s) responsible for configuring/maintaining workflow.

Note: Securities with an asterisk (such as Workflow Monitor) have sub-securities that are listed in the middle section of the Security field. Sub-security descriptions appear in the bottom section of the field
Log off and log back on to SalesPad. Workflow Setup and Workflow Monitor options should now be available on the ribbon.

Workflow Setup
The Workflow Setup screen is used to configure workflows for a desired business object. It displays all workflows at a glance under the All tab or groups them under individual business object tabs. For example, clicking the CaseTrackerCase tab will show only CaseTrackerCase workflows.
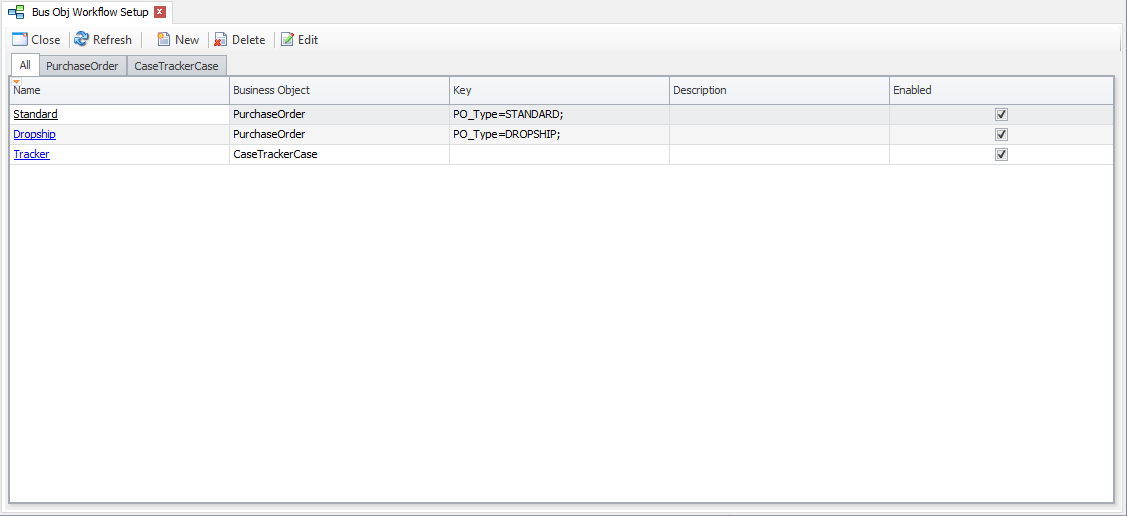
Add New Workflow
To create a new workflow, click the New button. Workflow Card will open, allowing the user to set workflow batches, rules, conditions, and actions. If a specific business object tab was selected prior to clicking the New button, that business object will be pre-selected on the Workflow Card.
Note: If a particular business object is not available for selection, it will have to be added by the SalesPad development team.
Delete Existing Workflow
To delete an existing workflow, click the Delete button.
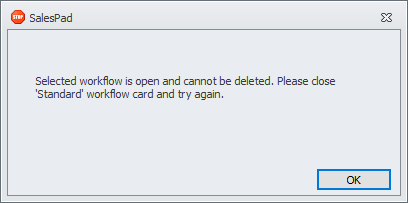
Note: Workflow cannot be deleted from the Workflow Setup screen if the Workflow Card for that workflow is currently open in SalesPad.
Edit Existing Workflow
To modify an existing workflow, click the Edit button. The Workflow Card will open, allowing the user to modify workflow batches, rules, conditions, and actions.
Workflow Card
Workflow Card is used for workflow configuration. Users can enable or disable workflow, edit batches and rules, and set conditions and actions.
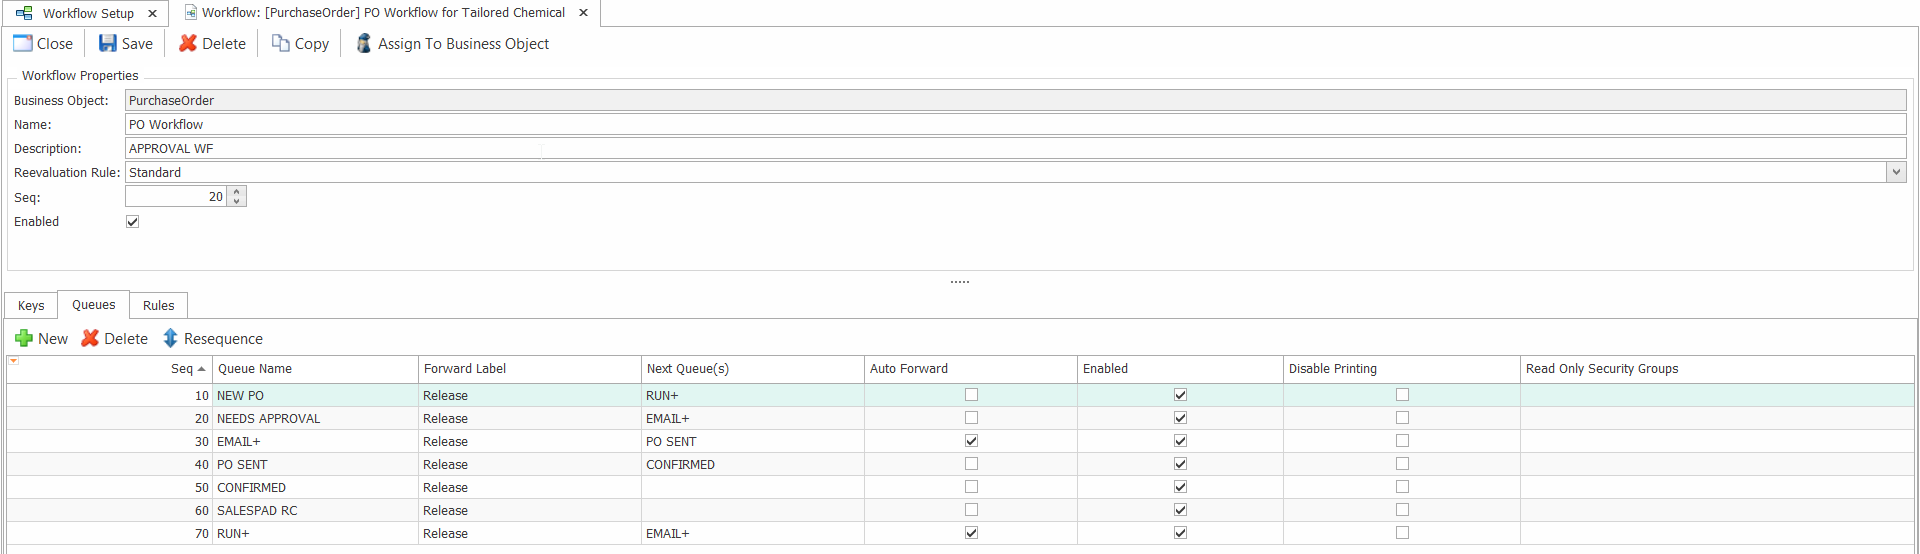
Workflow Properties
Workflow properties apply to the entire workflow. Property fields are:
Business Object – Name of the business object to which the workflow will be applied. Once this field is set and workflow saved, it cannot be changed.
Key – Workflow key is optional and is not required for most business objects. Please see the Workflow Key section for more details.
Name – Custom name for the workflow. This name will be used to identify the workflow on the Workflow Setup screen.
Description – Workflow’s purpose can be specified here. This field is optional.
Enabled – Sets the workflow as enabled or disabled.
Workflow Key
Workflow keys allows the user to create multiple workflows for the same business object. Workflow keys are optional.
For example, a workflow key for the Purchase Order business object could be the PO Type field. Purchase order types in Dynamics GP are STANDARD, DROPSHIP, BLANKET, and DROPSHIPBLANKET. This means that theoretically four different workflows can be created for the Purchase Order business object. That being said, SalesPad currently supports only STANDARD and DROPSHIP types so two different workflows can be created.
Queues
Users can add workflow batches on the Queues tab.

To add a new queue to the workflow, click the New button.
| Sequence |
Assigned automatically and determines queue order (clicking the Resequence button will auto-assign a sequence number to each queue) |
| Queue Name |
The name of the queue (must be unique and is required) |
| Forward Label |
The text of the button used to forward business objects through workflow |
| Auto Forward | Checking this means the document/object will forward through the queue automatically without user intervention (commonly used to check rules or fire a plugin) |
| Disable Printing | Checking this disallows printing in that queue |
| Enabled | Enabled means the queue is active. If this is not checked, the queue is not apart of the workflow |
| Read-Only Security Groups | Security groups added here can only view objects/documents in the queue, not edit |
| Next Queue(s) |
Designate which queue(s) documents can be forwarded to (if more than one queue is selected here, SalesPad will prompt the user to manually select the desired queue before forwarding) |
Note: If more than one batch is selected under Next Queue(s) and the business object is being forwarded from the Workflow Monitor screen, SalesPad will not prompt for the forward batch and will instead forward to the first available batch.
Rules
Users can add workflow rules on the Rules tab. Workflow rules determine how business objects are forwarded through workflow.
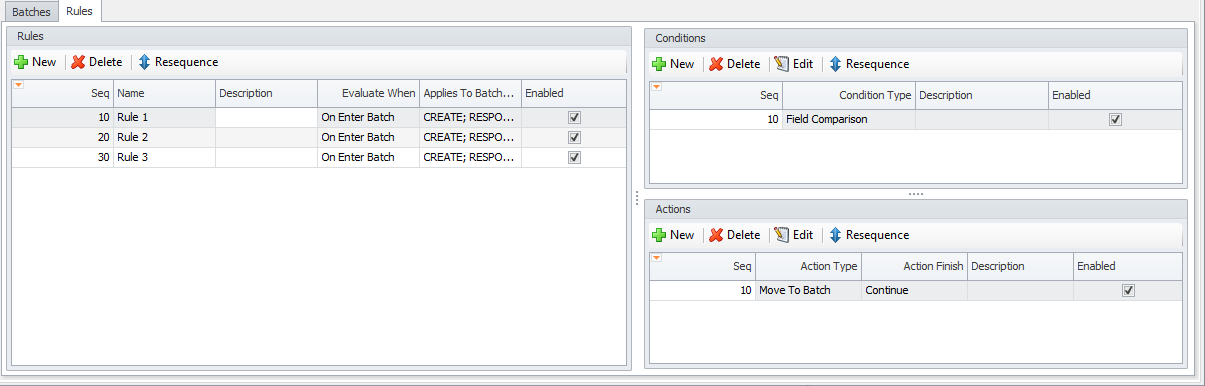
The Rules tab is split into three separate sections - Rules, Conditions, and Actions. To add a new rule, click the New button.
| Sequence |
Assigned automatically and determines the order in which the rules will be evaluated (clicking the Resequence button will auto-assign a sequence number to each queue) |
| Name |
The name of the rule (this is a required field) |
| Description |
A description of the rule (optional) |
| Evaluate |
Determines when the rule will be evaluated ('On Enter Queue' or 'On Exit Queue') |
| Applies To Queue(s) |
Determine which queue(s) this rule will apply to |
| Enabled |
Enable or disable a rule |
| Prevents Movement |
Allow a rule to prevent a business object from continuing through the workflow if it does not evaluate as 'True' |
Conditions
Conditions are conditional statements used to determine if a rule has been satisfied. A rule can have more than one condition, but all conditions must evaluate to true in order for the rule to be satisfied.
Available condition types:
- Value Comparison
- Field Comparison
- SQL Procedure
- C# Script
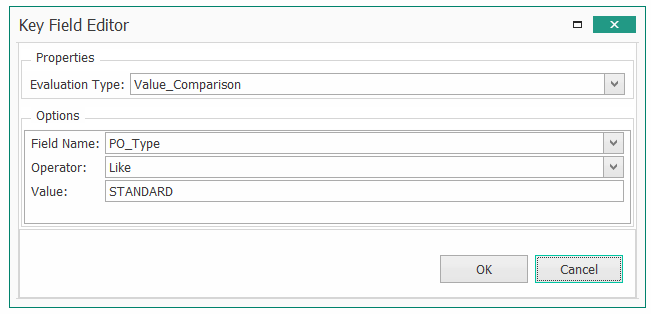
Value Comparison
Value comparison condition compares a business object field (including user fields) to a static value.
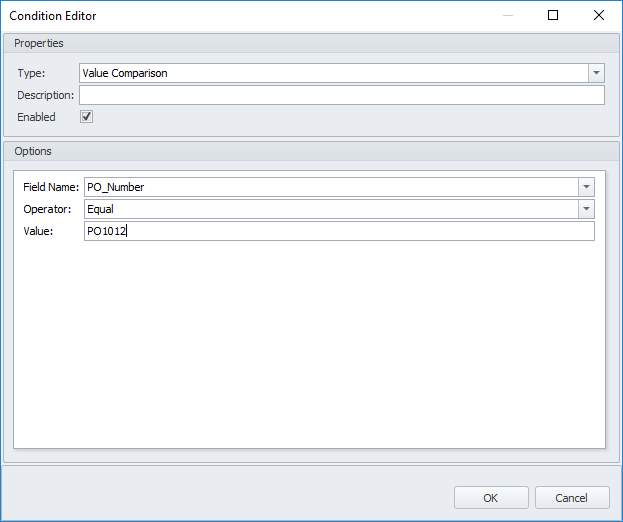
If the field value matches the value entered, the condition will evaluate to true.
Note: Field data type must match the value data type. For example, if the field is of type string, then value must also be string.
Field Comparison
Field comparison condition compares a business object field (including user fields) to another business object field.

If the field value matches the second field value, the condition will evaluate to true.
SQL Procedure
SQL procedure condition uses a SQL stored procedure to compare values.
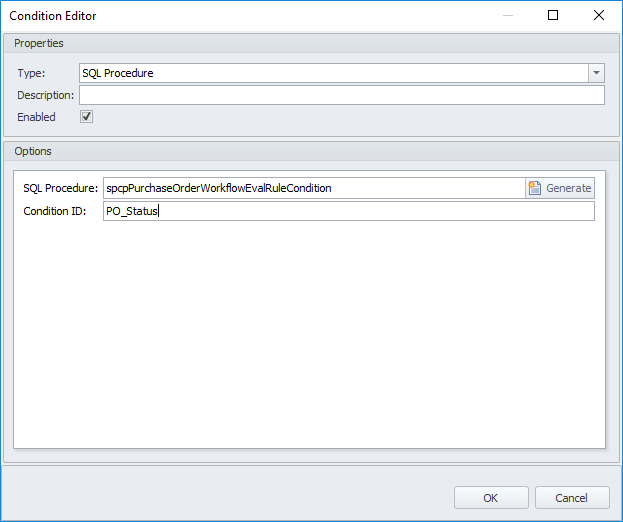
SQL procedure does not exist in the database by default, but clicking the Generate button will create it. For example, SQL procedure for CaseTrackerCase business object will be generated as spcpCaseTrackerCaseWorkflowEvalRuleCondition.
Generated SQL procedure is empty by default and will need to be edited in Microsoft SQL Server Management Studio by adding desired conditions. Once the conditions are added, the user can then specify them in the Condition ID field.
C# Script
The C# script condition uses a C# script to compare values.
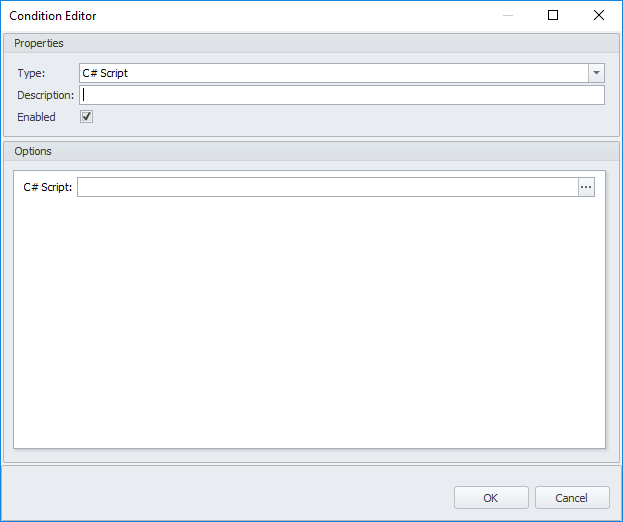
The C# script is the most versatile condition type. It allows the user to write complex conditions in the form of an executable script. The available script parameters are:
Apollo.Data.BusinessObjectWithWorkflow businessObject
Apollo.Data.ValueWrapper<bool> conditionMatched
The businessObject parameter is the generic business object that is being forwarded through workflow and will need to be cast to the appropriate business object.
For example; if the business object that is being forwarded is CaseTrackerCase, then the cast would look like this:
SalesPad.Bus.CaseTrackerCase ctc = (SalesPad.Bus.CaseTrackerCase)businessObject;
The conditionMatched parameter is a Boolean value wrapper that determines if the condition is true. To make the condition true in the script, set:
conditionMatched.Value = true
To make the condition false, set:
conditionMatched.Value = false
Actions
Actions are operational statements that are executed when the rule is evaluated. A rule can have more than one action. If the rule does not have any conditions, all actions are executed. If the rule does have condition(s), all conditions must be true before actions are executed.
Note: Conditions are not required to execute actions. If conditions are not set, all actions will execute.
Available actions:
- Run Script
- Move To Batch
- Run Plugin
Email action is used to send email messages. Email settings will need to be configured in SalesPad before this action can be used. Please see the Settings section of the Emailing in SalesPad Desktop documentation for more information.
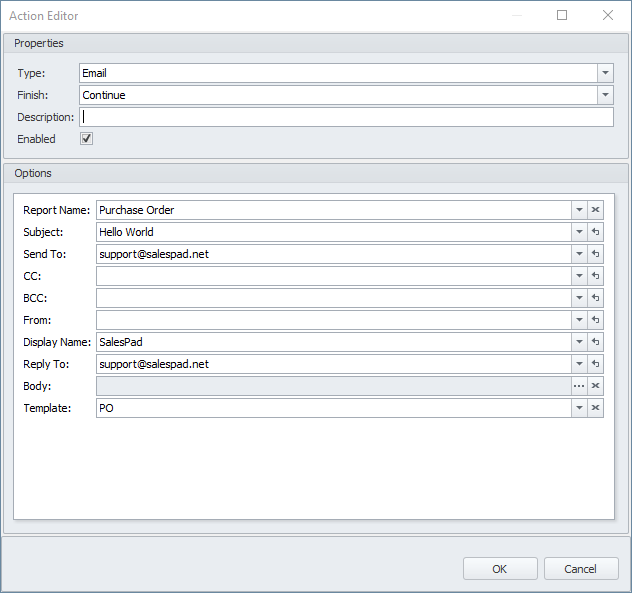
Report Name – Name of the printed report that will be sent as an attachment in the email message. If the business object does not support printing, this field will be blank.
Subject – Email subject.
Send To – Email address to which email will be sent. Multiple email addresses can be entered in a semicolon delimited list.
CC – Carbon copy email address. Multiple email addresses can be entered in a semicolon delimited list.
BCC – Blind carbon copy email address. Multiple email addresses can be entered in a semicolon delimited list.
From – From email address.
Display Name – Display name that will be shown in the email message.
Reply To – Reply to email address.
Body – Body of the email message. Click the ellipsis button to open the Email Body Editor. If email template is being used, this field will be inaccessible.
Template – Email template. If email body is being used, this field will be inaccessible.
Note: Email templates are not available for all business objects. If email template is not available for a selected business object, the Template field will not be available.
Users can edit email body text using the Email Body Editor.
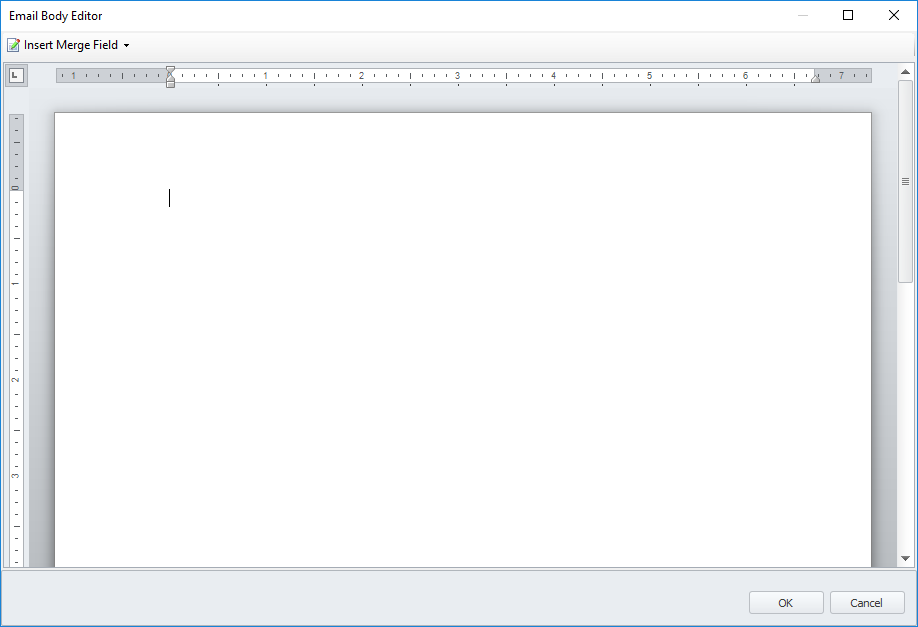
Email Body Editor is similar to the Email Template Editor in terms of functionality. The user can type the email body text and even insert merge fields by clicking the Insert Merge Field button.
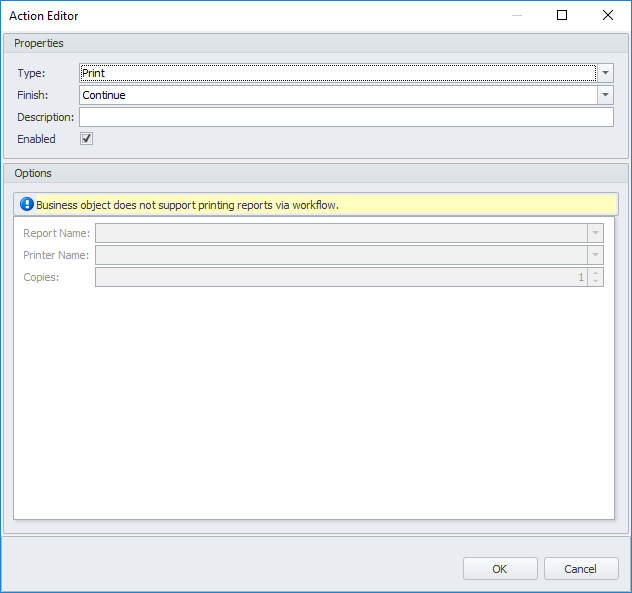
Print action is used to print reports.
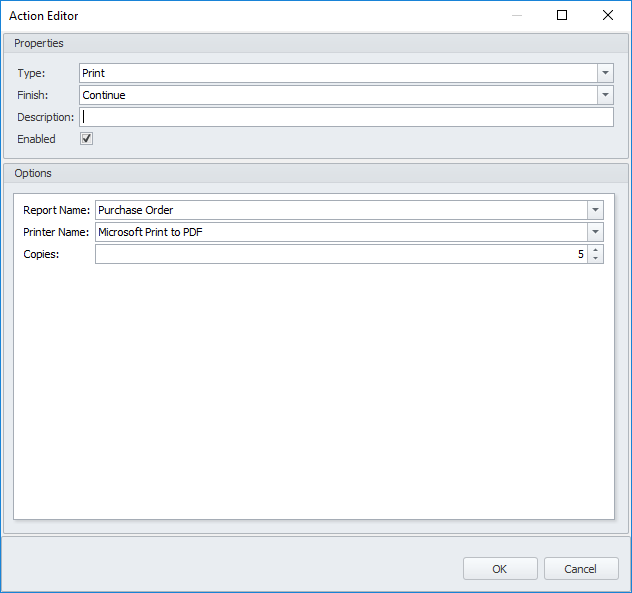
Report Name – Name of the report to be printed.
Printer Name – Name of the printer that will print the report.
Copies – Number of copies to be printed.
Note: SalesPad will let the user know if the business object does not support printing in workflow.
Run Script
Run script action is used to execute a C# script.
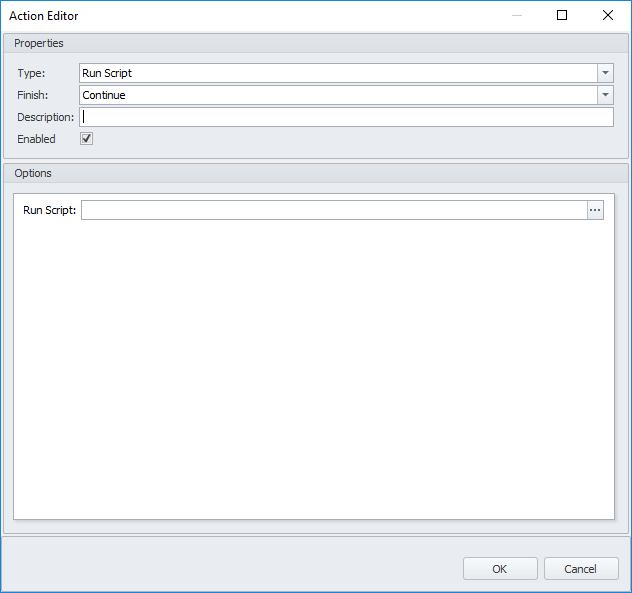
The Run script allows the user to write complex actions in the form of an executable script.
The businessObject parameter is the business object that is being forwarded through workflow. Just like the condition script, it will need to be cast to the appropriate business object before it can be used. Please see the Conditions section for more information.
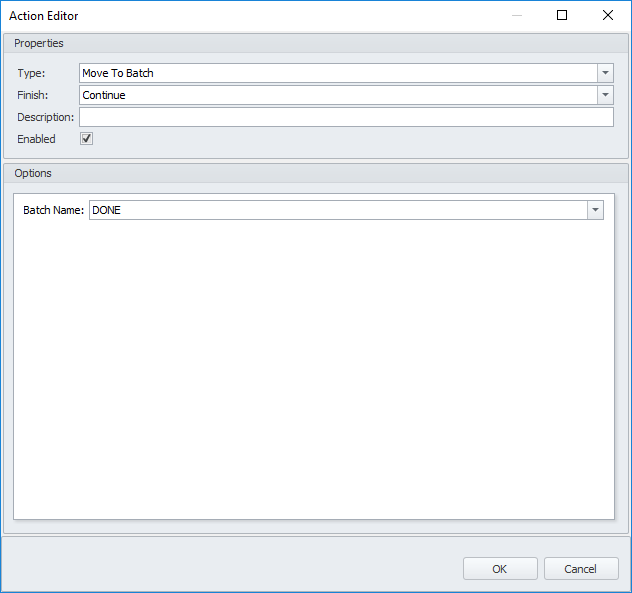
Move To Batch
Move to batch action is used to send the business object to a specific workflow batch.
Run Plugin
Run plugin action is used to execute a business object-specific plugin.
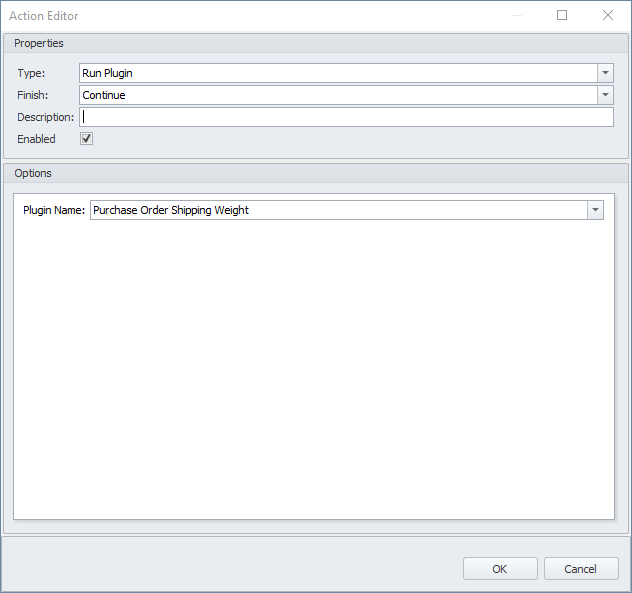
Note: SalesPad will let the user know if the business object does not support plugins in workflow.

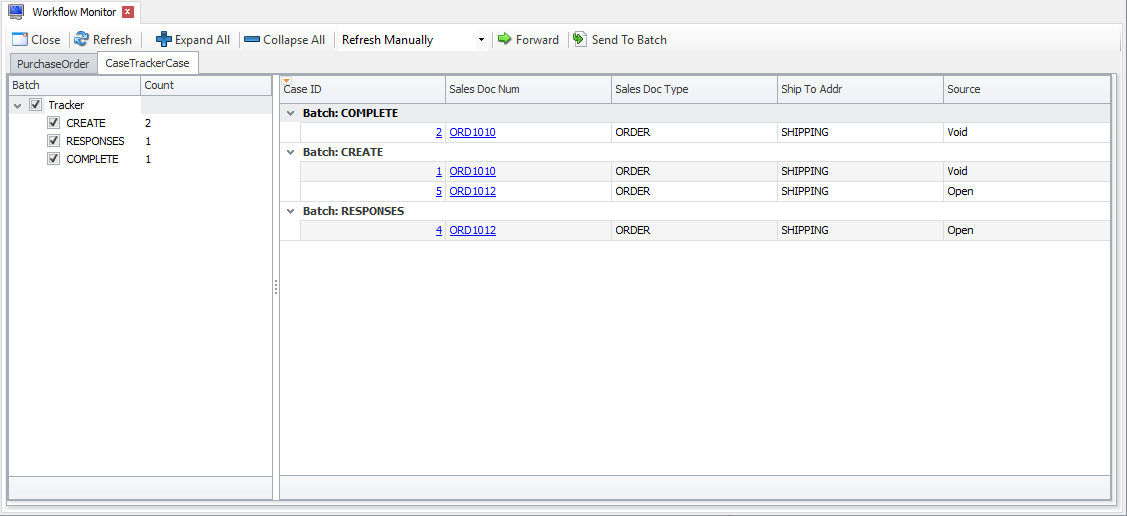
Workflow Monitor
Workflow Monitor is used to view business object workflows and queues at a glance. It also allows users to forward business objects through workflow or send them to a specific queue.
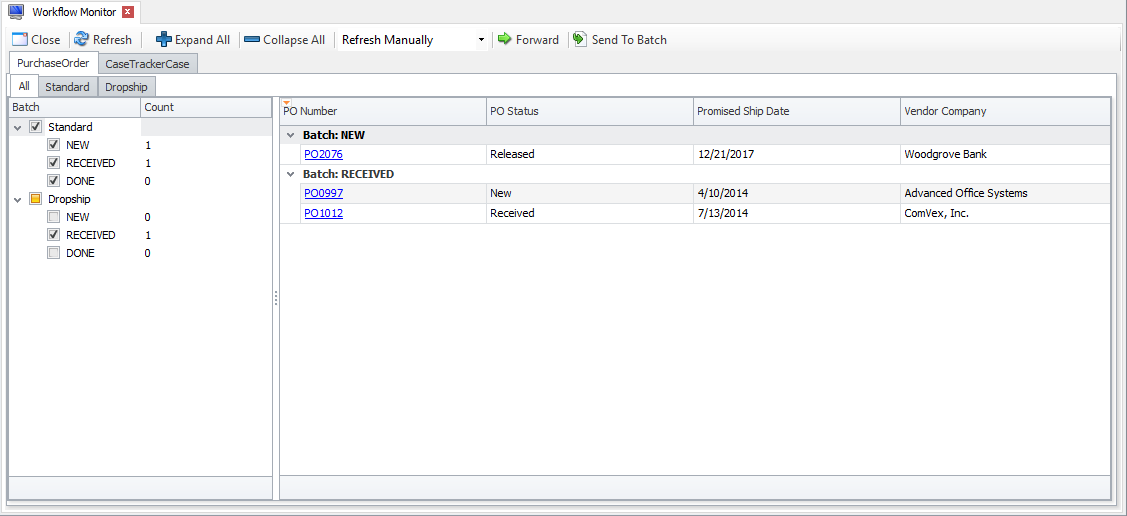
The Workflow Monitor screen has a tab for each business object, such as PurchaseOrder and CaseTrackerCase. Every business object tab has a sub-tab for each workflow. If business object does not support multiple workflows, sub-tabs will not be shown. For example, CaseTrackerCase business object does not support multiple workflows.
Forwarding
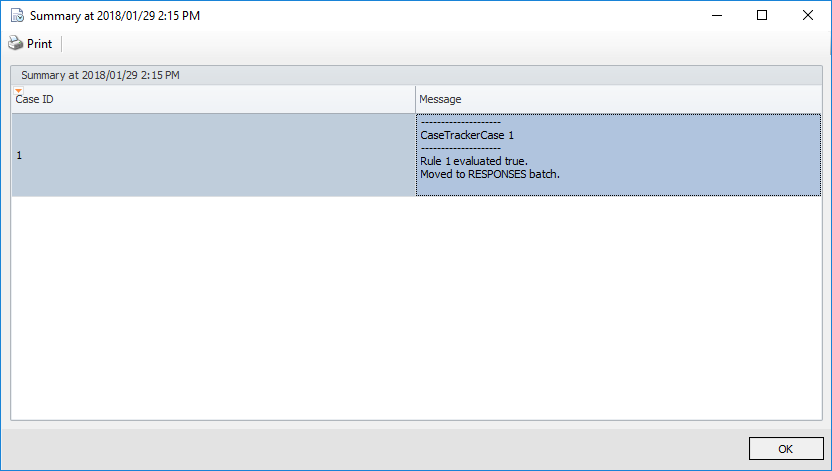
To forward business objects through workflow, select one or more (CTRL + click to multiselect) from the grid on the right and click the Forward button. SalesPad will ask the user to confirm the forward action. Clicking Yes will forward the selected business objects through workflow.
After the forward action is complete, the Summary window is displayed.
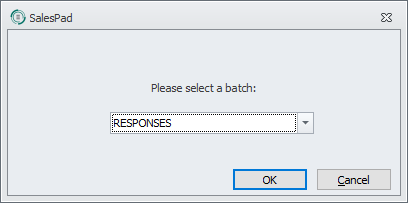
Send To Batch
Send to batch is used to send business objects to a queue/batch without actually forwarding them through the workflow. Sending business objects directly to a batch will not trigger workflow rules, conditions, and actions.
To send business objects to a batch, select one or more from the grid on the right and click the Send To Batch button. SalesPad will ask the user to select the desired batch. Clicking OK will send the selected business objects to the selected batch.
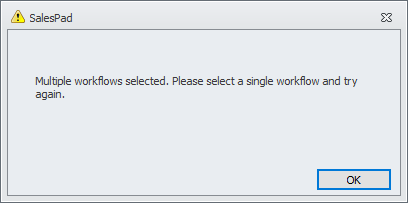
Note: If multiple business objects are selected from two or more workflows, SalesPad will not be able to send to batch and will inform the user accordingly.
Kayako Admin
Comments