Overview
The Auto Item Conversion plugin takes a client’s alternate items (3rd party items) and converts them into inventory items by adding them to the Item Master.
Requirements
-
To use Auto Item Conversion, you must have items in the Alternate Items table. Refer to the Alternate Item Import Manager documentation for more information. Use Inventory Lookup to view these items.
-
The Excel import requires the Manufacturing Item Number as well as the Item Number in the import, as it will convert to the manufacturing item number from the Alternate Item table. Refer to the Import Manager document for more information.
-
The plugin only works with the unit of measure definitions of the EACH unit of measure schedule in GP.
Inventory Lookup
In Modules > Inventory Lookup, check the Search Alternate Items box and use the Alternate Items tab to search for alternate items. 3rd party items will display in this table.
You can import more 3rd party items with the Import Manager.
Import Manager
Import Manager allows you to import item data from a 3rd party catalog file into the Alternate Items table. These items will be kept separate from inventory before using the Auto Item Conversion plugin. Items must be imported into the spAlternateItems table before being auto converted. Refer to the Alternate Item Import Manager and Import Manager document for more information.
Security
To make Auto Item Conversion available during sales order entry, the security setting must be enabled in the Security Editor (Modules > Security).
To enable Auto Item Conversion, go to Modules > Security In the Security column, filter to "Auto Item" and make sure Auto Item Conversion is checked.
Note: You must log out and log back in for Security changes to take effect.
User Fields
Note: The user field used here is the same user field used for Purchase Order Generation. If Purchase Order Generation has already been set up according to the instructions, you should not set up an additional user field.
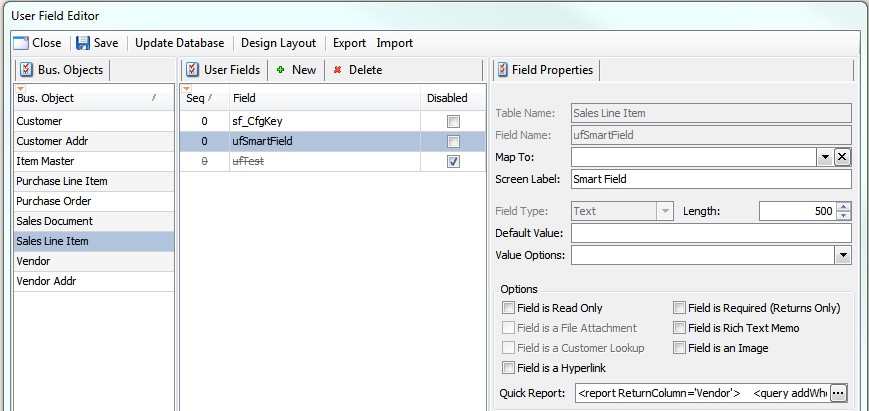
In order to use Auto Item Conversion, you must set up a user defined field, as shown below. In the example, the field is called “ufSmartField”:

Add the following code to the Quick Report section under Field Properties (click the ellipsis to enter code):
<report ReturnColumn='Vendor'>
<query addWhere="false"> select Vendor='', Vendor_Name=''
union
select Vendor = Vendor_ID + char(9) + Vendor_Name, Vendor_Name from spvVendor order by vendor
</query>
</report>
Note: Refer to the SalesPad User Defined Fields document for more information on configuring user fields.
Settings
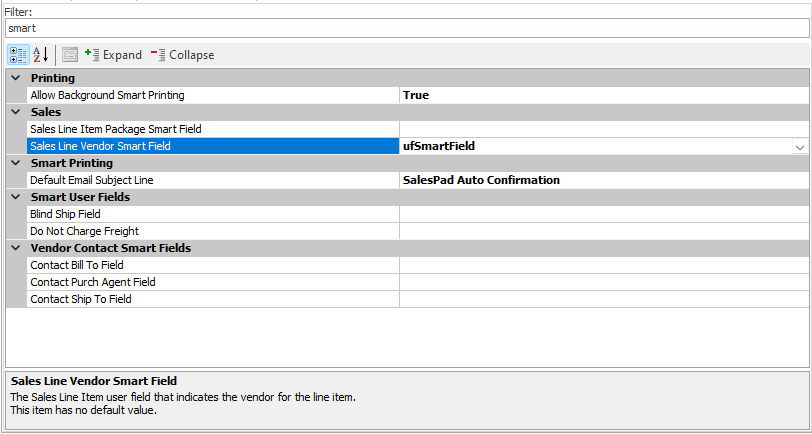
To configure the necessary settings for Auto Item Conversion, go to Modules > Settings, filter to “smart”, and select Sales Line Vendor Smart Field. Enter the user field name (ufSmartField) into the field.
Save your changes.
Sales Order Entry
During sales order entry, add as many alternate items to the sales order as needed. When finished adding items, run the Auto Item Conversion plugin, available under the Actions dropdown menu in the sales document.
The plugin cycles through the items and adds them to the Item Master.
Note: There is no visual feedback after running the plugin, but an inventory search in the Inventory Lookup module will find the new item in that list.
Workflow
The Auto Item Conversion plugin can also be used as part of workflow setup, where the conversion will be handled automatically.
To add the plugin to workflow, go to Modules > Workflow Setup. Select the Document Type and Workflow Queue, then, in the Workflow Queues table, select Auto Item Conversion from the Plugin drop-down, at the queue you want items to be converted.

When the document reaches that point in the workflow, it will call the plugin and automatically convert items from the 3rd party catalog to the Item Master.
Note: If Auto Item Conversion is not properly set up, you will receive an error each time a document reaches this point in the workflow process.


SalesPad Support
Comments