Overview
SalesPad Desktop 5.4.2 introduced new ways to import serial and lot item data from spreadsheets via Import Manager. Users can now import receipts for serial-tracked items, mass update serial item user defined fields (UDFs), and mass update lot item attributes and UDFs. The inventory adjustment import can now be used to assign UDF values for serial items that are being adjusted into the system.
This article assumes that the reader has some familiarity with Import Manager. For general information on how to use Import Manager, refer to this article.
Table Of Contents
- Purchase Receipt Inventory Serial Num Import
- Inventory Adjustment Import Updates For Serial Item UDFs
- Inventory Serial Num Mass Update Import
- Inventory Lot Num Mass Update Import
- In-Transit Transfer Fulfillment Details Import
Purchase Receipt Inventory Serial Num Import
Import Manager has a new option that allows receiving serial-tracked items via Purchase Order (PO) receiving, In-Transit Transfer (ITT) receiving, and standalone/PO-less receiving. The import will look at the Receipt Type, PO Number, and ITT Doc Num fields to deduce the receiving type for each row in the spreadsheet, so a single spreadsheet can perform all three types of receiving if desired.
This import is similar to the Receiving screen in SalesPad and the PO and ITT Receiving modules in Inventory Manager in that it has the following features and restrictions:
-
This import automatically creates new receipt documents and line items as needed, so users do not need to manually create receipts ahead of time
-
To receive items for a PO or ITT, the PO or ITT document must already exist in the system and be in a receivable state
-
Updating a serial number on a pending receipt requires removing and re-inserting it
-
Removing a serial number from a pending receipt must be done manually via the Serial/Lot Receiving plugin in Receipt Transaction Entry in SalesPad Desktop, or in GP
-
Serial numbers can be auto-generated when receiving items for a PO or standalone receipt by putting “AUTO ASSIGN” in the Serial Number column and then specifying the quantity of serial numbers to generate in the Serial Lot Qty column
Note that this import option only supports receiving serial-tracked items. It does not support importing receipts for lot-tracked or non-tracked items.
Row Consolidation
If a row has a blank Receipt Number, the import will create a new receipt. If multiple rows have a blank Receipt Number, the import will group together similar rows and put them on the same receipt instead of creating a separate receipt for each row. Rows will be grouped together on a single receipt if they share the following traits:
-
The rows have the same receipt type
-
The rows have the same values for all fields which are prefixed with ‘Receipt.’
-
The rows have the same PO Number or ITT Doc Num
The last requirement can be removed via the Purchase Receipt Inventory Serial Import Consolidation setting. If an import definition is selected in that setting, then that import definition will group together rows which have the same receipt header values even if they are for different purchase orders or in-transit transfers. Note that PO receipts must always have the same vendor to be combined.
There is also a Purchase Receipt Inventory Serial Import Line Consolidation setting which controls whether the import will group similar rows onto the same receipt line. Serial numbers will be grouped together on a single receipt line if the import definition is selected in that setting and the rows share the following traits:
-
The rows are for the same purchase receipt
-
The rows have the same values for all fields which are prefixed with ‘ReceiptLine.’
Note that row consolidation worked differently before SalesPad 5.4.12. In older versions, receipts would automatically consolidate based on the receipt type, vendor, and PO/ITT Number fields, and receipt lines would not consolidate so each serial item would have its own line.
Setup
In Import Manager, create a new import definition and select PurchaseReceiptInventorySerialNum as the table. Then create field mappings to map SalesPad fields to columns in the spreadsheet.
The SalesPad fields include fields from 4 different tables: Receipt, Receipt Line, Receipt Serial, and Serial User Fields. The Serial User Fields table is optional and does not require any mappings unless users want to import Inventory Serial Num user fields. The other tables have a variety of required fields.
If a field exists in multiple tables, each version of that field should be mapped to the same column in the spreadsheet. For example, Location is a field on the Receipt Line and Receipt Serial tables. If a user wants to map that field to a spreadsheet column called Site ID, he or she should create 2 field mappings to map Location on each table to the same Site ID column in the spreadsheet.
Required Fields For All Receiving Types
-
ReceiptSerial.Serial_Lot_Number
-
ReceiptLine.Item_Number
-
ReceiptSerial.Item_Number
-
ReceiptLine.Location
-
ReceiptSerial.Location
-
ReceiptSerial.Bin (only required for multibin companies)
-
Receipt.Receipt_Number
-
ReceiptLine.Receipt_Number
-
ReceiptSerial.Receipt_Number
-
ReceiptLine.Line_Seq
-
ReceiptSerial.Line_Seq
The Serial (Lot) Number, Item Number, Location, and Bin fields are straightforward. To receive an item, the system must know what is being received and where it is being received. The Bin field is only required for multibin companies.
The Receipt Number and Line Seq fields are required due to a design philosophy of Import Manager that each import definition must require its database primary keys. While spreadsheets must include column headers for Receipt Number and Line Seq, it is fine and even expected for those columns to not have any values.
Additional Required Fields for PO Receiving
-
Receipt.Vendor_ID
-
ReceiptLine.Vendor_ID
-
ReceiptSerial.Vendor_ID
-
ReceiptLine.PO_Number
-
ReceiptLine.PO_Line_Seq
The PO Number and PO Line Seq fields specify which purchase order line item is being received. PO Number is the purchase order’s main identifier and is a highly visible field in SalesPad and GP. PO Line Seq is part of the primary key for purchase order line items and is less visible. PO Line Seq can be viewed in SalesPad by going to Purchase Order Search, selecting a purchase order, and adding the Line Seq column to the Line Items grid.
Additional Required Fields for ITT Receiving
-
ReceiptLine.ITT_Doc_Num
-
ReceiptLine.ITT_Line_Num
The ITT Doc Num and ITT Line Num fields specify which in-transit transfer line item is being received. ITT Doc Num refers to the Order Document ID field (also known as Document Number or Transfer Number in GP) on the in-transit transfer. ITT Line Num is part of the primary key for ITT line items and is less visible. ITT Line Num can be viewed in SalesPad by going to In-Transit Transfer Search, selecting an ITT document, and adding the Line Item Seq column to the Line Items grid. Note that the grid also has fields for Line Seq and Service Line Seq, but they are different and cannot be used as the ITT Line Num.
Additional Required Fields for PO-less Vendor Receiving
-
Receipt.Vendor_ID
-
ReceiptLine.Vendor_ID
-
ReceiptSerial.Vendor_ID
A vendor must be specified so that the system knows from which vendor the items are being received. This vendor will be assigned on the generated receipt, and the receipt lines will not be tied to PO lines.
Additional Required Fields for Shipment/Invoice Receipts
-
Receipt.Receipt_Type
-
Receipt.Vendor_Doc_Num
Receipt Type is normally not required. It defaults to In-Transit Inventory if the spreadsheet row specifies a value for the ITT Doc Num column, or Shipment if ITT Doc Num is blank or missing from the spreadsheet. However, if a user wants to enter a Shipment/Invoice receipt, they must specify that Receipt Type in the spreadsheet. Because Receipt Type is stored as an integer in the database, a row must have the number “3” in the Receipt Type column to create a Shipment/Invoice receipt, instead of specifying “Shipment/Invoice” directly. The supported receipt types and their integer values are:
|
Integer to use in spreadsheets |
Receipt Type |
|
1 |
Shipment |
|
3 |
Shipment/Invoice |
|
8 |
In-Transit Inventory |
Additional Required Fields for Inventory Serial Num User Fields
-
SerialUserFields.Item_Number
-
SerialUserFields.Serial_Num
Inventory Serial Num UDFs can be supplied via the SerialUserFields table. Because Import Manager’s design philosophy dictates that each table requires its primary keys, Item Number and Serial Num must be included and mapped to the correct spreadsheet columns for Inventory Serial Num user fields to import. All available serial item UDFs will be available on the SerialUserFields table for importing.
Notable Optional Fields
-
Receipt.Batch
-
ReceiptSerial.Serial_Lot_Qty
-
Purchase Receipt User Fields
-
Purchase Receipt Line Item User Fields
Import Manager automatically populates many other fields on the generated receipt and line items from the item master, vendor, purchase order line item, and/or ITT line item records. However, there are a few additional fields which are worth noting.
The purchase receipt’s batch will default to “SalesPad RC” for vendor-based receiving or “SalesPad ITT RC” for ITT receiving. Users can manually specify a batch via Receipt’s Batch field.
Users can use the Serial Lot Qty field when auto-generating serial numbers to specify the number of numbers to generate. Import Manager ignores the Serial Lot Qty field when a row manually specifies a serial number. The serial number column for the record in the spreadsheet must be “AUTO ASSIGN” to trigger this serial number auto-generation.
Purchase Receipt user fields are available for import alongside other receipt fields, while Purchase Receipt Line Item user fields are available for import alongside other receipt line fields.
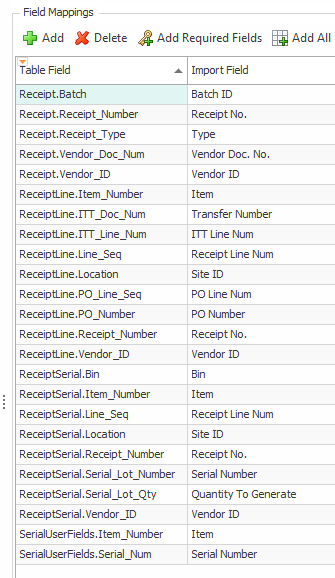
Example Mapping
This screenshot shows a sample mapping for all of the fields which have been mentioned so far.
Usage
Like most imports, the Purchase Receipt Inventory Serial Num import can be run from Import Manager via the Run Import button. It is also possible for users to run this import via the Receiving screen’s Serial Item Receipt Import plugin. This allows users to receive via spreadsheets without having access to Import Manager’s setup screen.

Inventory Adjustment Import Updates For Serial Item UDFs
Import Manager already provided the ability to import inventory adjustments. SalesPad version 5.4.1 added the ability to import Inventory Serial Num user defined fields as part of this import. The main use case is to set UDFs for a serial number that is being adjusted into the system. It is possible to set serial UDFs for a serial number which is being adjusted out as well, but this is less common because the UDF values would not be easily visible after posting the adjustment.
Row Consolidation
By default, the import will create one new inventory adjustment and will create a line item on that adjustment for each row in the spreadsheet. If the Batch Num field is mapped to a spreadsheet column and that column has values in the spreadsheet, then the import will create a new inventory adjustment for each unique Batch Num instead.
As of SalesPad 5.4.12, there is an Inventory Adjustment Import Line Consolidation setting which controls whether the import will group similar rows onto the same adjustment line. Fulfillments will be grouped together on a single line item if the import definition is selected in that setting and the rows share the following traits:
-
The rows are for the same inventory adjustment
-
The rows have the same Item Number, Unit of Measure, and Site
-
The rows have the same Unit Cost if mapped and specified
-
The rows have the same adjustment direction (e.g. a row with 4 quantity can group with a row that has 2 quantity, but not with a row that has -8 quantity)
Setup
In Import Manager, create a new import definition and select InventoryAdjustment as the table. Then create field mappings to map SalesPad fields to columns in the spreadsheet.
Required Fields
When adjusting in a serial number with user fields, the following fields are required:
-
Item_Number
-
Quantity
-
UOfM
-
Site
-
Serial_Lot
-
SerialUserFields.Item_Number
-
SerialUserFields.Serial_Num
Both Item Number fields should map to the same column in the spreadsheet. Likewise, Serial Lot and Serial Num should both map to the same column.
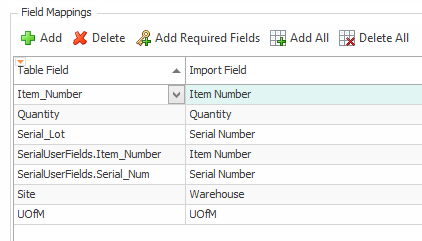
Example Mapping
This screenshot shows a sample mapping for all of the required fields.
Usage
Users can only run the Inventory Adjustment import in Import Manager via the Run Import button. After running the import, the adjustment will be visible in SalesPad and GP. However, the UDF values will not be visible in SalesPad right away. Once the Inventory Adjustment document is posted, the items will enter the system, and then the serial UDFs can be viewed on the Equipment Maintenance screen which is accessible by selecting a serial number in the Equipment Lookup. If a user needs to view the serial UDFs before posting, they can be found in the spxInventorySerialNum table in the database.
Inventory Serial Num Mass Update Import
Import Manager also has the ability to mass update Inventory Serial Num user defined fields for serial numbers which are already in inventory. Standard serial fields such as Location and Bin are not editable via this import.
Setup
In Import Manager, create a new import definition and select InventorySerialNum as the table. Then create field mappings to map SalesPad fields to columns in the spreadsheet.
Required Fields
InvSerial.Item_Number and InvSerial.Serial_Num are the only required fields.
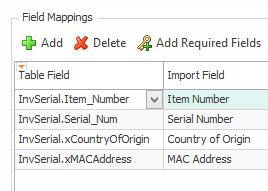
Example Mapping
This screenshot shows a sample mapping for the required fields and a few UDFs.
Usage
Users can only run the Inventory Serial Num import in Import Manager via the Run Import button. Once imported, the updated serial UDF values can be viewed by going to the Equipment Search screen, selecting a serial number, and going to its User Fields tab.
Inventory Lot Num Mass Update Import
Import Manager has the ability to update lot attributes and user defined fields for lot items which are already in inventory.
Setup
In Import Manager, create a new import definition and select InventoryLotNum as the table. Then create field mappings to map SalesPad fields to columns in the spreadsheet.
Required Fields
-
InvLot.Item_Number
-
InvLot.Location
-
InvLot.Lot_Num
-
InvLot.Qty_Type
-
InvLot.Date_Received
-
InvLot.Date_Seq_Number
-
InvLot.Bin (only required for multibin companies)
Lots have many primary keys to support the possibility of a lot number being received or adjusted in multiple times. Mis-matching any of these values will result in an error that “The provided primary key data did not match any lot numbers in inventory”. Users can view all of these fields on the Lot Number Search screen, with the Warehouse column corresponding to the Location field and the Seq column corresponding to the Date Seq Number field.
SalesPad only officially supports the On Hand quantity type, but the following quantity types can also be imported:
|
Qty Type to use in spreadsheets |
Integer in the database |
|
On Hand |
1 |
|
Returned |
2 |
|
In Use |
3 |
|
In Service |
4 |
|
Damaged |
5 |
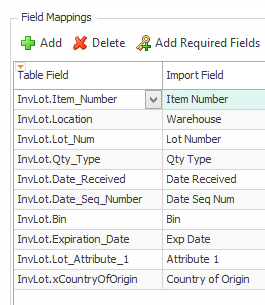
Example Mapping
This screenshot shows a sample mapping for the required fields and a few other fields.
Usage
Users can only run the Inventory Lot Num import in Import Manager via the Run Import button. Once imported, lot dates and user fields can be viewed by going to the Lot Number Search screen and looking at the grid, or selecting a lot to open its card. Lot attributes can be viewed by going to Lot Number Entry, clicking the Lot Attributes dropdown, and selecting Copy To.
In-Transit Transfer Fulfillment Details Import
The In-Transit Transfer import definition (called ServiceTransfer) was updated in SalesPad 5.4.12 to allow users to specify serial fulfillment information for ITT lines. This fulfillment information can be defined for existing ITTs, and it can also be used to create new ITTs with new fulfilled lines. All other ServiceTransfer import functionality works as it did previously, with some new data validation checks that help prevent prohibited values.
The new ITT fulfillment logic is similar to using the In-Transit Transfer Fulfillment plugin in ITT Entry, and it has the following features and restrictions:
-
This import automatically creates new ITTs and line items as needed, so users do not need to manually create ITTs ahead of time
-
Updating a serial number on an ITT requires removing and then re-inserting it
-
Removing a serial number from an open ITT must be done manually via the In-Transit Transfer Fulfillment plugin or in GP
-
Serial Numbers must exist in the system at the time of fulfillment
Note that this documentation will focus on serial-tracked fulfillment, but lot-tracked and bin-tracked fulfillment is also fully supported.
Row Consolidation
If a row has a blank Order Document ID, the import will create a new In-Transit Transfer. If multiple rows have a blank Order Document ID, the import will group together similar rows and put them on the same new ITT instead of creating an ITT for each row. Furthermore, rows will be grouped together on a single line if they have the same values for all fields which are prefixed with “ITTLine.”.
This row consolidation is disabled by default, but it can be enabled for specific import definitions with the Service Transfer Import Line Consolidation setting. If an import definition is selected in that setting, then the rows will be consolidated as described above.
Setup
In Import Manager, create a new import definition and select ServiceTransfer as the table. Then create field mappings to map SalesPad fields to columns in the spreadsheet.
The SalesPad fields include fields from 4 different tables: Service Transfer, Service Transfer Line, Service Transfer Serial Lot, and Serial User Fields. The Serial User Fields table is optional and does not require any mappings unless users want to import Inventory Serial Num UDF values. The other tables have a variety of required fields.
If a field exists in multiple tables, each version of that field should be mapped to the same column in the spreadsheet. For example, Order_Document_ID is a field on the Service Transfer, Service Transfer Line and Service Transfer Serial Lot tables. If a user wants to map that field to a spreadsheet column called OrderDocID, they should create three field mappings to map Order_Document_ID on each table to the same OrderDocID column in the spreadsheet.
Required Fields
-
ITT.Order_Document_ID
-
ITTLine.Order_Document_ID
-
ITTFulfillment.Order_Document_ID
-
ITT.From_Site
-
ITTLine.From_Site
-
ITT.To_Site
-
ITTLine.To_Site
-
ITTLine.Item_Number
-
ITTFulfillment.Item_Number
-
ITTLine.Line_Item_Seq
-
ITTFulfillment.Transfer_Line_Item_Seq
-
ITTLine.Transfer_From_Qty
-
ITTFulfillment.Quantity (should be 1 for serial-tracked items)
-
ITTFulfillment.Serial_Lot_Num
-
ITTFulfillment.Serial_Lot_Seq_Num
-
ITTFulfillment.From_Bin (only required for multibin companies)
-
ITTFulfillment.To_Bin (only required for multibin companies)
The Serial (Lot) Number, Item Number, Site, and Bin fields are straightforward. To set the fulfillment for a line, the system must know what is being fulfilled and where it should come from. It is important to note that the From Site and To Site in the header do not need to match the From Site and To Site on the line items, so these fields should be mapped to separate sheet columns if that is a valid use case. The Bin fields are only required for multibin companies.
The Order_Document_ID is required due to a design philosophy of Import Manager that each import definition must require its database primary keys. While spreadsheets must include column headers for Order Document ID, it is fine and even expected for those columns to not have any values when creating new ITTs. This is also true for Line Item Seq and its fulfillment counterpart, Transfer Line Item Seq, which can also be left blank for new lines. These values will be determined at save for new ITTs.
Serial Lot Seq Num is another field that can be left blank. It represents the ordering of the fulfillment details, which is usually determined at save but can be defined by the user if they wish. The only time it is required is if the user is fulfilling different quantities of the same Lot to the same line.
Transfer From Qty is the total quantity of the ITT line and is not to be confused with the quantity fulfilled. ITTFulfillment.Quantity is the amount of inventory that needs to be fulfilled. For serial-tracked items this is always 1, but for lot- or bin-tracked it can be any value greater than 0. While these two fields may often be the same value, it is recommended that the mappings and spreadsheet separate these fields. For example, in order to create and fulfill an ITT line that is serial-tracked and has a Transfer From Qty of 3, three separate import rows are required. Each row defines one serial number to fulfill, and all of those lines will set ITTFulfillment.Quantity to 1 and Transfer From Qty to 3. The Service Transfer Import Line Consolidation setting must be enabled to support this scenario.
Notable Optional Fields
-
Service Transfer User Fields
-
Service Transfer Line User Fields
-
Serial User Fields
Import Manager automatically populates many other fields on the generated ITT and ITT lines from the item master and From Site. However, there are a few additional fields which are worth noting.
Service Transfer user fields are available for import alongside other ITT fields, while Service Transfer Line Item user fields are available for import alongside other ITT line fields. Serial User Fields can also be imported if they are defined in the mapping.
Example Mapping
This screenshot shows a sample mapping for all the fields which have been mentioned so far.
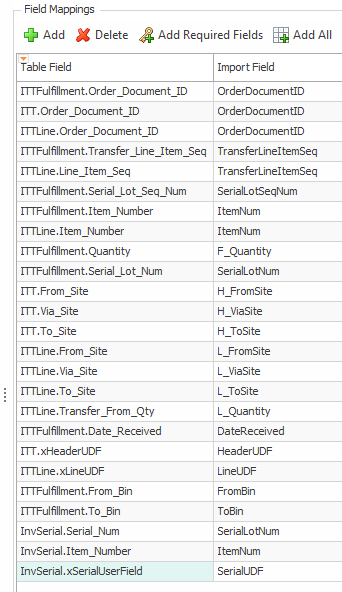
Some of the import columns in the above example are preceded by F, H or L. This is a style choice and can be used to help easily determine which field is for which table when the field names are the same, but the values can’t be shared. For example, H_FromSite is the header’s From Site field, and L_FromSite is the line’s From Site field, because these values can be different between the ITT header and its lines. F denotes the fulfillment table in the examples above, so F_Quantity is the fulfillment quantity and L_Quantity is the line’s quantity.
Usage
Like most imports, the ServiceTransfer import is run from Import Manager via the Run Import button. The new and updated ITTs can be found in the In-Transit Transfer Search and launched for viewing in ITT Entry. Applied fulfillments can be reviewed in the In-Transit Transfer Fulfillment plugin.
SalesPad Support
Comments