Overview
SalesPad now offers a Workflow Visualizer, a helpful new feature that generates a visual flowchart diagram of your workflow so you can see exactly how your documents route through your processes. Review which queues make up your workflow, where workflow rules will trigger to reroute documents, and which automated plugins run along the way. This tool will help you understand and streamline your existing workflow, see how new changes will affect it, and catch missed configuration and orphaned queues.
Setup
Securities
The Workflow Visualizer is enabled by default. If access needs to be adjusted, there are sub-securities available for the two screens where it is available:
-
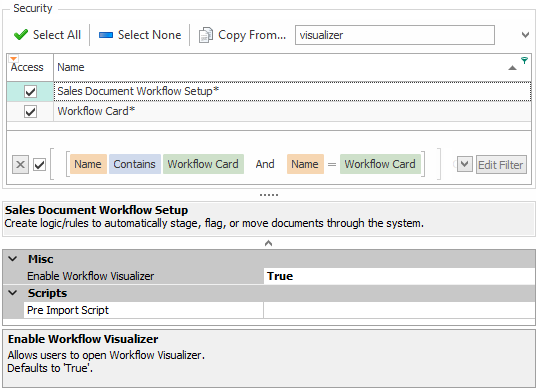
Sales Document Workflow Setup > Enable Workflow Visualizer - Allows users to open Workflow Visualizer. This affects the Sales Document Workflow Setup screen.
-
Workflow Card > Enable Workflow Visualizer - Allows users to open Workflow Visualizer. This affects the Business Object Workflow Setup screen (used for PO workflow, customer workflow, item workflow, etc).
Settings
There is one setting for the Workflow Visualizer, which is automatically set to a default value that does not need to be adjusted unless you encounter any issues with generating the flowchart diagram.
-
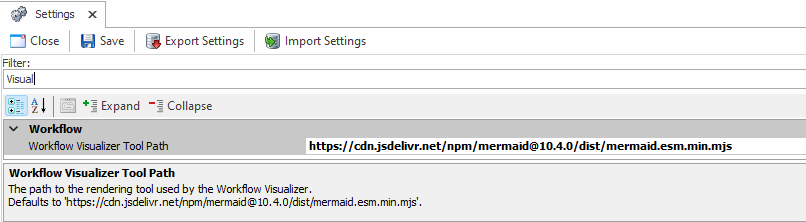
Workflow Visualizer Tool Path - The path to the rendering tool used by the Workflow Visualizer. Defaults to “https://cdn.jsdelivr.net/npm/mermaid@10.4.0/dist/mermaid.esm.min.mjs”.
Usage
The Workflow Visualizer is available in both Sales Document Workflow Setup and Business Object Workflow Setup. This walkthrough will focus on Sales Document Workflow, but the principles are the same for Business Object Workflow.
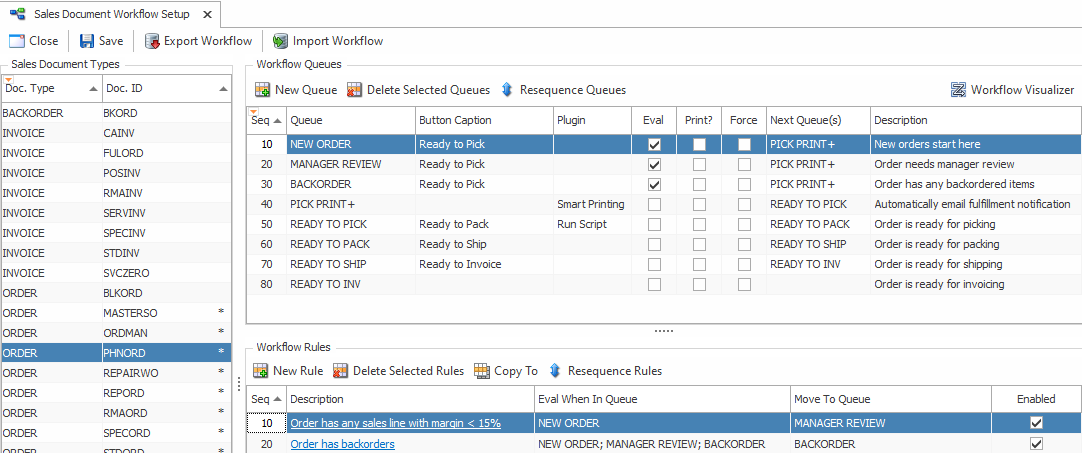
In the Sales Document Workflow Setup screen, there is a new Workflow Visualizer button available at the top right of the screen. Clicking this button launches a popup window that generates the flowchart diagram for the currently selected workflow.
The window can be resized as needed, and the flowchart can be scrolled vertically and horizontally. Hold CTRL while scrolling with the mouse wheel to zoom in and out.

Flowchart Structure
Workflow Queues
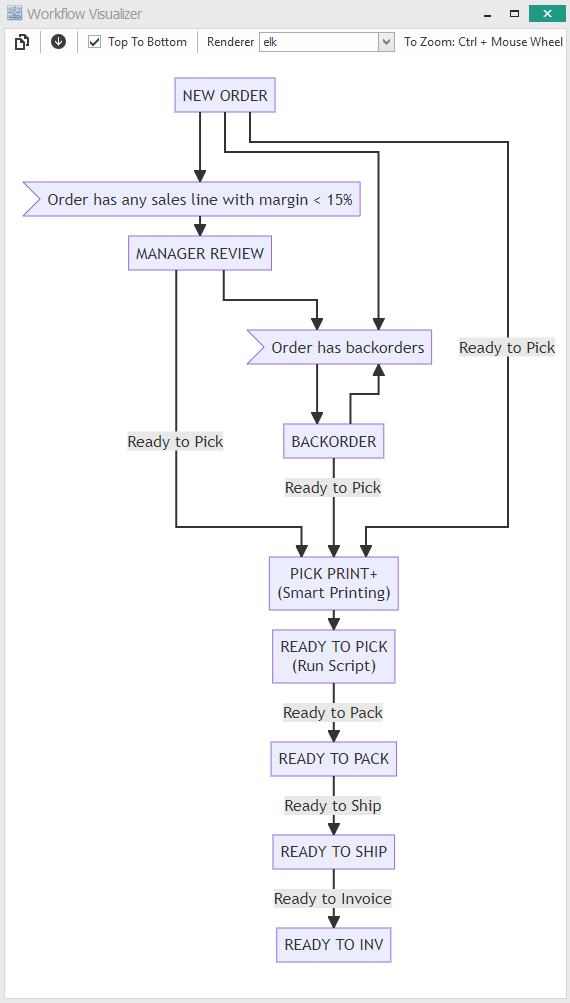
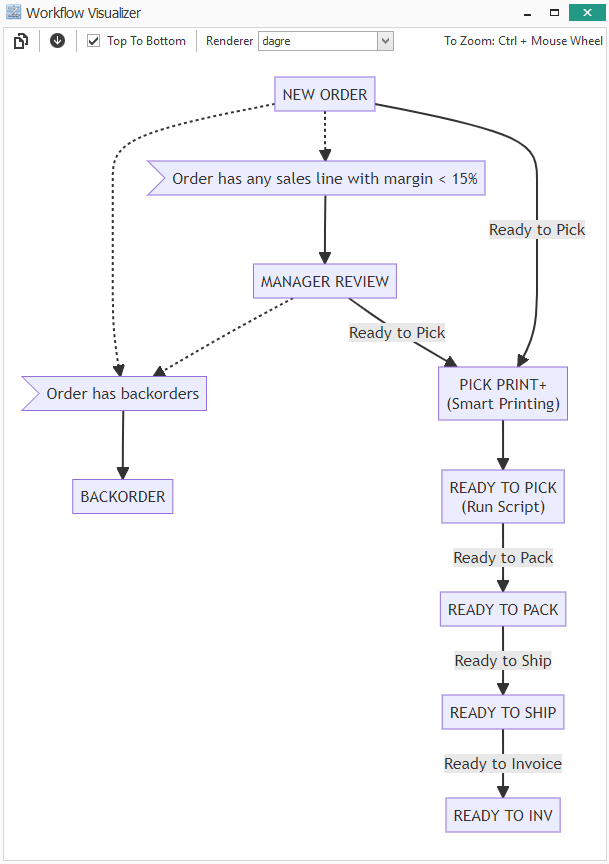
In the flowchart, each workflow queue is displayed as a rectangle, which indicates a step in the workflow process. Arrows connect the queues, leading from the originating queue and pointing toward the destination queue. If that connection has a Button Caption configured in workflow, then that caption will be displayed on the arrow.
Workflow Rules
Workflow rules appear as flags. Arrows pointing into workflow rules show when that rule will be checked. If the rule passes, then the document would continue along the path that leads away from that rule. If the rule fails, then the next rule is checked, and this continues until no rules are left; then the document would continue along the path that leads to a queue instead of a rule. One of the renderer options shows these conditional paths as dotted lines, and the other shows them as solid lines.
Workflow Plugins
Workflow plugins are noted in the same rectangle as the queue to which they are attached, shown in parentheses after the workflow queue name. This means that documents forwarding out of that queue will trigger that plugin.
This includes processing like Run Scripts and Smart Printing, although it does not include any more specific information regarding the scripts or printed/emailed reports.
Flowchart Generation Options
There are a few options available to change how the flowchart diagram is created:
Top To Bottom
-
When checked, the flowchart will flow from top to bottom.
-
When unchecked, the flowchart will flow from left to right.
Renderer
-
The dagre renderer creates the flowchart with curved lines instead of straight lines, and with dotted lines to indicate the conditional workflow rule paths. The previous screenshot uses the dagre renderer.
-
The elk renderer creates the flowchart with straight lines and no dotted lines. The following screenshot uses the elk renderer.
Flowchart Export
There are two options for exporting the flowchart at the top left of the Workflow Visualizer popup window.
The Download SVG button will download the entire visual flowchart diagram as an SVG file, which can be launched for viewing at any time. This lets you save your visual workflow for later reference, and refer to it when making changes.
The Copy To Clipboard button will copy the flowchart code to the clipboard. This is useful when there is an issue with the network or the renderer that is causing the visual flowchart to not appear properly in SalesPad.
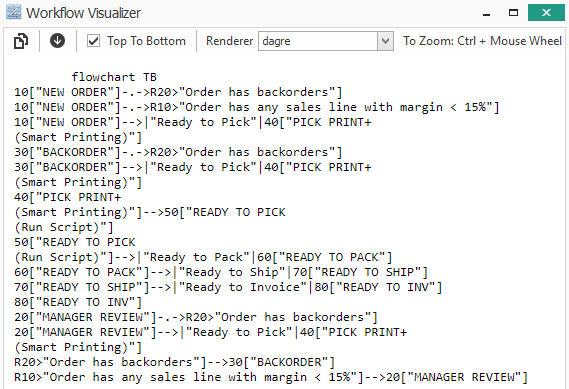
When a network or renderer issue occurs, the flowchart code remains displayed in the Workflow Visualizer popup window. However, you can still view the flowchart by copying that code using the Copy To Clipboard button and pasting it into the code side of the online Mermaid flowchart renderer. Continue to the next section for more information on Mermaid.
Mermaid Flowchart Renderer
SalesPad uses an open source flowchart generator named Mermaid to create the visual flowchart diagrams. Mermaid’s API is called with the workflow code that is generated in SalesPad, and Mermaid renders the visualization that is displayed in SalesPad. The only data sent to Mermaid is the flowchart code, with no other identifying information, and that code is not stored by Mermaid.
Network issues or Mermaid API version issues could cause the flowchart to not display properly within SalesPad. When this happens, the Copy To Clipboard button can be used to copy the flowchart code, and then you can navigate to mermaid.live and paste into the code section on the left, replacing all code that was already there. This will allow you to view and interact with the flowchart diagram within Mermaid’s interface, and the flowchart can still be downloaded from Mermaid via the Actions in the lower left.

Finding Workflow Issues
Visual flowchart diagrams make it much simpler to find some kinds of issues in workflow, such as dead end queues and orphaned queues.
Dead End Queues
When a workflow queue does not have a configured Next Queue, then it is a dead end. This means that opening a document that is in that queue will not show the Forward button to forward that document in workflow. This may be intentional if the queue is the final queue in the workflow (e.g. an order’s last queue before it is transferred to invoice), or if a process requires a user to manually change the current queue in order to move sales documents out of that queue (e.g. a manager review queue where the manager must decide where the order needs to go next).
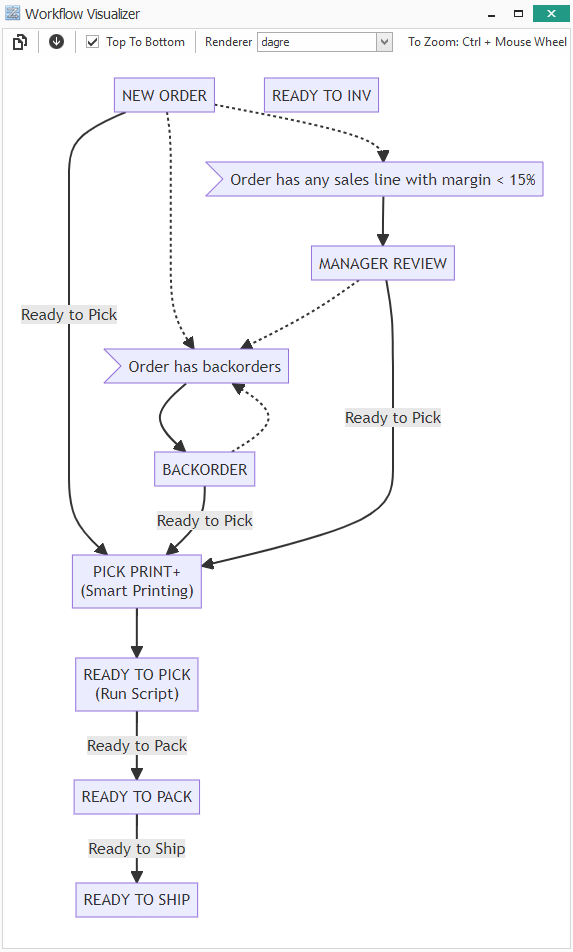
Any queue that has arrows leading into it, but no arrows leading out of it, is a dead end queue. In the following workflow example, the READY TO INV queue is an intentional end queue. But the BACKORDER queue has been erroneously disconnected from its Next Queue. This would be fixed by setting the BACKORDER queue’s Next Queue back to PICK PRINT+, which would make it match the previous screenshots again.
Orphaned Queues
When a workflow queue does not have a configured Next Queue, and it is not a Next Queue for any other queues, then it is an orphaned queue. This could be intentional if a process requires users to manually move documents to a particular queue, and then users also need to manually move documents out of that queue. This is typically not advisable because it interrupts the flow of workflow.
Any queue that does not have arrows connecting it to or from any other queues is an orphaned queue. In the following workflow example, the READY TO INV queue is displayed at the top without any connections. This would be fixed by setting the READY TO PACK queue’s Next Queue back to READY TO INV, which would make it match the previous screenshots again.
SalesPad Support
Comments