Overview
Intercompany EDI communications allow two companies to send EDI documents to one another without being processed by a third party intermediary EDI processor like SPSCommerce. A main use case is when two internal companies directly purchase from each other, and there is a need to automate this process. This requires specific configuration within SalesPad, as well as an SFTP server that both companies can access.
Cavallo recommends that this setup only be used for EDI communications between two internal companies. EDI with external entities should still be processed through a third party EDI processor, such as SPSCommerce.
Scenario
The scenario this documentation covers is an internal company (Company 1) sending an outbound 850 to another internal company (Company 2), which will import that 850 and automatically create a sales order. However, intercompany EDI communications are possible for all supported EDI documents, not just the 850. The only changes required would be additional Business Object Mappings for any other EDI documents, and updates to the Data Cross Reference for the other EDI documents.
Setup
Server Connections

Company 1 will generate outbound 850 documents for their purchase orders and send those to Company 2 to be automatically created as sales orders. Log into SalesPad using Company 1’s connection.
In the EDI tab in the main ribbon, launch the Server Connections screen. Click the New button to create a new server connection, then edit the record according to the following requirements:
-
Enter a Description that will indicate which connection this is, in case multiple EDI connections are necessary for this company.
-
The Host Name and Port number must match the SFTP server.
-
The Username and Password should be provided by whoever created the SFTP server.
-
Provider must remain SPS Commerce.
-
Connection must remain Renci SSH.Net.
-
Server Directory Upload is the directory in which the generated outbound EDI documents will be uploaded.
-
Server Directory Download is the directory in which the inbound EDI documents must be placed if this company will be importing EDI documents. For the scenario this documentation covers, this field is not required.
-
File Location is the local directory where copies of the EDI documents are stored. These copies are used when reprocessing failed documents or when reviewing EDI documents.
-
EDI Schedule is required for automating importing EDI documents, but this is not required in this scenario.
-
Is Enabled must be checked.

Company 2 will receive the outbound 850 that Company 1 sent and process it as an inbound 850 to automatically create a sales order. Log into SalesPad using Company 2’s connection.
In the EDI tab in the main ribbon, launch the Server Connections screen. Click the New button to create a new server connection. Company 2 will have similar setup to Company 1:
-
It requires a Description.
-
The Host Name, Port, Username, Password, Provider, and Connection must match Company 1’s fields.
-
The Server Directory Upload is not required in this scenario, but it is where outbound EDI documents would be sent from this company.
-
Server Directory Download must match Company 1’s Server Directory Upload. This is where Company 2 looks to download inbound EDI documents that need to be processed.
-
EDI Schedule is required if the order creation process needs to be automated. A new schedule can be created in the EDI Scheduler, but setup for this will not be covered in this documentation.
-
File Location is the local directory where copies of the EDI documents are stored for review and any necessary reprocessing.
-
Is Enabled must be checked.
Business Object Mapping
EDI mappings must be created for each company. This maps fields on the EDI document to their corresponding fields in SalesPad. This documentation will cover the requirements for the Transaction section of the Business Object Mapping, but it will not cover the Element section. For more information on this setup screen, refer to this documentation.

For Company 1, in the EDI tab in the main ribbon, launch the Business Object Mapping screen. Click the New button in the Transactions section to create a new transaction, and edit the record according to the following requirements:
-
Set a Mapping Name to describe which document is configured, e.g. “850 Outbound”.
-
If EDI Server does not appear in the column headers, right click and choose Column Chooser and then drag and drop the EDI Server column into the column headers. From the dropdown of EDI Server, choose the EDI Connection that was created previously.
-
The Provider must be SPS Commerce.
-
In the EDI column, select 850 and tab off to automatically fill in some descriptive columns.
-
Set the Direction to be “Out” and the Document Type to be “Purchase Order”.
-
Select a Document Subtype of either Standard or Dropship.
-
The Trading Partners column can be set to any unique value, but it must be all caps with no spaces. This value is used by Company 2 to determine which Data Cross Reference will be used when processing the inbound document. Data Cross References will be discussed later in this documentation.
-
Is Enabled must be checked.
-
The Elements section for this outbound 850 must be set up to configure which sales order fields are inserted into which data elements for the 850 document.

Business Object Mapping setup for Company 2 will be very similar to setup for Company 1:
-
Set a Mapping Name to describe which document is configured, e.g. “850 Inbound”.
-
Set the EDI Server to the server connection that was created previously.
-
The Provider must be SPS Commerce.
-
In the EDI column, select 850 and tab off to automatically fill in some descriptive columns.
-
Set the Direction to be “In” and the Document Type to be “Sales Document”.
-
For the Document Subtype, select the sales document ID that will be set for the sales orders when they are created.
-
For Batch, select the workflow queue/batch where the new sales orders will begin.
-
Trading Partner must be set to the same value that was set for Company 1.
-
The Elements section for this inbound 850 must be set up to configure which sales order fields are populated with which data elements from the 850 document.
Data Cross Reference
A Data Cross Reference will need to be created for both Company 1 and Company 2. This is used to translate values from one system into the other. For example, if Company 1 has an item called HD40 but Company 2 calls that same item 40HD, in order for that item to be translated properly, an item master data cross reference must be created. For more information on this setup screen, refer to this documentation.

For Company 1, in the EDI tab in the main ribbon, launch the Data Cross Reference screen. Click the New button to create a new partner, and edit the record according to the following requirements:
-
Set the Trading Partner ID to the trading partner value set in the Business Object Mapping.
-
Partnership should be “Vendor”.
-
Vendor ID should be set to the vendor that is assigned to the purchase orders that will be sent to Company 2.
-
EDI must be “850 Purchase Order”.
-
Is Enabled must be checked.
-
Additional configuration is available in the tabs in the bottom portion of this screen. However, it is not required to set up these tabs for the outbound document because the translation of this data occurs on the inbound side (i.e. Company 2). If testing determines that some setup on this end is required, then update this configuration as needed.

For Company 2, in the EDI tab in the main ribbon, launch the Data Cross Reference screen. Click the New button to create a new partner, and edit the record according to the following requirements:
-
Set the Trading Partner ID to the trading partner value set in the Business Object Mapping.
-
Partnership should be “Buyer”.
-
Customer Num should be set to the customer that will be assigned to the created sales orders.
-
EDI must be “850 Purchase Order”.
-
Is Enabled must be checked.
-
Additional configuration is available in the tabs in the bottom portion of this screen, which are used to translate data between Company 1 and Company 2. If there are any conversions that need to occur for item numbers, UofMs, etc, then this should be configured here. This documentation will not cover this portion of the setup, but it is recommended that pre-existing data cross references could be used as a reference when creating new cross reference records.
Processing
In Company 1, create a purchase order using the vendor that was assigned in the Data Cross Reference. Once the PO is complete, from the Action menu, trigger the “EDI 850 - Purchase Order” plugin and confirm the prompt. A success message will appear if the 850 was generated correctly. The EDI Processing screen can also be used to confirm that the 850 was properly sent.

In Company 2, open the EDI Processing screen and select Retrieve or Start. If a service is active, go into EDI Service and reconfigure the service. The system will then go out and grab the 850 generated by Company 1 and process it into a sales document.

For more information on the EDI Processing screen, refer to this documentation.
Automation
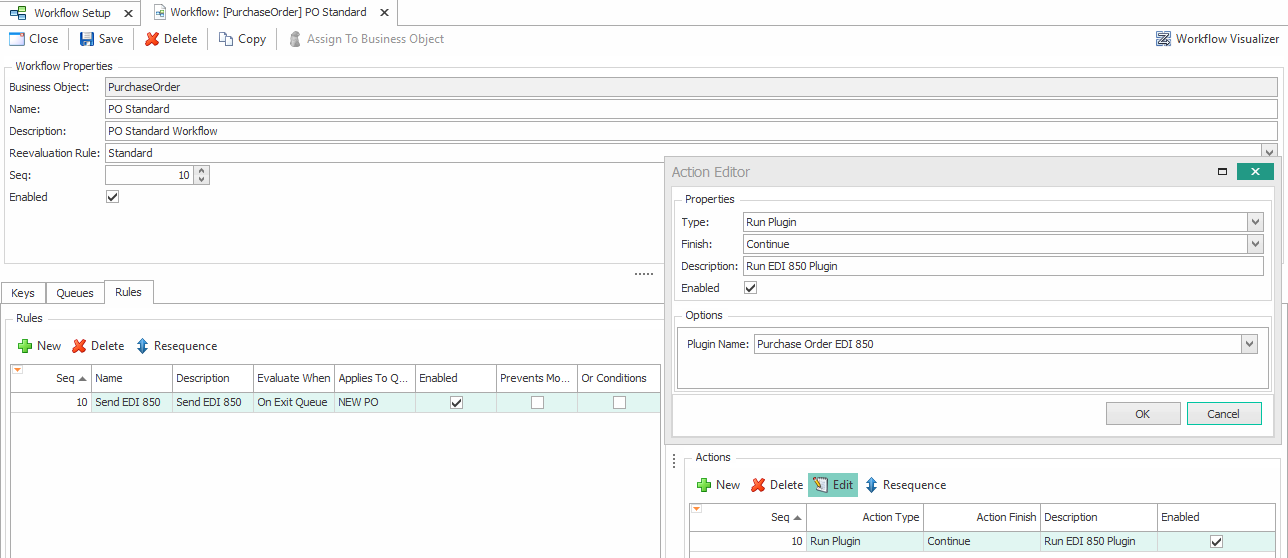
It is possible to fully automate sending the outbound 850 from Company 1 by leveraging Purchase Order Workflow. The Purchase Order EDI 850 plugin can be automatically triggered when a purchase order enters or leaves a specified queue, which will then generate the EDI 850 document as if the user had manually activated the plugin for that PO. Automating this step via workflow eliminates the possibility that users could forget to send the 850, as they would simply need to forward the PO in workflow.
SalesPad Support
Comments