How to prepare:
-
Complete at least one round of setup and testing with the Cavallo Professional Services team, and have at least one trading partner submitting transactions in production.
-
Engage the SPS team for validation testing
-
Will need test files provided by SPS (note: setup & configuration can be done prior to the test file being received)
-
-
Ensure you have access to a test database that mirrors the most recent production data
-
Compile a list of all trading partners and documents
-
Complete the Data Cross-Reference Excel Template for each trading partner *Please do not add additional columns to the sheet
-
Gather the Trading Partner ID (TPID) provided by SPS
-
If UCC-128 Label required, will need ‘Label UID’ provided by SPS
-
SalesPad/GP customer number for each trading partner
Trading Partner Cross Reference Setup
-
Select the ‘Server Connections’ button on the top ribbon to confirm that the connection is accurately set up to the information provided by SPS (ex. Description, Host Name, Port, Username, Password, etc.) If it's already there it should be fine to move forward.
-
Open SalesPad in your test company, click on ‘EDI’ tab, then click on ‘Data Cross Reference’

-
Click ‘New’, under the ‘Trading Partner ID’ column enter the TPID (for accuracy, we recommend copying and pasting the values provided by SPS using your computer’s clipboard)
-
Tab over to the ‘Partnership’ column, click on drop-down arrow, select ‘Buyer’
-
Tab to the ‘Customer Num’ column, enter in SalesPad/GP customer number [Cust#] (if unknown, click the ellipse to open Customer Search to look up the Customer Number.)
-
Tab to the ‘EDI’ column, in the drop-down select the documents needed for this trading partner
-
(IF UCC-128 LABEL IS REQUIRED) Tab to the ‘Label UID’, enter in the SPS provided Label UID.
-
‘Is Enabled’ is checked by default.
-
‘Packaging Generation’ is set to none by default. This field allows for package generation upon incoming 850 XML files. When testing the ASN, this field may need to be modified depending on customer-specific requirements.
-
Once all columns are updated to the required information, hit ‘Save’
-
NOTE: The row that is highlighted to a specific trading partner will reflect the details in the bottom screen.
DATA CROSS REFERENCE

-
To enter in the Data Cross References:
-
Start with the ‘Addresses’ tab, hit the carrot to the right of the ‘New’ tab, then select ‘Import From Excel’. A box will appear; navigate to the Data Cross-Reference Excel Template (linked above) that is saved to the users desktop. Select, file and click open.
-
A message box will appear, stating “Multiple worksheets are available. Please choose one:’, choose ‘Address Codes’ in the dropdown, click ok. Address codes will be populated from the template.
-
-
For the ‘Items’ tab, copy the step above: hit the carrot to the right of the ‘New’ tab, then select ‘Import From Excel’. A box will appear, navigate to the Data Cross-Reference Excel Template that is saved to the users desktop. Select, file and click open.
-
A box will appear, stating “Multiple worksheets are available. Please choose one:’, choose ‘Items’ in the dropdown, click ok. Items will be populated from the template.
-
-
‘UofMs’: Users will need to enter in the ‘Partner Unit of Measure’ column that is in the 850 XML file. Choose the ‘Unit of Measure Schedule’ in the drop down. Choose the ‘Unit of Measure’ in the drop down.
-
‘Convert Type’: select if you are going to do a Unit of Measure conversion.
-
‘Convert Unit’: enter info if you are going to do a Unit of Measure conversion.
-
-

-
‘Currencies’ tab: If the trading partner is sending currency in the 850 XML you need to click ‘New’ and select the currency in the drop down; hitting the ‘tab’ key will automatically select the cross reference needed.
-
‘Payment Terms tab: If the trading partner is sending payment terms in the 850 XML then click ‘New’ and copy/paste the payment term from the 850 XML file into the ‘Partner Payment Term’ column, tab over then select the correct ‘Payment Term’ from the drop down.
-
‘Shipping Methods’ tab: If the trading partner is sending carrier information in the 850 XML, click ‘New’ then reference the 850 XML file to obtain the carrier information (if applicable.)
-
‘Status Code’ tab: Only applies when using the 870 document. Based on the queue the order is in, it sends the corresponding status code. (note: 870 is not a standard SalesPad integrated document and will require consulting or development assistance)
- Available codes:
- CC: Shipment Complete on (Date)
- DD: Delivered to Destination on (Date)
- DE: Deleted Order
- ED: Expect to Ship By (Date)
- IN: In Process
- PR: Partial Shipment
- Available codes:
-
Item Export Fields Tab: Allows customization of the Excel file generated during the EDI 846 process.
-
‘Generic Values’ tab: uncommonly used, but if needed, Generic Values are set in the business object mapping and lets you define a cross reference for any field, for any value.
Business Object Mapping

-
Select the ‘Business Object Mapping’ button on the top ribbon.
-
Click ‘New’.
-
Under the ‘Mapping Name’ column, in the blank field, enter in [the document number - Trading Partner name]. (This is a free form field that we suggest entering in ex. [850 - Walmart])
-
Tab to the ‘EDI’ Column and select the EDI document that needs to be set up in the drop down.
-
Tab to the ‘EDI Description’: ‘Schema Name’ and ‘Schema Version’ will automatically populate.
-
Under the ‘Direction’ column, select the direction of the EDI document. For reference, SalesPad integrated and supported documents are below:
-
-
-
|
Document |
Direction |
Document |
Direction |
|
|
850 |
Inbound |
870 |
Outbound |
|
|
810 |
Outbound |
940 |
Outbound |
|
|
855 |
Outbound |
945 |
Inbound |
|
|
856 |
Outbound |
846 |
Outbound |
|
|
860 |
Inbound |
The following documents are SalesPad integrated documents, but will require development services when configuring:
|
Document |
Direction |
|
852 |
Outbound |
|
850 |
Outbound |
|
856 |
Inbound |
-
Under the ‘‘Document Type’ column select ‘Sales Document’ in the drop down. When you tab over, the mappings will appear in the ‘Elements’ section below. (When creating the 846, the document type is ‘ItemMaster’. When creating the ‘000’ shipping label, the document type is ‘Shipping Header Single’.)
-
Under the ‘Document Subtype’ column select the ‘ORDER’ and document ID based on the type your business uses. (Ex. ORDER EDI or ORDER STDORD)
-
The ‘Batch’ column is only used for the 850. If setting up an 850 choose the batch name in the drop down for the workflow batch you wish these EDI orders to begin in (i.e.. NEW ORDER or NEW EDI ORDER)
-
Under the ‘Trading Partner’ Column, select the trading partner ID (TPID) that this is for.
-
The ‘Complete Fulfillment’ column is used for the 945 document. This would only be checked if you are setting up a 945 mapping.
-
‘Is Enabled’ column is checked by default.
You will repeat these steps for adding documents in each row as needed, paying attention to the ‘Direction’ column.
DEFAULT CARRIER INFORMATION
Any ship method that will be used during your EDI processing must be entered here. The drop down will have options populated from GP. (If there are no available options then shipping methods are not set up and will need to have GP Partner assist with this.)
-
Under the ‘Shipping Method’ column, select your shipping method in the drop down.
-
Under the ‘Description’ column, this should already be populated with what GP brings in.
-
Under the ‘Carrier Alpha Code’, enter in the Carrier Alpha code provided by the carrier. (if needed, these are provided here: https://en.wikipedia.org/wiki/Standard_Carrier_Alpha_Code)
-
Under the ‘Carrier Trans Method Code’, enter in the code and description provided by the carrier.
-
Under the ‘Service Level Code’, enter in the code and description provided by the carrier.
-
Under the ‘Carrier Routing’, enter in the Carrier Routing provided by the carrier (Note: this is a free form field, that you can make the same as the ‘Shipping Method’)
TESTING
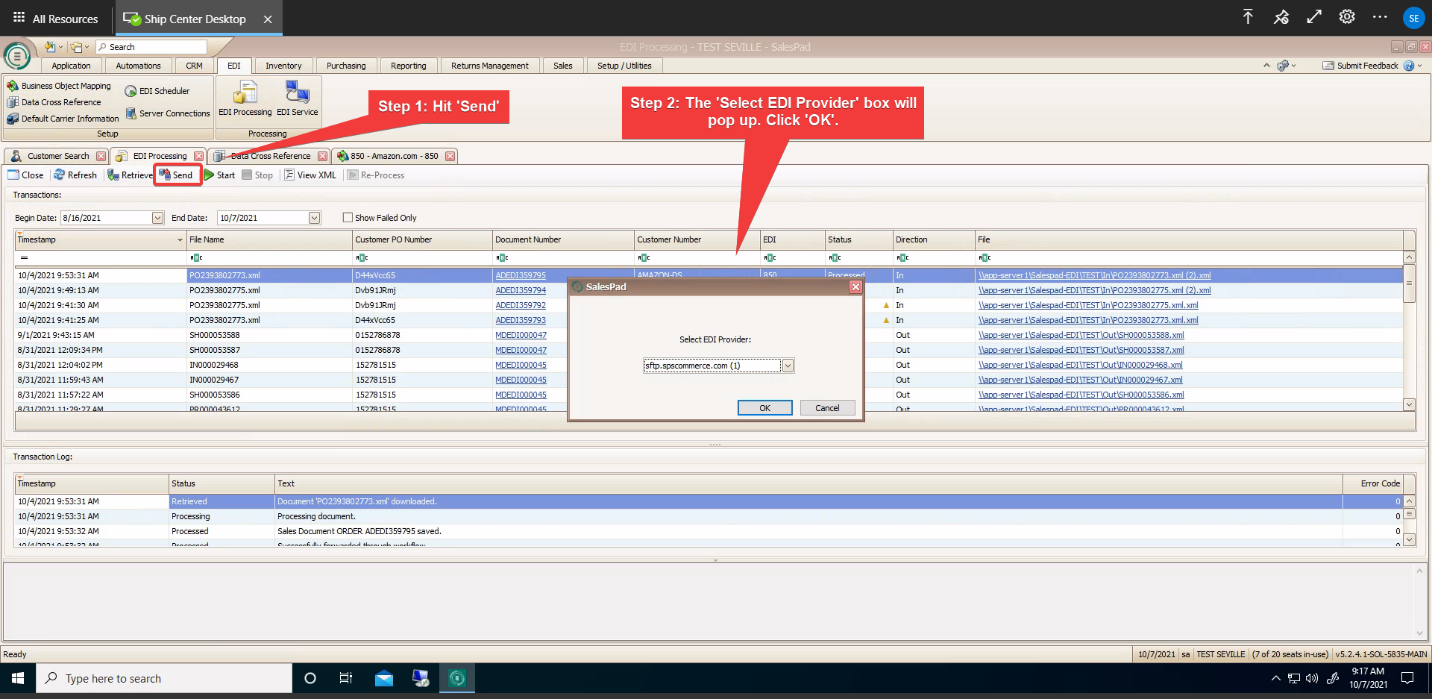
SPS will need to provide the 850 XML test files attachment. Follow these next steps to retrieve the document:
-
Hit ‘Send’
-
The ‘Select EDI Provider’ message box will pop up. Click Ok.
-
File Explorer will open. Navigate to the location you have the test file stored. Select the file and click Ok.

-
The ‘Select a directory’ box will open. Click the dropdown arrow and select ‘Download Test.’ Click Ok.

-
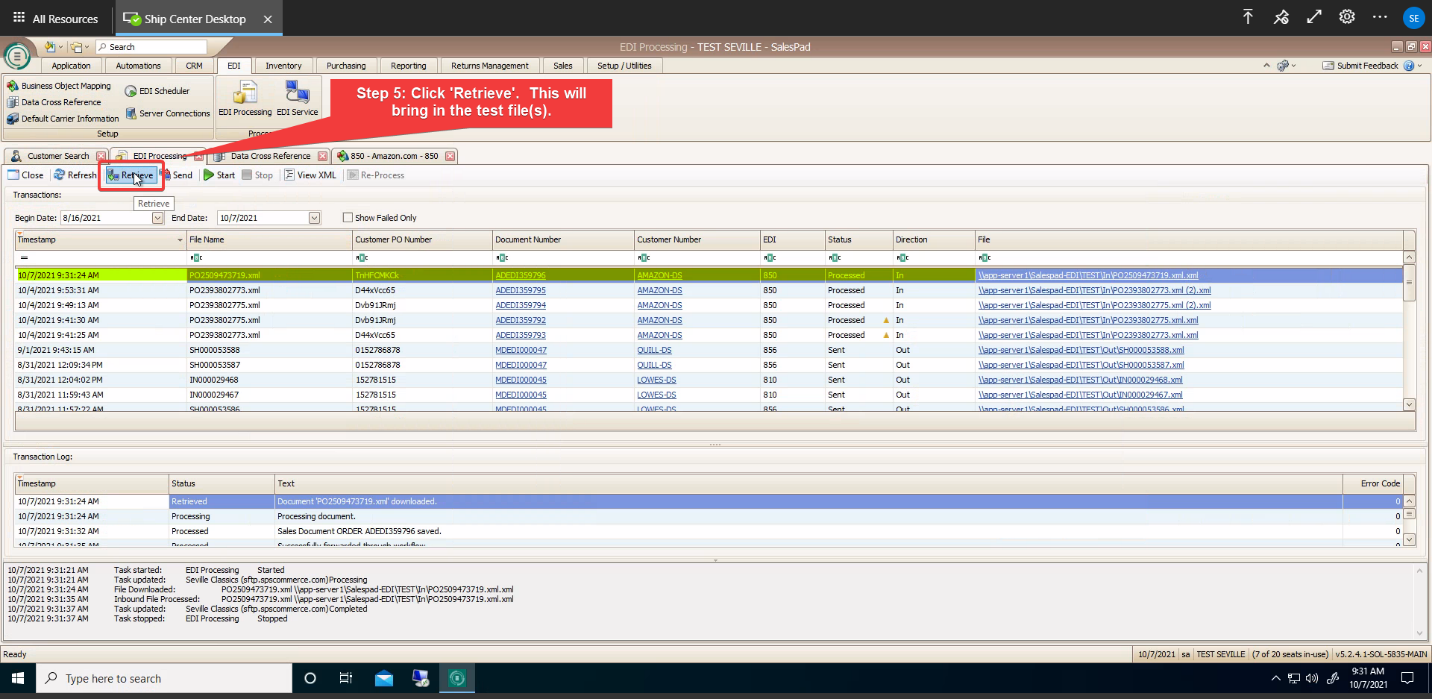
Click ‘Retrieve. This will bring in the test file(s)
-
Once retrieved, open up the sales document and review to make sure it integrated successfully.
-
If there are any errors, view the error message found in the ‘Transaction Log’ screen. Based on the error message, make corrections and reprocess the file. Once processed with no errors, this will create a sales document.
7. You can then begin sending the outbound test files to SPS for validation.
-
SPS will then review the documents sent to them and provide feedback on whether it is successful or requires adjustments.
-
Once all documents required for a trading partner are validated as successful, you are able to coordinate a Go Live date with SPS.
MOVING INTO PRODUCTION
In your TEST database:
-
Navigate to the ‘Data Cross Reference’ button at the top of the ribbon.
-
Highlight the trading partner under the ‘Trading Partner ID’ Column, then click ‘Export Selected’ button above and save the file with the already provided name (don’t change the name) to the desired folder or desktop.
-
Click Save.
-
A pop-up will appear stating ‘Export Complete’, hit ok.
-
-
Navigate to the ‘Business Object Mapping’ button at the top of the ribbon.
-
Highlight all the documents for the desired trading partner (can highlight multiple using the control/ctrl keyboard key) under the ‘Mapping Name’ column then click ‘Export Selected’ button above, and enter in a file name, click save to the desired folder or desktop.
-
A pop-up will appear stating ‘Export Complete’, hit ok.
-
In your LIVE database in SalesPad:
-
Navigate to the ‘Data Cross Reference’ button at the top of the ribbon.
-
Select the ‘Import’ button.
-
A popup will appear for you to select the Trading Partner file to be imported. Click ‘Open’ to bring in the file, and then hit ‘Save’ at the top of the screen.
-
-
Navigate to the ‘Business Object Mapping’ button at the top of the ribbon.
-
Select the ‘Import’ button.
-
A popup will appear for you to select the Business Object Mapping file to be imported. Click ‘Open’ to bring in the file, and then hit ‘Save’ at the top of the screen.
-
Note: You will need to coordinate with the SPS team to activate the flow of documents into production for the desired trading partner.
Jacob Beimers
Comments