Overview
ShipTo lets you monitor and manage your sales orders so you can ship products quickly and reliably. Ship To makes it easy to import your shipment data to UPS or Fed Ex, process the shipment and then write back the shipment costs, shipping date, and package tracking numbers back to your sales orders.
ShipTo integrates with UPS WorldShip, FedEx Ship Manager, Microsoft Dynamics GP and, optionally, Sales Pad. USPS Mail shipments are also supported via UPS Mail Innovations, UPS Sure Post and Fed Ex Smart Post.
Ship To is a Microsoft . NET Framework-based application, which provides a feature rich experience by using best-in-class technology components and techniques to help users find sales documents, manage and process shipments, perform batch shipments and much more. All information is pulled from and saved to the Dynamics™ GP company database - there is no synchronization, duplicated data, or time- delayed access to data.
This guide provides instructions for the installation, setup, and use of Sales Pad® Ship To.
ShipTo Installation & Connection
Installation Requirements
- Supported Operating Systems: Microsoft Windows XP, Vista, Windows 7 and Windows 8
- Ship To requires that the . NET 4 .0 Framework be installed.
- Ship To versions 3 .1 . 125 and higher require that the Microsoft Access Database Engine 2010 be installed. If you are updating to 3 .1.125 or higher, you must install this prior to the Ship To update. Microsoft Access Database Engine 2010 is available free of charge from Microsoft’ s website.
- UPS World Ship® and/or Fed Ex Ship Manager® must be installed on the same computer as Ship To on standalone integrations. UPS WorldShip® can be installed on a different computer on network setups where the UPS database is shared by all UPS workstations. Ship To will connect to the shipping program via SQL.
Note: Because UPS Worldship now enforces strong passwords, the password for the ShipTo login in the UPSWSDBSERVER ( the database instance UPS Worldship installs as their backend database) in Ship To versions 3 .1 . 118 and higher is “ salespadshipto”. The password for all versions prior to 3 .1. 118 was “ shipto”. This password may need to be updated when updating versions.
Note: ShipTo is compatible with UPS World Ship versions 2011 , 2012, and 2013 , and FedEx Ship Manager 2509 to 2605 .
Install Client Program
On each machine to be used as a shipping station, open the Ship To install file, read and accept the EULA ( End User License Agreement) and install the program to the default (or desired) folder.
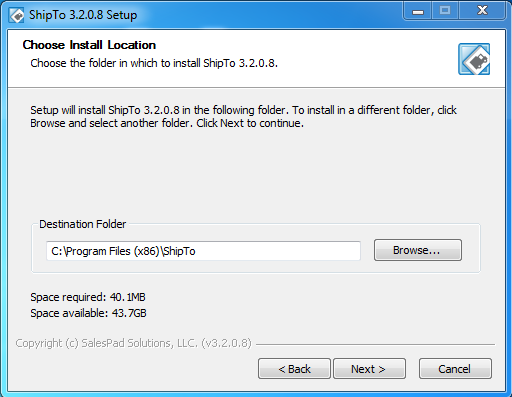
Follow the instructions until the application has been installed. Each machine must also have UPS World Ship and/or Fed Ex Ship Manager installed.
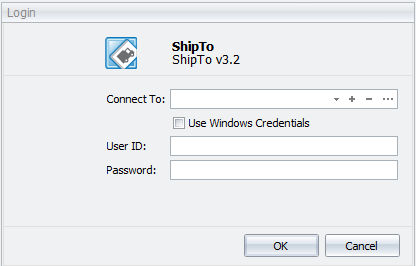
Connecting for the First Time
Before you can begin using Ship To with your Dynamics GP company, you must set up a connection to the company.
- Run ShipTo via the Start Menu icon or the desktop icon
- Click the + in the Connect To: box to set up a new connection
Set Up a New Connection
To create a connection using GP credentials:
- Specify the name of the SQL server hosting the Dynamics GP database
- Enter the User ID and Password used to access the SQL server
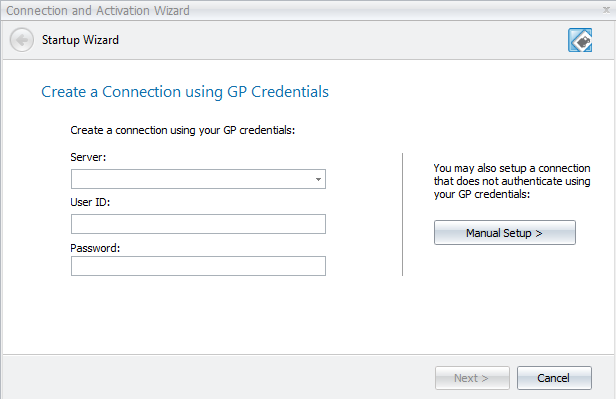
- Click Next, or, click the Manual Setup button to create a manual connection.
Manual setup is the preferred process when SalesPad is also installed. By default, if Sales Pad is installed, SalesPad security will authenticate user name and password
Create a Manual Connection
To create a manual connection:
- Specify a Connection Name, Server Name (the server hosting the database), and the Database used for this connection
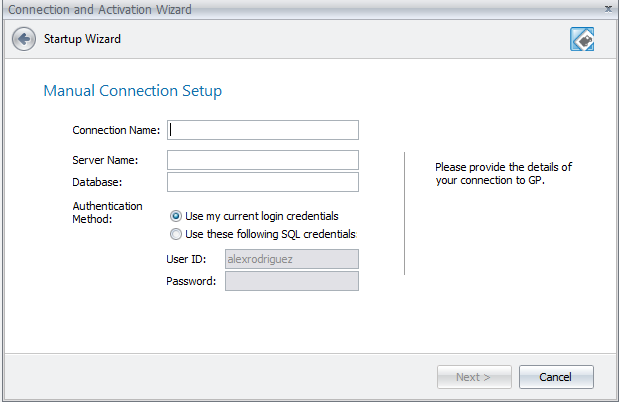
- Choose an Authentication Method:
Use my current login credentials: Select this option to connect using Windows credentials.
Use these following SQL credentials: Select this option to connect using the supplied SQL server credentials.
User ID: User ID used to access the SQL server
Password: Password used to access the SQL server - Click Next to save the connection and return to the Login screen. The new connection should appear in the Connect To: box

- With the new connection selected from the Connect To: box, click the ellipsis button (…) to edit connection properties from the SQL Server Connection screen
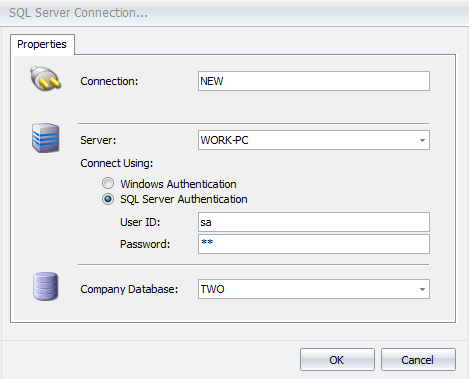
- Fill out the following:
- Connection: Name used as a label for the connection
- Server: The server hosting the database
- Connect Using:
- Windows Authentication: Select this option to connect using Windows credentials
- SQL Server Authentication: Select this option to connect using the supplied SQL server credentials
- User ID: User ID used to access the SQL server
- Password: Password used to access the SQL server
- Company Database: If the SQL server credentials are correct, the dropdown box will populate with available databases to choose from. Select the database used specifically for this connection
- . Click OK to return to the Login screen
- . Log in to Ship To. The Ship To Import screen should appear:

Setup
Once Ship To is installed and connections are set, ShipTo should be set up in the Main Window and additionally configured in Application Settings.
Note: If you are going to integrate ShipTo with UPS World Ship, be aware that ShipTo will need to use Reference Fields 1 and 2 for its exclusive use. If you are currently using Reference Fields 1 and 2 to print information on your UPS labels, you may use Reference Fields 3-5 for that purpose. The UPS World Ship software allows you to set which fields (Reference 1 -5) are printed on the label.
The Main Window
Access the Main Ship To Window by clicking the Show/Hide Main Window button ( ) from the Ship To Import screen.
Note: Clicking the Show/ Hide Main Menu button a second time will hide the window, but closing the window will exit out of Ship To.
- The Paint Styles button (
 ) displays a dropdown menu with different paint scheme options to choose from.
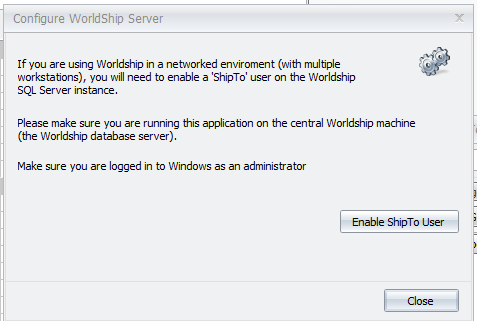
 - The Configure WorldShip Server button (
 ) will establish the connection needed for ShipTo to work properly with UPS World Ship. Follow the on-screen instructions.
- The Import button (
 ) will toggle back to the ShipTo Import screen.
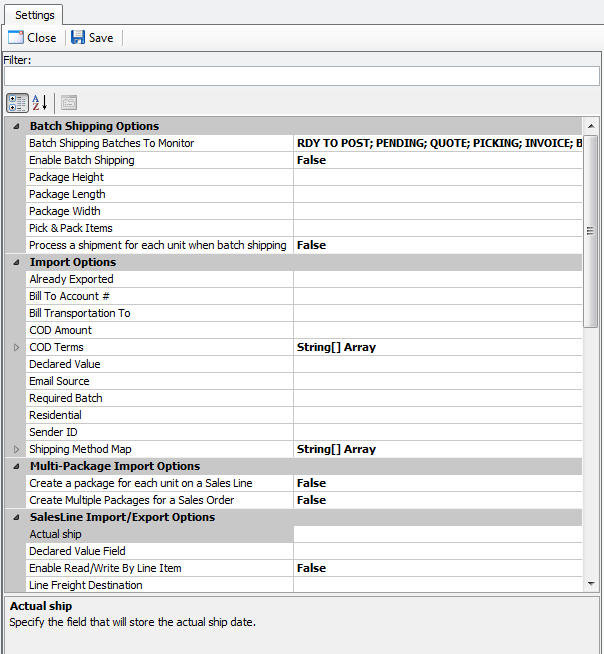
Application Settings
Access the Application Settings screen by clicking the Show Main Window button > Main Menu button > Application Settings. All Ship To settings and sub-settings are located in the Application Settings screen. Here, users can configure how ShipTo will import and export data with UPS World Ship and/or FedEx Ship Manager. Settings and options are described below.
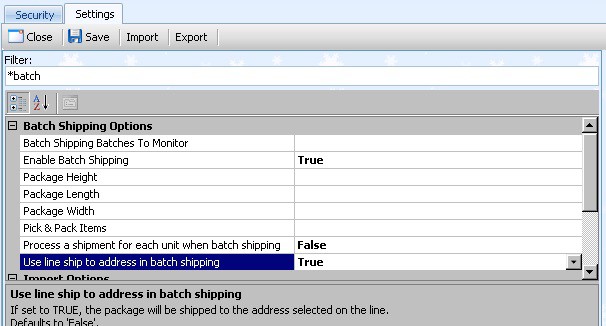
There is a newer setting, Use line ship to address in batch shipping, under Batch Shipping Options. When set to True, the Ship to Address selected on the sales line will be pulled in as the ship address when imported to UPS Worldship)
COD TERMS
Select which payment terms are to be coded as COD. The check boxes displayed in this section correspond to the Payment terms set up in Dynamics GP. This information can be accessed and modified in GP from Microsoft Dynamics GP dropdown > Tools > Setup > Company > Payment Terms
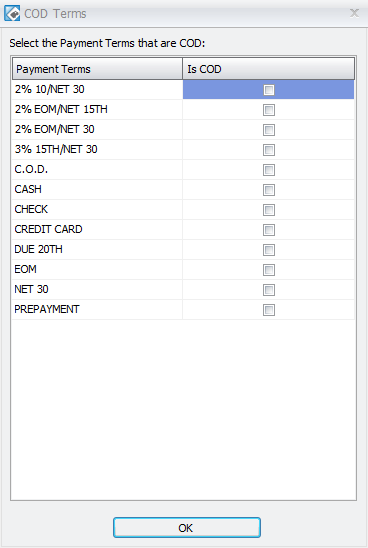
If a Payment Term is selected here as COD, when that payment term is used on an order and imported, the Amount field in the shipping software must show the amount that the driver must collect at delivery before the shipment can be processed. The COD amount will be printed on the label so the delivery driver knows the correct amount to collect from the customer.
IMPORT OPTIONS
Select values from the Import Source Fields drop- down menus to configure which Sales Pad or GP fields will populate the appropriate fields in the shipping programs.
Sales Document Import Fields
- Declared Value: Specify a user defined field that contains the declared value of the items being shipped, for insurance purposes. This value will populate the appropriate field in either the UPS Worldship or FedEx Ship Manager
- Bill Transportation To: The specified field can be mapped to a User Defined Field that will switch the shipping software to bill the shipper, the customer, or a 3rd party.
Note: ShipTo has an option to convert the string values to integer values dynamically via a user-defined field. Refer to the ShipTo Bill Transportation Setup knowledge base article for the values and setup for this option
- Bill to Account #: Specify a user defined field that stores the Bill To Account number for the associated freight carrier. This can be used in conjunction with Bill Transportation To so if the freight is to be billed to the customer or a 3rd party, Ship To can put the appropriate account number in as well
- Email Source: Specify a user defined field that stores an email address to be passed to UPS Quantum View or Fed Ex Shipping Notification. This allows the carrier to notify the customer of their shipment and tracking information. You can also specify Sales Document Email, to pull the email address from the sales document.
- Already Exported: Specify the user defined field check box set up in SalesPad that is checked after a shipment has been processed, to indicate that the package has already shipped. ( Refer to: FedEx - Stop Multiple Processing of Packages)
- Sender ID: Maps to the Ship From tab in UPS World Ship. Can also be used to change the SenderID from a user defined field in Sales Pad to Fed Ex Ship Manager (Refer to: ShipTo - Sender ID).
- Residential: Specify the Sales Pad user defined field that marks whether or not an address is residential— the extra charge will be added by UPS World Ship to the document shipping costs. (Refer to: Residential Shipments)
Batch Import Source Fields (used for Batch Shipping)
Specify the user fields in Sales Pad used to specify package dimensions for the shipment:
- Package Length
- Package Width
- Package Height
- Pick & Pack Items: Specify the line- level user defined field used to indicate items that will be ignored during batch shipping. These are considered small enough not to include in the shipment. (Pick & Pack items will display as checked in the Pick Pack column on the Batch Shipping tab.)
Import Options
- Required Batch: To require that documents must be in a specified batch in order to import, when the Shipping Monitor Batch setting under ShipTo User Options is set to “( none),” select a batch here. This setting is used for the Shipping Monitor import only.
- Create Multiple Packages: (UPS Only) If this box is checked, a package will be created for each line item on the sales document.
- Create a Package for Each Unit: (UPS Only) If this box is checked, a package will be created for each unit on each sales line on a sales document ( ex: Line item with QTY 5 will create 5 packages). This option is only used if Create Multiple Packages is enabled.
SALES LINE OPTIONS
Under Sales Line Items, select the fields from Sales Pad or GP that will correspond with fields in the shipping programs.
- Enable Read/Write By Line Item: Check the box to enable the ability to read and write on the line level
- Line ID Field: Specify the field that will assign a variable that Ship To can use to reference track shipping information per line
- Name Field; Declared Value Field: Specify the fields that will write back to these fields in the shipping program.
Under Write Back Settings, select the SalesPad or GP fields where information exported upon completion of a shipment will be written.
- Line Freight Destination: Specify the field to store the freight per line item.
- Line Tracking Destination: Specify the field that will store tracking information per line.
- Actual ship: Specify the field that will store the actual ship date
SHIPPING METHOD MAP
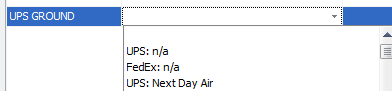
Use Shipping Method Map to map GP shipping methods to the corresponding UPS and FedEx delivery services.
To modify the mappings, click fields adjacent to the desired shipping method and make selections from the drop-down boxes. If the freight is to be written to a separate field, select the desired field from the Freight Dest. Override column.
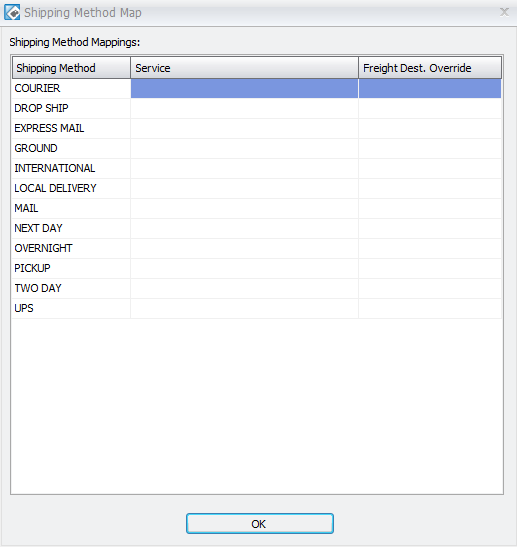
- Shipping Method: Entries in this column are populated with the shipping methods defined in Dynamics GP to be matched with the appropriate service in the Service column. Access and modify in Microsoft Dynamics GP button > Tools > Setup > Company> Shipping Methods
- Service: The shipping service to be matched to the shipping method (Example: Shipping Method Ground with Service UPS: Ground).
Note: If an n/ a option is selected, Ship To assumes that UPS World Ship or FedEx Ship Manager will have a default shipping method set up. If Prompt user for confirmation if shipping method is not available is enabled under User Options, users will see a warning that a default shipping method should exist in UPS World Ship or Fed Ex Ship Manager
- Freight Destination Override: This allows for the ability to override the global account field to store the freight on a per- shipping method basis. ( see Fig. 1 )
MULTI-PACKAGE IMPORT OPTIONS
- Create Multiple Packages: (UPS Only). If this box is checked, a package will be created for each line item on the sales document.
- Create a Package for Each Unit: ( UPS Only). If this box is checked, a package will be created for each unit on each sales line on a sales document ( ex: Line item with QTY 5 will create 5 packages). This option is only used if Create Multiple Packages is enabled.
USER OPTIONS
User Options set what documents are visible on the Shipping Monitor.
- Warehouse Filter: Filters visible documents by the warehouse they will be shipped from. The warehouse displayed correspond to the sites that have been set up in GP (configurable from Cards > Inventory > Site). If a warehouse is selected, all other warehouses are excluded; leave blank to allow documents shipping from all warehouses.
- Add Charges To COD Amount: If enabled, freight charges can be added to the COD total.
- Apply handling charge on missing account number: If enabled, and a Bill To Account # is specified under Import Options, a handling charge can be added manually for customers who do not provide a FedEx or UPS account number for you to bill.
- Prompt user for confirmation if shipping method is not available: If enabled, users will see a confirmation message if the selected shipping method is unavailable.
- Use customer name on ship from address for drop ship orders: If enabled, the customer name will be used on the Ship From address when importing a drop ship order (the shipment will appear to have been sent from the customer). The Sender ID Source Field must be set up to use this feature ( Refer to: ShipTo - Sender ID).
- Process a shipment for each unit when batch shipping: If enabled, during batch shipment each line item will create a different shipment; otherwise all selected lines will be in the same shipment.
- Create multiple packages: If enabled, allows for the creation of more than one package.
- Decimals to use when rounding total: Enter the number of decimals to use when rounding freight totals (see Total amount rounding operation).
- Total amount rounding operation: Select an operation for rounding freight totals: Up - rounds up to the nearest set decimal; Down - rounds down to the nearest set decimal; Standard - rounds up or down to the nearest set decimal (5 or greater = up; less than 5 = down) or None - no rounding.
- Shipping Monitor Batch: Documents from the selected batch will display. Select a ready- to- ship batch. (If “(none)” is selected, then documents in all batches will display.)
- Batch Shipping Batches: Documents from batches entered here will display on the Batch Shipping tab. ( If “( none)” is selected, then documents in all batches will display).
- Enable Logging: Check this box to enable logging. A log file will be created (C:\ Ship To Log.txt) and written to during run time.
BATCH SHIPPING OPTIONS
- Enable Batch Shipping: If set to true, the batch shipping tab will be visible to users
- Batch Shipping Batches To Monitor: Documents from batches entered here will display on the Batch Shipping tab. If no batches are entered, documents in all batches will display.
- Package Length: Specify the user field in SalesPad used to set the value of the package length
- Package Width: Specify the user field in SalesPad used to set the value of the package width
- Package Height: Specify the user field in SalesPad used to set the value of the package height
- Pick & Pack Items: Specify the line- level user defined field used to indicate items that will be ignored during batch shipping. These are considered small enough not to include in the shipment. (Pick & Pack items will display as checked in the Pick Pack column on the Batch Shipping tab.)
WRITE BACK OPTIONS
Write back options allow control over the information that will be exported to the sales document after the shipment has been processed. To enable any write back capabilities, check the write back checkbox. With this checked, the remaining write back options can be modified as required.
- Write back Enabled: Allow Ship To to write back information to the Sales Document
- Write back by Document: Sets if write back depends on a the value of the write back indicator field
- Write back by Document Indicator Field: Defines the sales document level user defined field that will be used as the indicator that will determine if the sales document should be written back to
- Prompt to Write back: Sets if the prompt screen displays when shipments are processed. It will state what information will be exported and give the user the option to cancel the write back
- Named Note: Sets the named note field where the tracking number and ship date will be written (only applicable if Sales Pad is installed).
- Write back Tracking Number: Sets if tracking numbers associated with packages to be written to the GP database into the standard GP tracking number fields
- Write back Freight: Sets if Ship To will write back shipping charges to the document once the shipment is processed
- Shipper Destination Field: The user field that will be used to write the freight costs if Bill Transportation To option is set to “ Shipper”
- Receiver Destination Field: The user field that will be used to write the freight costs if Bill Transportation To option is set to “ Receiver”
- Collect Destination Field: The user field that will be used to write the freight costs if Bill Transportation To option is set to “ Collect”
- Third Party Destination Field: The user field that will be used to write the freight costs if Bill Transportation To option is set to “ Third Party”
- Handling Charge Destination Field: Select the field where the carrier handling charge will be written for a specific shipment
- COD Amount Destination Field: Specify a user field to store the COD amount that was written to the shipping label
- Move to Batch: Specify the batch to move the document to once shipped ( or leave blank to keep the document in the existing batch)
- UPS Rate: Set this rate option to match the rate you use to calculate freight costs in UPS. The options are Published, Negotiated, and CCC rates.
- FedEx Rate: These are two separate fields in newer versions.
- Rate field: Set this rate option to match the rate you use to calculate freight costs in FedEx. The options are Customer rates and List rates
- FedEx Handling Type: Defines the type of handling charge that will be passed back to Sales Pad when exporting a shipment from Fed Ex. Select Fixed, Variable, or Both.
Using ShipTo
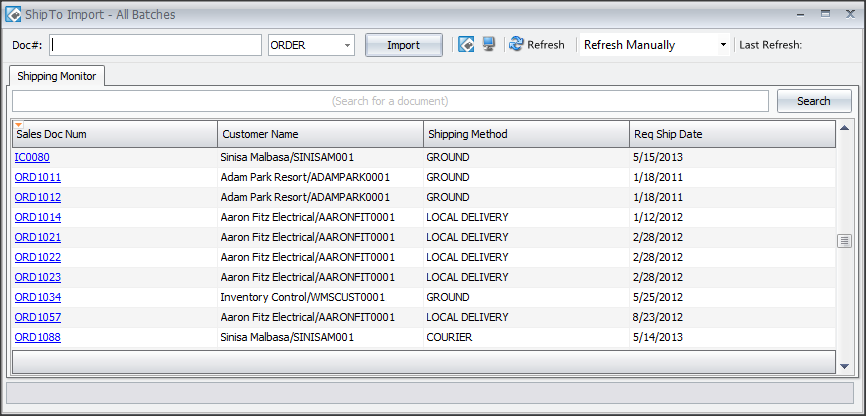
ShipTo Import

The Ship To Import dialog box is used to manually import shipping information from any open Sales Pad documents into the required shipping software.
Doc#: Enter or scan a document number here and click the Import button. This will populate the proper fields in the designated shipping program (UPS WorldShip or FedEx Ship Manager® depending on the designation in Options Manager > Shipping Method Map. Refer to the Options Manager section of this document for details), allowing the shipment to be processed.
To import shipping information to the shipping program, you can also click the document number hyperlink in the Sales Doc Num column ( with the Shipping Monitor expanded – see the Shipping Monitor section below).
Once shipped from the shipping program, shipping information including freight amounts, tracking information, and shipped date will be added to the appropriate fields in Sales Pad or Dynamics GP.
Shipping Monitor
The Shipping Monitor allows users to filter your ready-to-ship orders and prioritize them according to your needs. Click or scan the order number to import orders into UPS Worldship or FedEx Ship Manager. Our integration is the most accurate way of shipping your products because it minimizes user entry errors.
Access the Shipping Monitor by clicking the Show/Hide Shipping Monitor button ( ) to expand the Ship To Import screen.
The Shipping Monitor displays, in grid form, all documents ready to be processed from the batch and location set in Options Manager (Refer to the Options Manager section of this document for details).
To update the display to include any new documents, use the Refresh button, or set an automatic refresh rate from the Refresh dropdown.
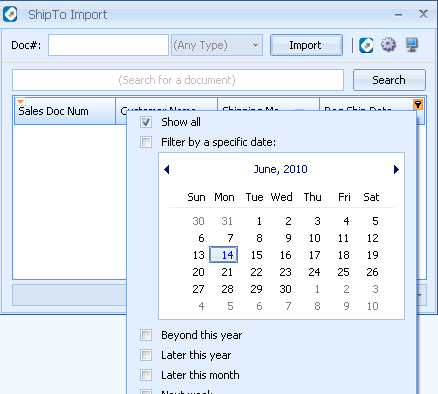
You can narrow the list using the Search function, which searches the Sales Doc Num and Customer Name fields. You can narrow further by clicking the corner icon (visible on hover) in the Req Ship Date column and filtering by specific date(s):
Note: Clicking the triangle in the upper right corner of the Shipping Monitor grid displays a dropdown menu with options to customize the grid with additional columns or a filter row. From this menu, users can also print or export grid information.
EXPORT
To export a document from this list, click the Sales Doc Num hyperlink. This will export the shipping information to the designated shipping software, allowing the shipment to be processed.
After shipment, tracking numbers for packages will appear on the sales document in SalesPad on the Tracking Numbers tab, and freight amounts will be added to the document total.
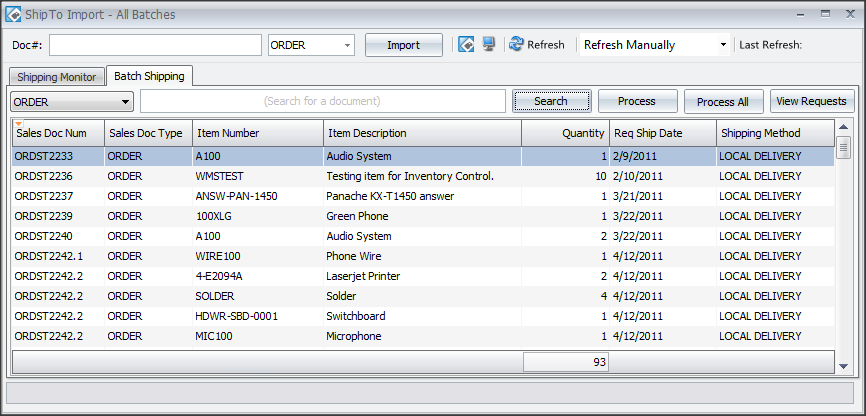
Batch Shipping
Users can process multiple shipments at once in ShipTo using the Batch Shipping tab. Batch shipping works only with UPS WorldShip only. It integrates with UPS World Ship Batch Import to import multiple sales line items in a single import.
SETUP
- Access Options Manager from the Settings button (
 ) on the ShipTo Import screen, or Show Main Window button > Main Menu button > Local Options.
 - Click on User Options
- Check the Enable Batch Shipping option
- In the Batch Shipping Batches field, enter a semicolon delimited list of the batches Ship To will monitor for batch shipping. Notice that the Shipping Monitor batch is monitored separately

- . Click OK to close the settings screen
- . Click Refresh. The Batch Shipping tab displays line items instead of entire orders:
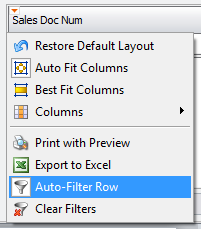
- . Use the Search bar to search for line items by Sales Document or Item Number. To narrow results further, use the Auto- Filter row under the orange triangle in the top left corner of the grid:
- . Select an item or items to ship. If nothing is selected, all displayed line items will be shipped. To select more than one line item for shipping, use Shift+Select or CTRL+Select. Depending on whether the Process a shipment for each unit when batch shipping setting under ShipTo User Options is enabled, the selected lines will be processed as separate shipments, or as one shipment
- . Click Process to process the shipment. A confirmation message will appear (click Yes). A log will pop up displaying successful shipments as well as any errors
After shipment, tracking numbers for packages will appear on the sales document in SalesPad on the Tracking Numbers tab, and freight amounts will be added to the document total.
Multi-Package Mode
Users can create packages on the shipment when importing into UPS World Ship from Ship To. This allows users to create packages based on the line items on a sales document rather than the entire document.
There are two configuration modes for creating multiple packages. The first is to create a package for each sales line on a sales document, for example, five sales lines = five packages on one Shipment in UPS World Ship ( Create Multiple Packages setting). The second is to create a package for each unit on each sales line on a document, for example, two sales lines with quantities of two and six = eight packages on one Shipment (Create a Package for Each Unit setting). For settings, refer to the Ship To Import Options in the Options Manager section.
When creating Packages, the batch shipping settings for Length, Width, Height and Pick and Pack are imported into UPS and respected. For settings, refer to the Batch Import Source Fields in the Options Manager section.
SalesPad Support
Comments
Brad Smith
Is Windows 10 supported?
Current documentation = "Supported Operating Systems: Microsoft Windows XP, Vista, Windows 7 and Windows 8"