Overview
Item Configuration Maintenance allows users to set up items that can be configured to individual customer specifications at order entry time, for example, a computer configured with hard drive size and monitor size options. During order entry, options will be selected and the customer-specified options will then be saved to the sales order and the item can be built to those specifications.
*NOTE: Cavallo will not be supporting changes to this feature. If you require more advanced functionality, we recommend exploring our documentation on Configurator, Configurator Advanced Part One, Configurator Advanced Part Two, Configurator Kits and Packages, and Configurator with Manufacturing.
Security
To enable Item Configuration Maintenance, follow the steps below in the Security Editor:
- Filter to “item config”
- Check the Item Configuration Maintenance box to allow users to modify configurations
- Check the Item Configurator box to allow the Item Configurator plugin to be used on a sales document. Set the Misc sub-settings under Item Configurator as needed
User Field Editor
In order to properly use Item Configuration, A user defined field called sf_CfgKey must be created on the Sales Line Item business object. The Field Type must be Text and the Length must be 50. Refer to SalesPad’s User Defined Field document for more information on creating user fields.
Configuration and Use
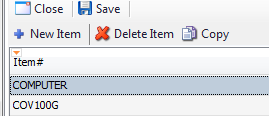
Note: New for 4.1, users can Copy an existing configuration to a new item number:
- Select the item with the configuration you wish to copy and click Copy (depending on window size, you may need to select Copy after clicking the >> arrows):
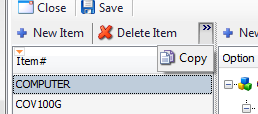
- In the popup window, enter the item number to copy the configuration to and click OK:
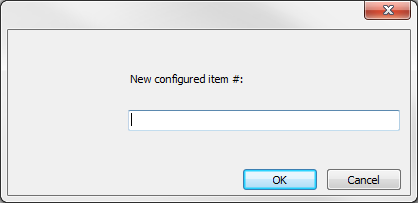
The configuration will be copied to the entered item number.
BASIC CONFIGURATION
To configure items, follow the steps below in the Item Configuration Maintenance module:
- On the left side of the window click New Item
- In the box that appears, enter the item number, or use the Inventory Lookup window by clicking Item Lookup
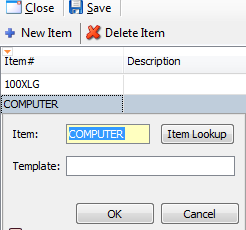
Note: If your SalesPad version displays the Template field, do not use it, as it is no longer functional. - Click OK
- To add options, highlight the main option name on the right side of the Item Maintenance screen and click New Option
- A window will appear below the initial item. Enter the Option (this can also be an additional item number, and you can use Item Lookup to search for an item), Description and Comment and click OK. The example below shows the setup for a computer item that will prompt for hard drive size:
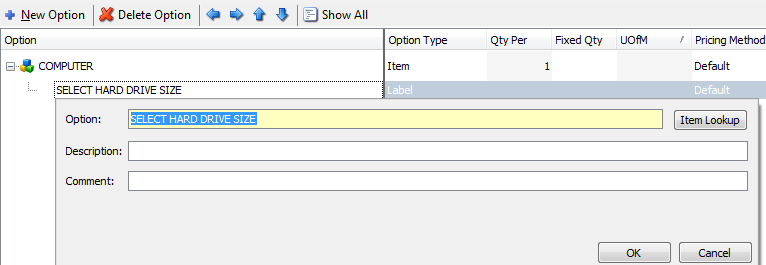
Note: The Description serves as an instruction during sales document entry, and the Comment appears only in Item Configuration Maintenance.
Note: In versions 4.1 and later, the description for an item number will automatically be pulled from stored item information after clicking OK. - Change the Option Type to Label: click the Option Type field next to the new option and select Label from the dropdown
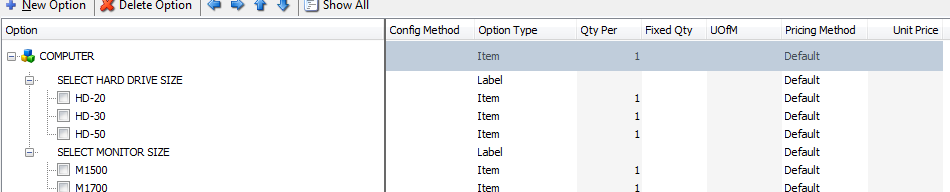
- To create a list of options (in the example case, a list of hard drives to choose from), highlight the Label option name (SELECT HARD DRIVE SIZE in the example) and click New Option again
- Fill out the information and click OK. This will create the first option for the list. Repeat the process for all options to appear on the list, making sure to click on the Label option name (Select Hard Drive Size, in the example) for each new option
- Set a Qty, UOfM, Pricing Method and Unit Price if necessary. Repeat for items under this option set.
Note: Qty Per is the quantity required of each component when creating the configured item— the Qty Per entered is multiplied by the number of configured items added to the document to reach the quantity needed on the document. Fixed Qty will always add the same number of components to the document, regardless of how many configured items are added to the document. - Repeat the steps above to create additional labels as needed. For example, Select Monitor Size for the computer item:
Note: To change the position of an item or label in the branches of the Configurator, use the up/down/left/right arrow icons. To edit the name of an item or label, double-click on it.
When the item number is entered on a sales document, a configuration window will display with the options set up in Item Configuration Maintenance. Make the necessary selections and click OK when finished.
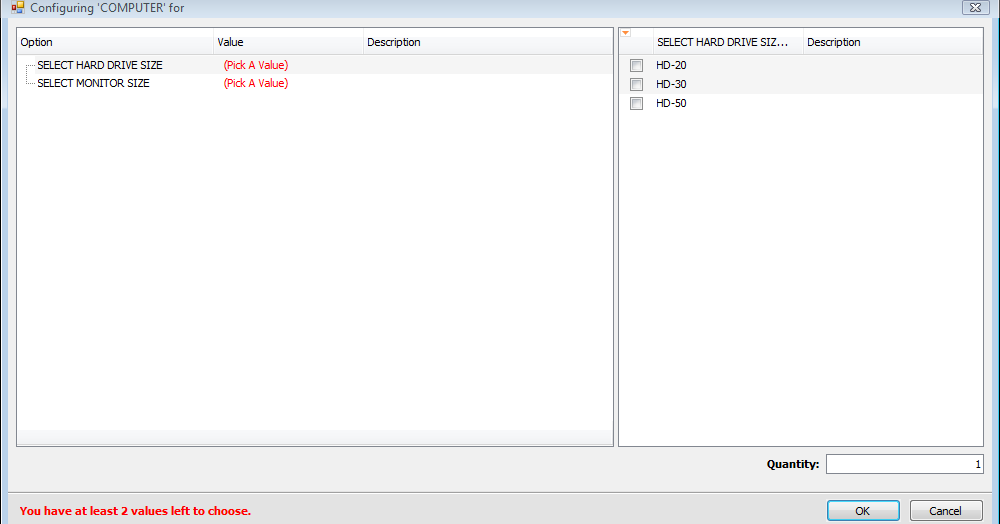
Selections will be added to the sales document:
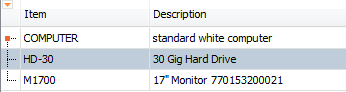
Note: The red box to the left of the main item number signifies that the item was created with the Item Configurator.
CONFIG METHOD CODES
Note: At this time, Config Method codes are not supported and will not work when configured in 4.0 versions. We recommend removing the Config Method column from the grid and not using it.
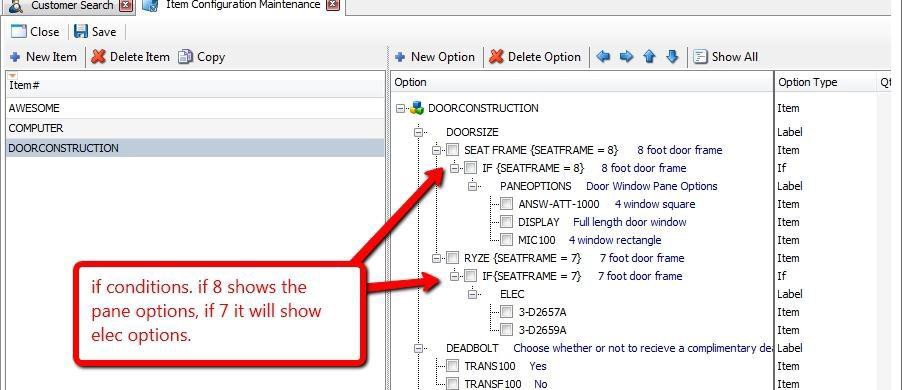
IF CONDITIONS
To display additional options only when certain selections are made, you can set up IF conditions. For example, a door item that has two seat frame options—selecting the 8 foot frame will display three Pane Options, but selecting the 7-foot door frame will display 2 Elec options.
To configure IF conditions:
- Put the condition identification in curly brackets at the end of the Option name on the Item
(example: SEAT FRAME {SEAT FRAME = 8} ) - Create each IF Condition as an Option Type If
(IF {SEATFRAME = 8} - Nest a Label and additional options (Option Type Item) under the IF condition
- Repeat for each condition and set of options An example of IF condition configuration:
On the sales document, users will be prompted to select additional options as determined by previous selections.
Option Types
In Item Configuration Maintenance, to add an item as required, rather than as selectable option, change the Option Type to Required Item. Required item values are automatically added to the sales document when the configurations are selected:

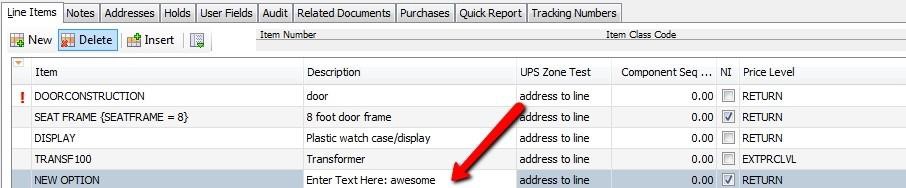
To allow a free text entry as one of the options, change the Option Type to Text in the Item Configuration Maintenance module. Text is entered on the left side, in the Description field, and when the user tabs off, that text will appear on the right side under Description:

When the Item Configuration screen is closed, the text entered will appear on the sales line, in the Description field:
AFTER CONFIGURATIONS ARE SELECTED
At this point, each line can be edited like a normal item. Deleting or changing the main item from the sales document will not delete any sub-items.
To return to the Configuration window after it is closed:
- Select the configurable item
- Click the line items Actions dropdown (
) and select Item Configurator
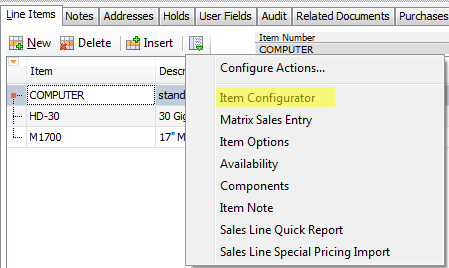
- The window will re-appear with the current selections specified. You can change your selections and click OK to return to the sales document
SalesPad Support
Comments