DataCollection Web Services Installation
Installing Internet Information Services (IIS)
To install Internet Information Services (IIS), follow the steps below:
- Start > Control Panel > Programs and Features
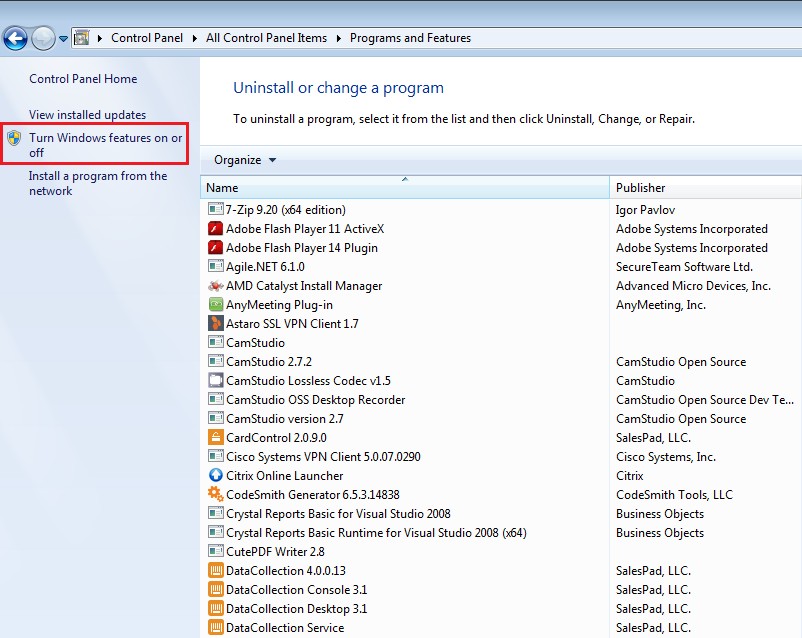
- Click Turn Windows features on or off. The Windows Features window will appear.
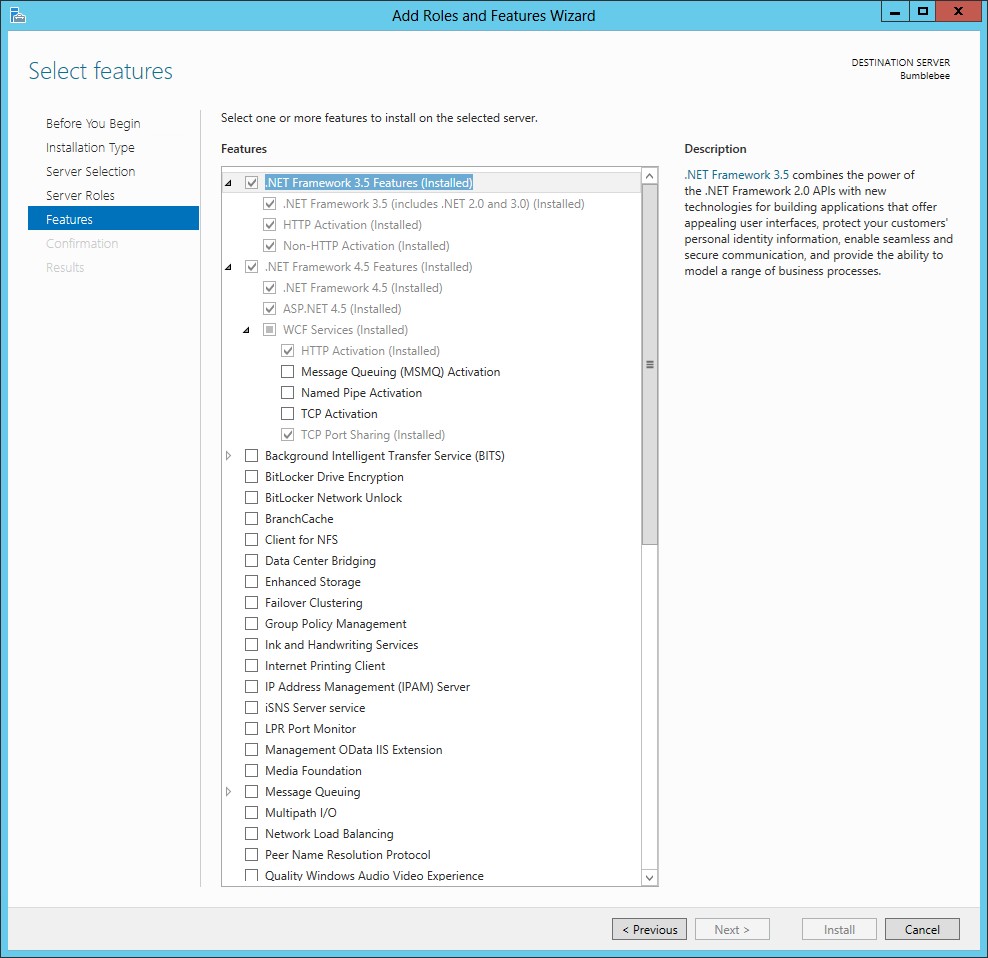
- Make sure all features under Internet Information Services and Microsoft .NET Framework are selected.
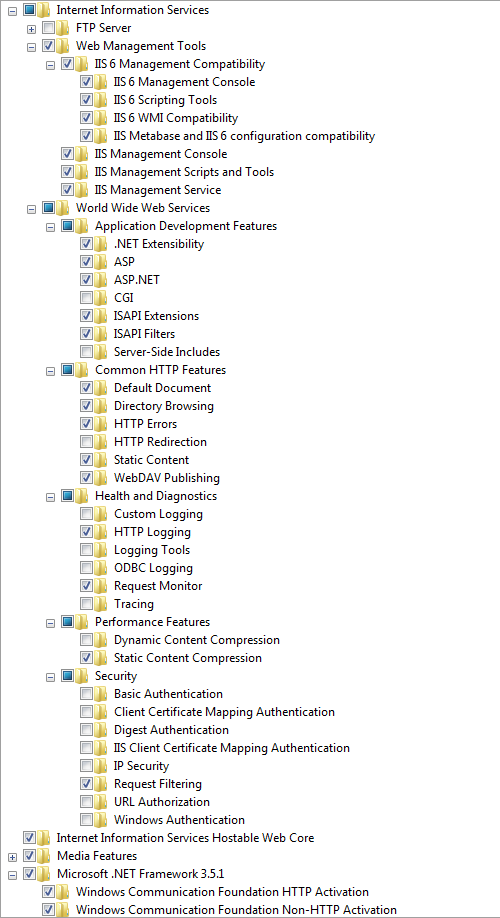
- Click OK to install selected Windows components, including IIS.
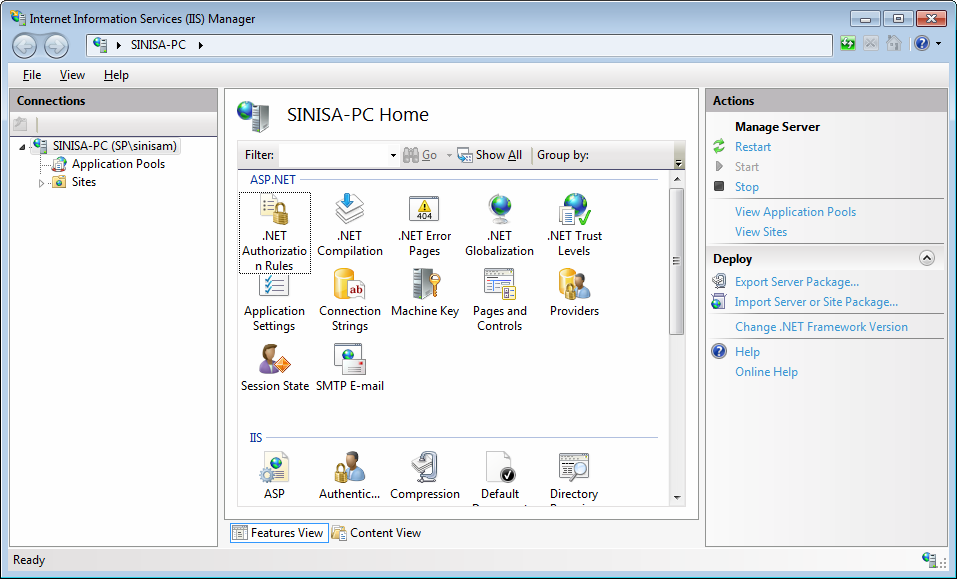
- To access IIS, click the Windows Start button. The Start menu/screen appears. Start typing internet information services manager in the search field and click the Internet Information Services (IIS) Manager once it appears.
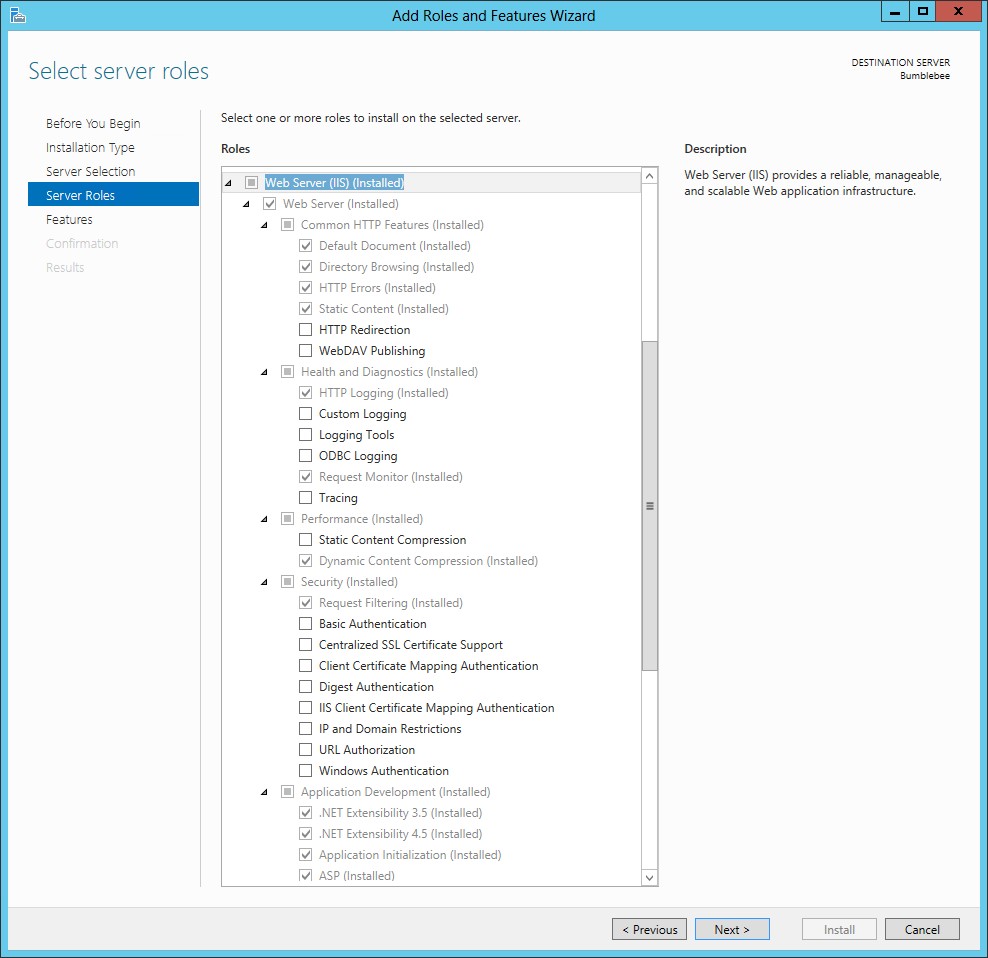
Windows Server 2012 Configuration
The following items are the minimum required items for DataCollection Web Service to run and install properly on Windows Server 2012. To change these settings, open the Server Manager > Roles and verify Web Server (IIS) is installed. View the following details and ensure all of the following items are selected on the server.
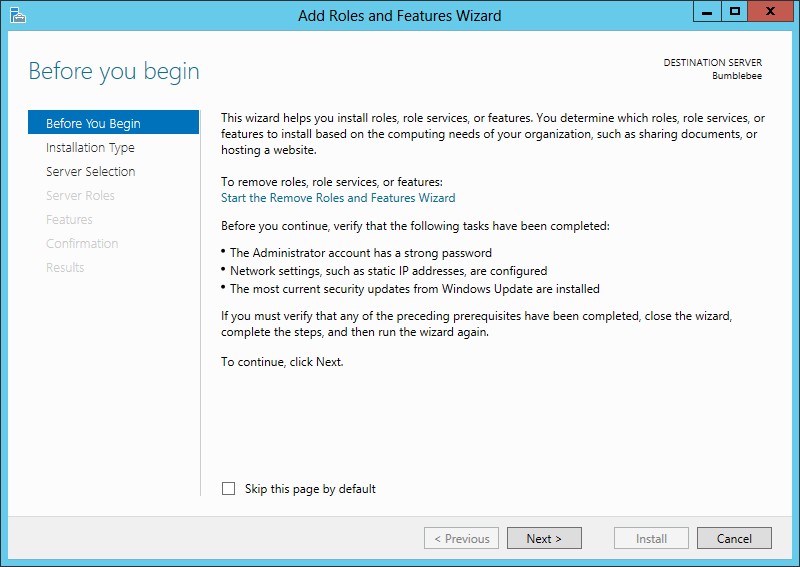
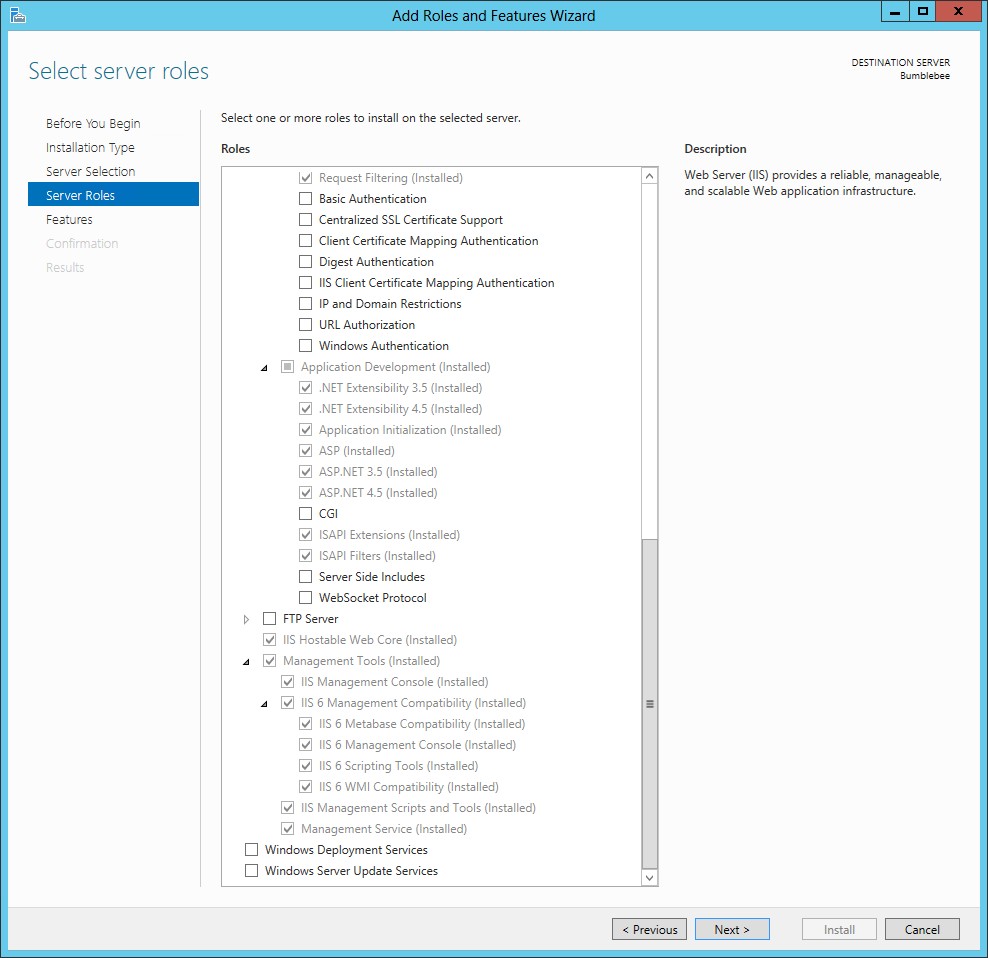
After you have selected all necessary roles and features, click the Next button to confirm your selection. Click the Install button to install selected roles and features on your server.
Installing DataCollection Web Service
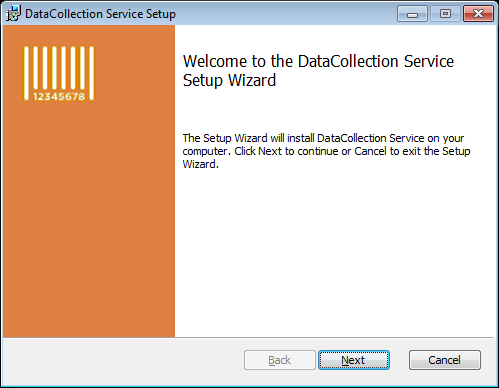
To install DataCollection Service on your computer/server follow these steps:
- Find the DataCollection Service installer file and double click it.
- The DataCollection Service wizard will appear. Click the Next button to continue.
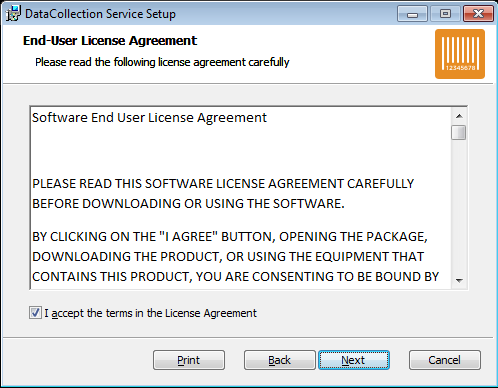
- Accept the licensing agreement and click Next to continue.
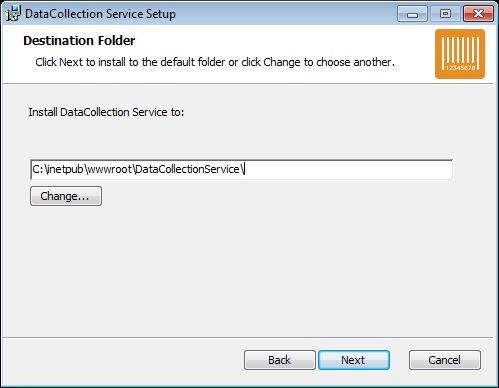
- Next page in the wizard allows you to change the directory to which DataCollection service will be installed. SalesPad recommends accepting the default directory. Click Next to accept your changes and continue.
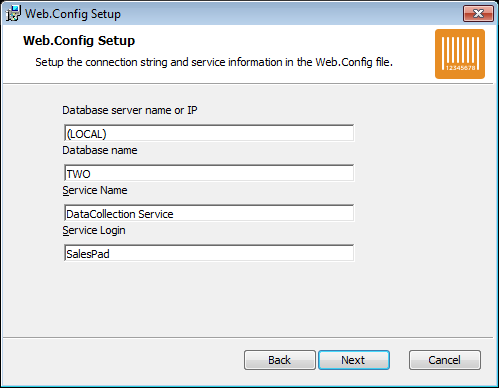
- The Web.Config Setup page allows customization of the web.config file (default location is C:\inetpub\wwwroot\DataCollectionService\web.config). Enter the name or IP address of the SQL Server that hosts the GP database in the database server field. Enter the name of the database in the database name field. Service name by default is DataCollection Service, but you may change it if you wish. Service Login is used for logging purposes and can be left as is.
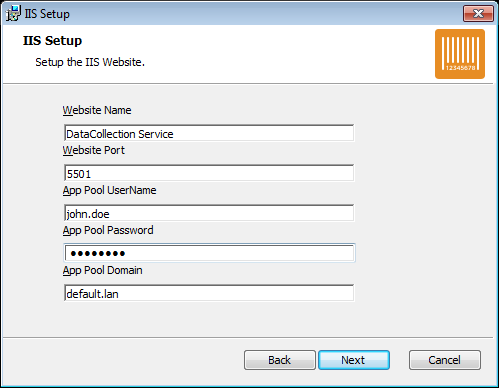
- The IIS Setup page allows customization of the website that will run the DataCollection Service.
- DataCollection Service is the default website name, but this can be changed if desired (note that the folder name from step 4 will NOT change with the website name and will have to be updated manually).
- Default website port is 5501 and should only be changed if another application is using it.
- DataCollection Service uses custom application pool identity by default, although this can be changed manually later on. The credentials should have Windows and SQL Server administrator rights.
- App Pool Username – Windows username with administrator privileges
- App Pool Password – Windows username password
- App Pool Domain – Windows domain to which app pool username belongs to
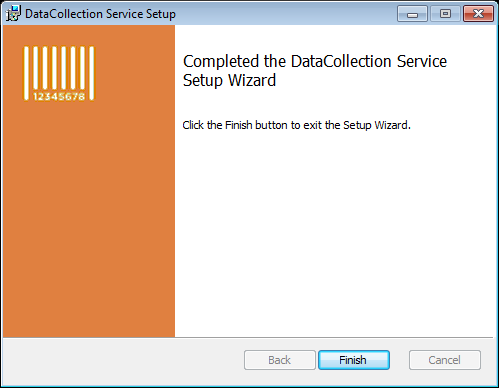
- Click Next and the installation wizard will install the DataCollection Service. Click Finish to exit the installer.
DataCollection Web Service Installation Check
Note: This section is optional. You may complete the installation of the DataCollection Service without running the installation check in this section. SalesPad advises referring to this section only for troubleshooting purposes.
To perform a DC service check:
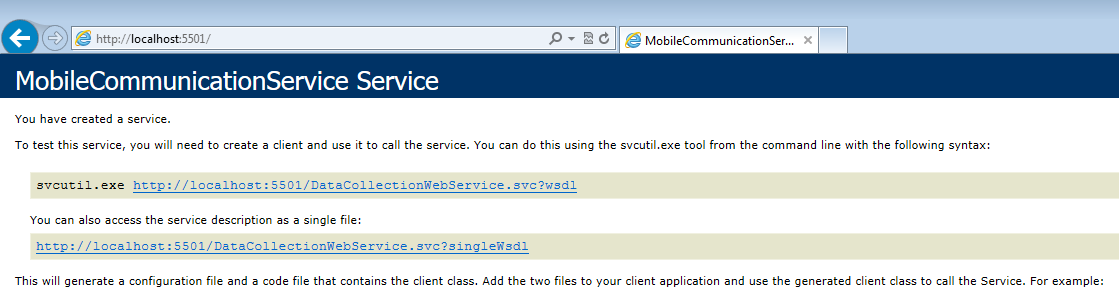
- Using your Internet web browser navigate to http://localhost:5501/, replacing localhost with the IP address of the computer/server that is hosting the DC service. If you changed the port number during the installation, replace 5501 with the modified port number. You should be greeted with the MobileCommunicationService page and you may safely conclude that Internet Information Services (IIS) is working properly and that DataCollection Service is responding successfully to authentication requests.
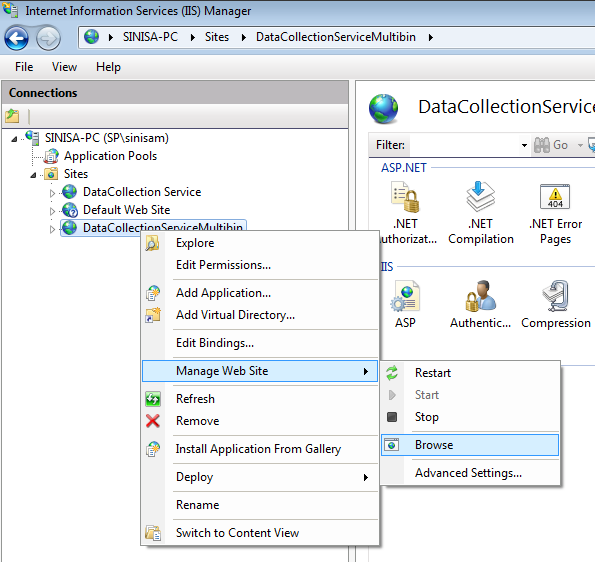
- Another way to check if DC service is set up and running is straight from the IIS Manager. Open up Internet Information Service (IIS) Manager, right click DataCollection Service website (name may be different depending on previous setup), Manage Web Site > Browse. This option will open up a web browser and automatically go to http://localhost:5501/. You should see the MobileCommunicationService page if the request has been successful.
DataCollection Web Services Configuration
Modifying Database Connection String
DataCollection Service installer will configure the DC service for you, including which SQL Server and database to use. However, sometimes it is necessary to change these values later on. Two reasons you may want to modify the web.config file are:
- You need to change the SQL Server or the database to which DC service is connecting.
- You do not wish to use custom application pool identity and would rather specify username and password directly.
Changing SQL Server and Database
Modifying the web.config file is easy! Follow these steps:
- In the virtual folder where DC service was installed (default is C:\inetpub\wwwroot\DataCollectionService), locate the web.config file.
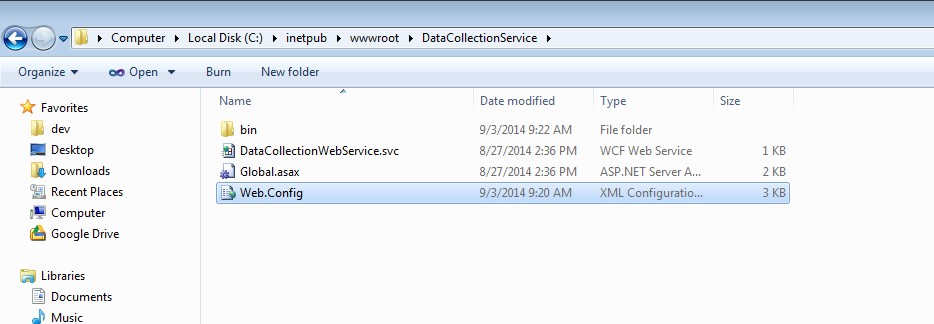
Right click on it and select the Edit option, then select an editor such as Notepad to edit the file. Make sure you do not select the option to always use this program to open this file type.
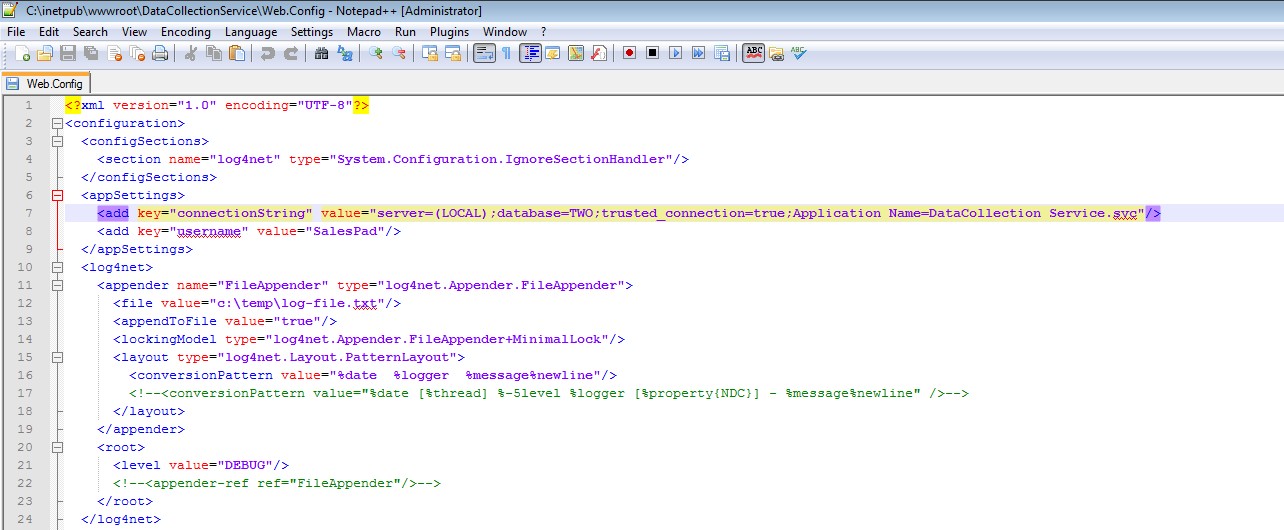
- Find the connection string section and replace the default server and database with values specific to your GP company.
- Save your changes and close.
Changing App Pool Identity
If you do NOT wish to use custom application pool identity that was set up by the installer:
- In the virtual folder where DC service was installed, locate the web.config file. Right click on it and select the Edit option, then select an editor such as Notepad to edit the file. Make sure you do not select the option to always use this program to open this file type.
- Find the connection string section and set trusted_connection option to False.
- Add user and password options right after the trusted_connection and specify username and password that are used to log in to the SQL Server. Note that these credentials are NOT username and password set in DataCollection, but rather SQL Server login credentials.
- Save your changes and close.
- Open the Internet Information Services (IIS) Manager and select Application Pools on the left-hand side.
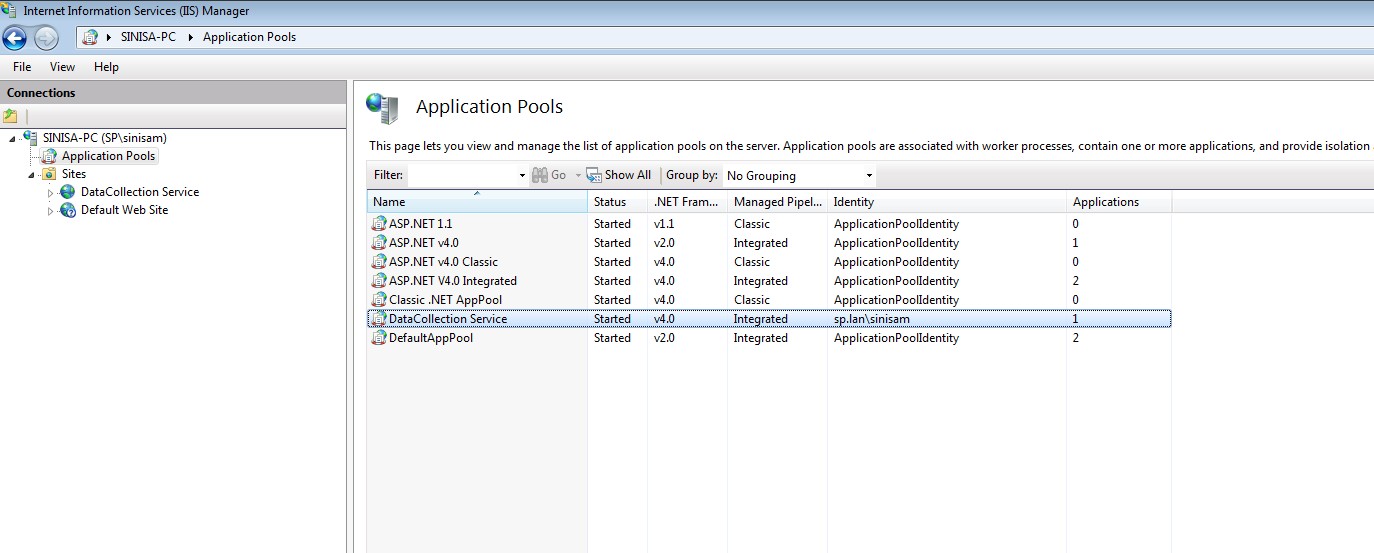
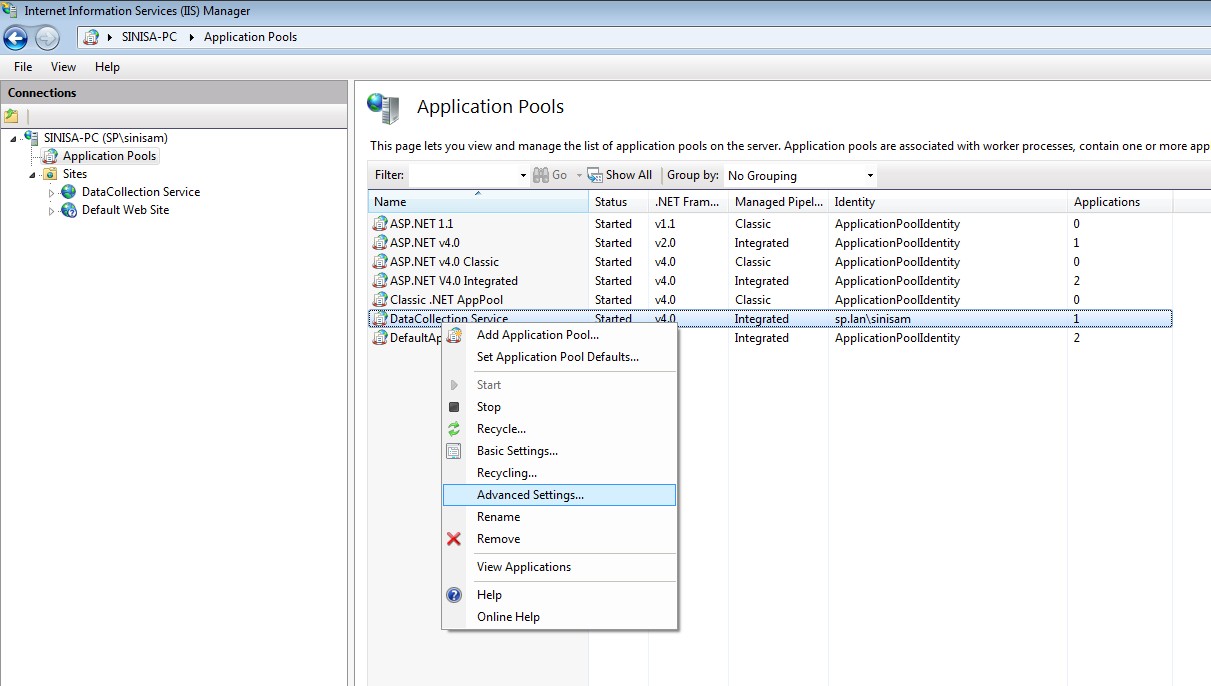
- Select DataCollection Service app pool from the list on the right, right-click, and select Advanced Settings
- Advanced Settings window will open. Select the Identity option under the Process Model heading and click the ellipsis (...) button on the right.
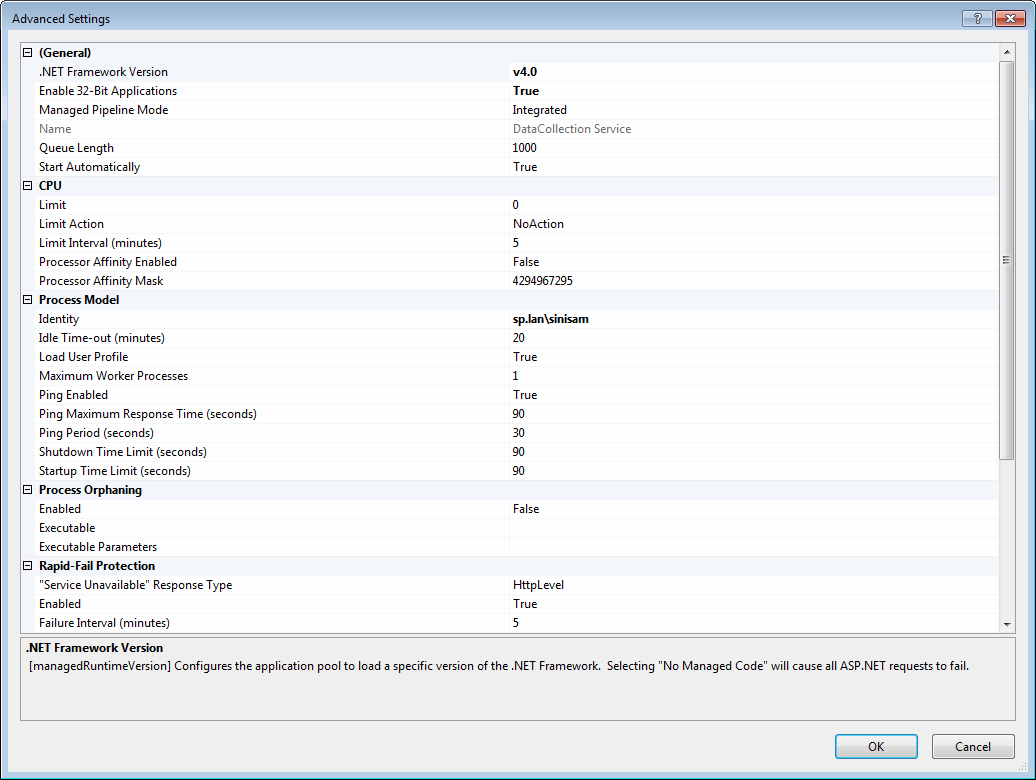
- “Application Pool Identity” window will open. Select the Built-in account radio button and select ApplicationPoolIdentity option from the dropdown.
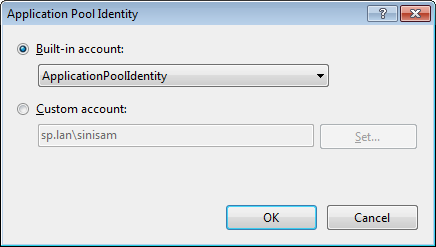
- Click OK to accept your changes and click OK again to close the Advanced Settings window. Restart the app pool by right-clicking on it, selecting Stop, then selecting Start.
Creating Multiple Companies
DataCollection Service installer will install and configure one DC service connecting to one GP company database. Running the installer again will give you an option to repair or uninstall the existing DC service, but you will NOT be able to install another instance of it.
Adding a second GP company database to DC service has to be done manually:
- In the IIS root folder (default is C:\inetpub\wwwroot), select the DataCollectionService folder, right-click and select Copy. Right-click again anywhere in the wwwroot folder and click Paste. A copy of the DataCollectionService will be created.
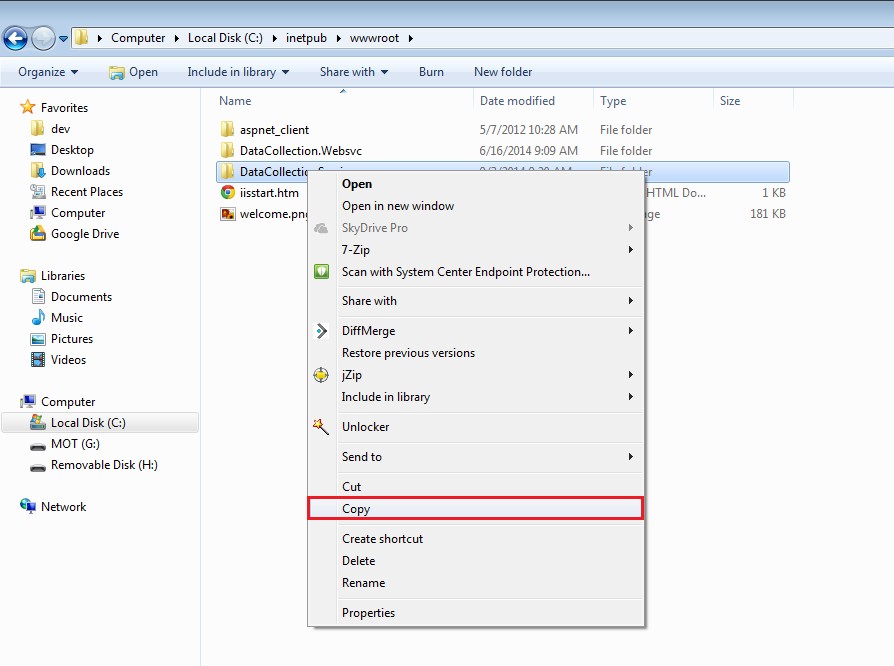
At this time it is a good idea to rename the folder to something more meaningful, such as DataCollectionServiceMultibin, DataCollectionService2, or DataCollectionServiceTest.

- Open the Internet Information Services (IIS) Manager, right-click on Sites and select Add Web Site
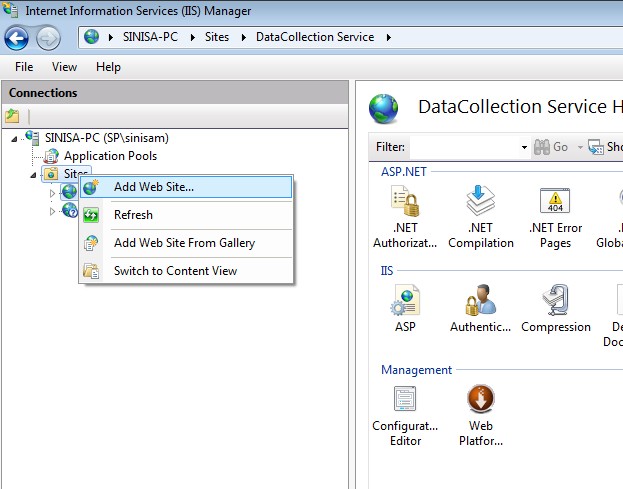
- “Add Web Site” window will open. Enter a site name (application pool will be created automatically) and for physical path select the folder from step 1. Enter a port number (for example, 5502). Click OK to create the website.

- A new app pool will automatically be created with the website, but it needs to be configured correctly. Select Application Pools on the left-hand side, select the newly created app pool on the right, right-click and select Advanced Settings.
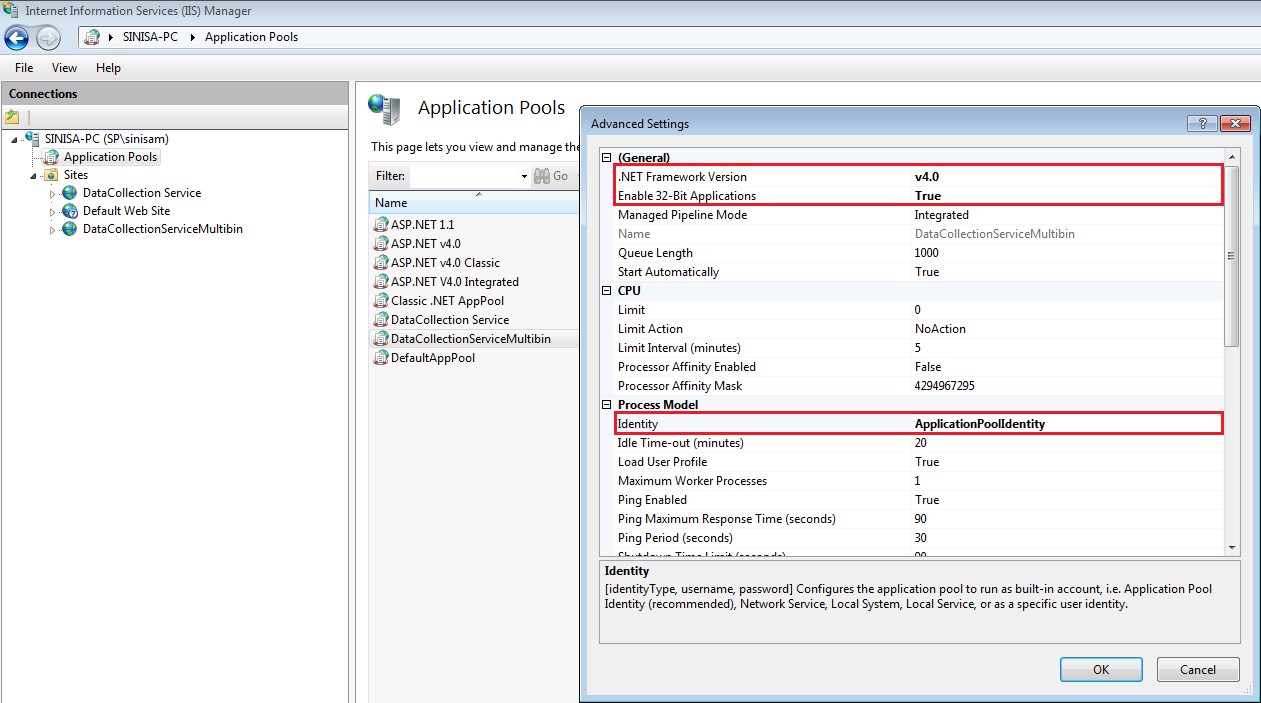
- On the “Advanced Settings” window make sure .NET Framework Version is set to 4.0, Enable 32-Bit Applications is set to True, and Identity is set to either ApplicationPoolIdentity or custom identity. Click OK to accept your changes and close the window.
- Select the DataCollection website under Sites and double-click the Default Document icon under IIS section.
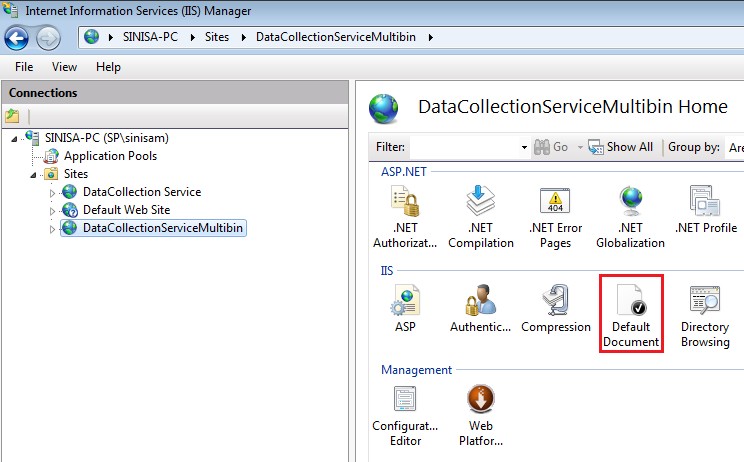
- With DataCollection website still selected, click Add on the right-hand side.
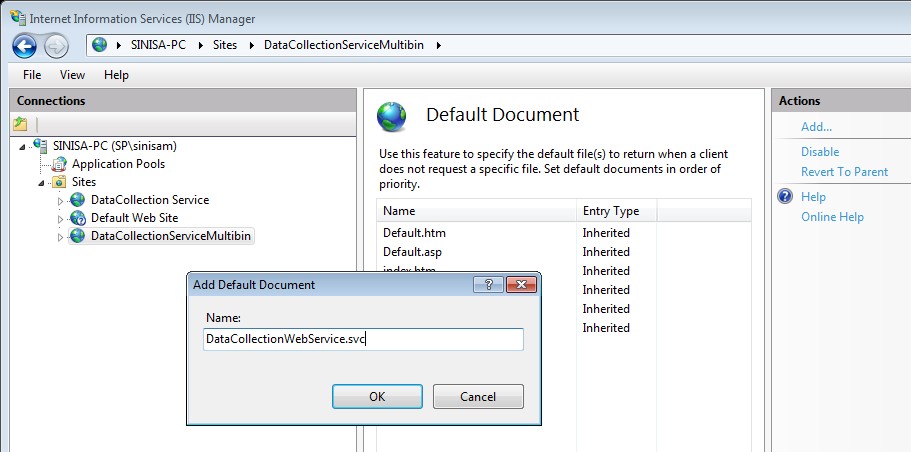
- Enter DataCollectionWebService.svc into the text field and click OK to add the default document.
- You are done! Test the new DC service by right clicking the website, Manage Web Site > Browse. You should be greeted with a MobileCommunicationService page.
Web Service Logging
You may enable logging for web services for troubleshooting purposes. Logging is turned off by default. SalesPad recommends leaving the logging feature set to the default setting unless you are instructed to enable it by SalesPad personnel.
The file tag inside the log4net section of the web.config file determines the path and file that will be used to write all logging output. The default output setting is C:\temp\log-file.txt

To enable logging for DataCollection Service simply open the web.config file in a text editor, such as Notepad, uncomment the two commented out sections in the log4net tag, and save the changes.
Configuring the Inventory Manager Service to Use an SSL Certificate
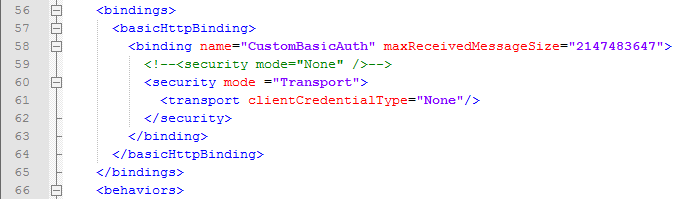
Users can secure the Inventory Manager service with an SSL Certificate by setting up an “https” type binding for the service in IIS and selecting a certificate. In order for the handheld app to successfully connect to the secured service, users must make a modification to the service’s Web.config file. Users can find the Web.config file by right-clicking the mobile service in IIS and choosing Explore. Once there, the line “<security mode=”None”/>” must be deleted or commented out, and the 3 lines directly below it starting with “<security mode ="Transport">” must be uncommented out by deleting the “<!--" at the beginning, and the "-->” at the end.
Configuring IIS To Run 32-bit Applications On 64-bit Windows (IIS 6.0)
Note from Microsoft: Windows Server 2003TM, Service Pack 1 enables IIS 6.0 to run 32-bit Web applications on 64-bit Windows using the Windows-32-on-Windows-64 (WOW64) compatibility layer. IIS 6.0 using WOW64 is intended to run 32-bit personal productivity applications needed by software developers and administrators, including 32-bit Internet Information Services (IIS) Web applications.
To enable IIS 6.0 to run 32-bit applications on 64-bit Windows:
- Open a Command Prompt and navigate to the %systemdrive%\inetpub\AdminScripts directory.
- Type the following command: cscript.exe adsutil.vbs set W3SVC/AppPools/Enable32BitAppOnWin64 “true”
- Press Enter.
.NET Compact Framework Installation
DataCollection Mobile requires a constant connection to a wireless network, which will need to be configured and connected prior to installing DataCollection Mobile software. DC Mobile requires at least .NET CF 3.5.
If you currently have the latest version of CF installed on your mobile device, skip down to the DataCollection Mobile Installation (CF version can be checked by tapping the \Windows\cgacutil file).
To install .NET CF 3.5 on your mobile computer:
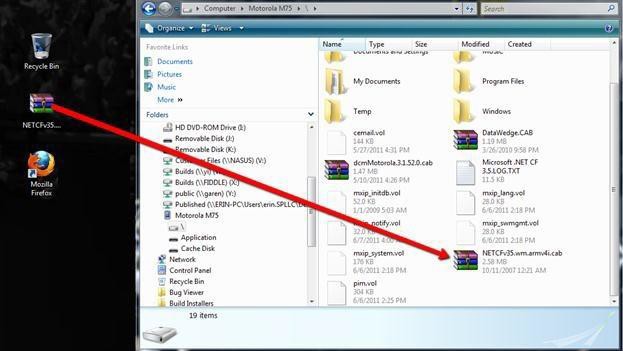
- Copy the “CAB installer” file to your mobile computer
- Connect your mobile computer’s cradle to your PC.
Note: Depending on your version of Microsoft Windows and the brand and model of your mobile computer, you may need to install device drivers to establish communication between your mobile computer and your PC. Most devices have plug-and-play capabilities and will automatically install any device drivers needed. If your mobile computer cannot connect to your PC or you do not own a cradle, please contact your handheld’s manufacturer for assistance regarding transferring files to your device. You may also use freeware utilities such as Microsoft ActiveSync, Windows Mobile Device Center, and MyMobiler to manage your connection. - On your PC, navigate to Start > My Computer.
- Find your portable device under the list for Portable Devices.
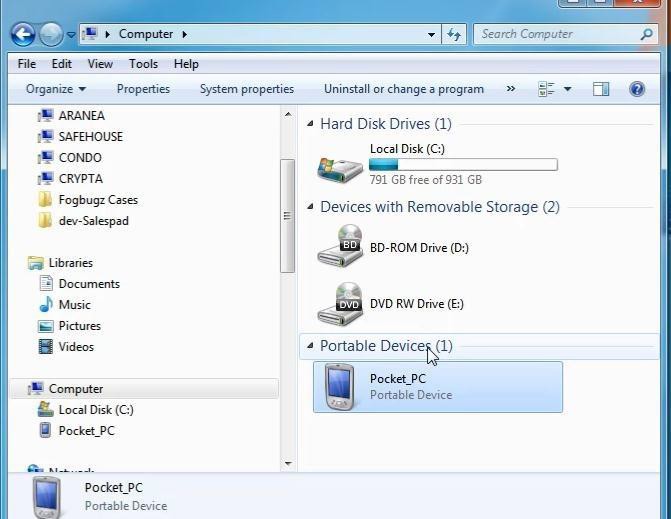
- Double click on your portable device and navigate to its root drive.
- Copy and paste the CAB installer file to the root of the drive.
- Connect your mobile computer’s cradle to your PC.
- To install Microsoft .NET CF 3.5, complete the following steps:
- On your mobile computer, tap the Start button then select the Programs option.
- Find the File Explorer option and double tap on it.
- Find the CAB file that you copied to this directory.
- Double tap the CAB file to initiate the setup process.
DataCollection Mobile Installation
To install DataCollection Mobile on your mobile computer please follow the instructions below:
- If you are not upgrading your version of DataCollection Mobile, skip step 2.
- Remove the current version of DataCollection Mobile by completing the following steps:
- Tap the Start button then select the Programs option.
- Find the Remove Programs option and double tap on it.
- The “Remove Programs” screen appears. Select SalesPad DataCollection from the list and tap the Remove button.
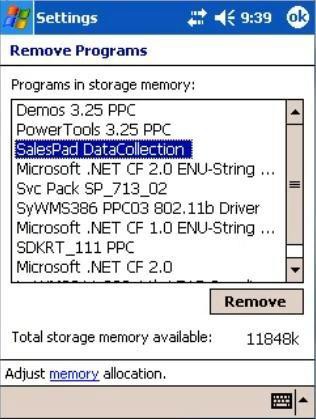
- Select Yes when the confirmation screen appears.
- Tap the OK button when the ‘Uninstall Complete’ screen appears.
- Tap the OK button again to exit the Remove Programs screen.
- Tap the X button to close the Settings screen and return to the desktop.
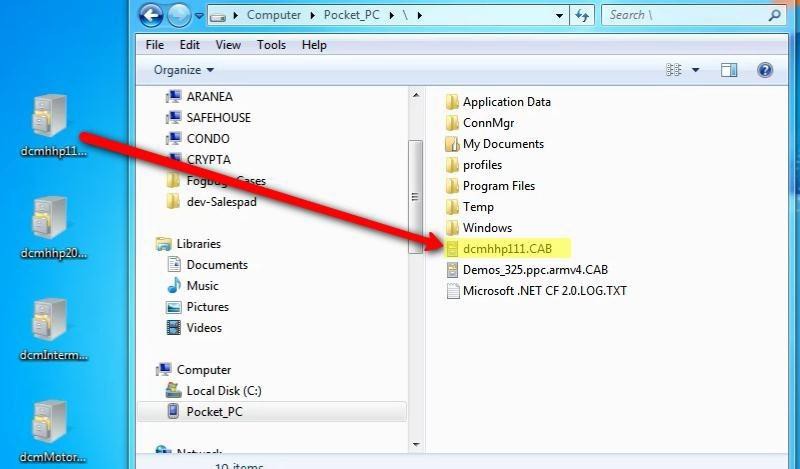
- Copy the CAB installer file to your mobile computer.
- Connect your mobile computer’s cradle to your PC.
- On your PC, navigate to Start > My Computer.
- Find your portable device under the list for Portable Devices.
- Double click on your portable device and navigate to its root drive.
- Copy and paste the CAB installer file to the root of the drive.
- To install DataCollection Mobile complete the following steps:
- On your mobile computer, tap the Start button then select the Programs option
- Find the File Explorer option and double tap on it.
- Find the CAB file you copied previously.
- Double tap the CAB file to initiate the setup process.
- Using File Explorer, navigate to Program Files > DataCollection and double tap on the DataCollection program to launch it.
- The “DataCollection” sign on screen appears. If no web service connections exist you will be automatically routed to the setup screen where you can enter your connection information.
DataCollection Mobile Configuration
To set up DataCollection Mobile:
- From the DataCollection sign on screen, tap on the Settings button. The Settings screen appears.
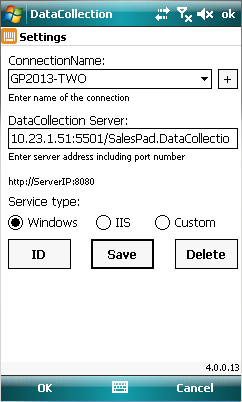
- Tap on the + button and enter a connection name.
- In the DataCollection Server text box, enter the IP address of the server running the Data Collection service followed by the port number (default is 5501).
- For service type select either Windows, IIS, or custom:
- Selecting the Windows radio button tells DC to automatically append the default suffix to the server URL for this connection type. Select this option if you are running DC service from the DC Console.
- Selecting the IIS radio button tells DC not to append a suffix to the server URL for this connection type. Select this option if you are running DC service from a website hosted on IIS.
- Selecting the Custom radio button tells DC not to modify the server URL in any way. Select custom if you have modified the service URL and it now differs from the default one.
- Tap the Save button. Tap the OK button to exit the Settings screen and return to the sign on screen.
SalesPad Support
Comments
Abel Quispe Orellana
Gracias