Overview
The Mobile License Manager allows users to add licenses for mobile devices on which the DataCollection mobile client will be installed. Without this license, the DataCollection mobile client will not be able to connect to the DC service.
Security
To access Mobile License Manager, it must first be enabled in the Security Editor (Modules > Security Editor). Make sure the Mobile License Manager option is checked in the Security grid.
DataCollection Mobile Installation
To upgrade your version of DataCollection Mobile on your mobile computer, you will first have to remove the current version of DataCollection Mobile by completing the following steps:
- Tap the Start button then select the Programs option.
- Find the Remove Programs option and double tap on it.
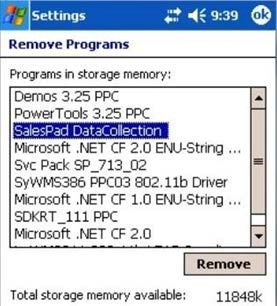
- The Remove Programs screen appears. Select SalesPad DataCollection from the list and tab the Remove button.
- Select Yes when the confirmation screen appears.
- Tap the OK button when the Uninstall Complete screen appears.
- Tap the OK button again to exit the Remove Programs screen.
- Tap the X button to close the Settings screen and return to the desktop.
To copy the CAB installer file to your mobile computer:
- Connect your mobile computer’s cradle to your PC.
- On your PC, navigate to Start > My Computer.
- Find your portable device under the list for Portable Devices.
- Double-click on your portable device and navigate to its root drive.
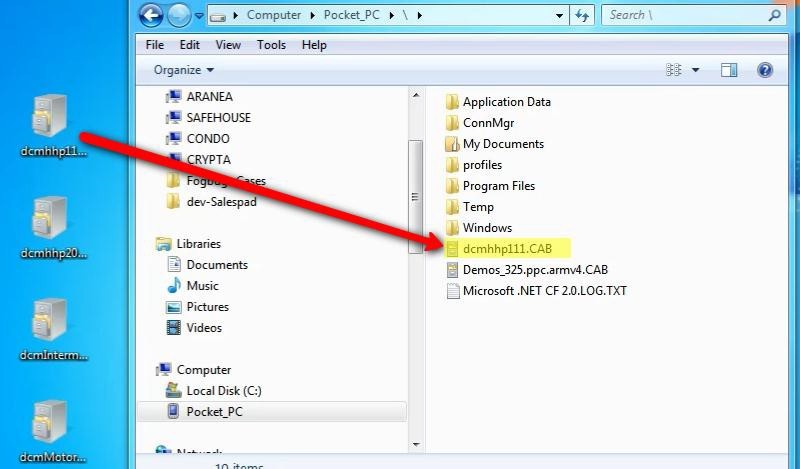
- Copy and paste the CAB installer file to the root of the drive.
To install DataCollection Mobile complete the following steps:
- On your mobile computer, tap the Start button then select the Programs option.
- Find the File Explorer option and double tap on it.
- Find the CAB file you copied previously.
- Double tap the CAB file to initiate the setup process.
- Using File Explorer, navigate to Program Files > DataCollection and double tap on the DataCollection program to launch it.
- The DataCollection sign on screen appears. If no web service connections exist, you will be automatically routed to the setup screen where you can enter your connection information.
DataCollection Mobile Configuration
To set up DataCollection Mobile:
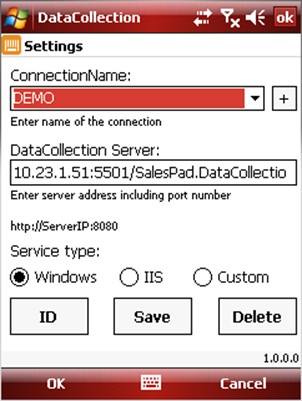
- From the DataCollection sign on screen, tap on the Settings button. The Settings screen appears.
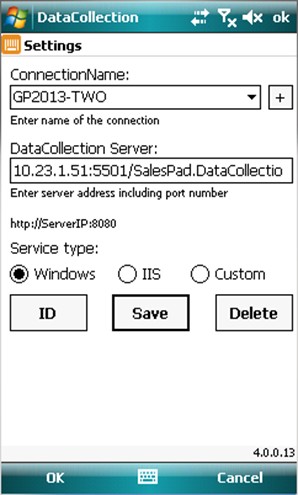
- Tap on the + button and enter a connection name.
- In the DataCollection Server text box, enter the IP address of the server running the Data Collection service followed by the port number (default is 5501).
- For service type select either Windows, IIS, or custom:
- Selecting the Windows radio button tells DataCollection to automatically append the default suffix to the server URL for this connection type. Select this option if you are running DataCollection service from the DataCollection Console.
- Selecting the IIS radio button tells DataCollection not to append a suffix to the server URL for this connection type. Select this option if you are running DataCollection service from a website hosted on IIS.
- Selecting the Custom radio button tells DataCollection not to modify the server URL in any way. Select custom if you have modified the service URL and it now differs from the default one.
- Tap the Save button. Tap the OK button to exit the Settings screen and return to the sign on screen.
Usage
Add License (Manual)
Click the New button on the Mobile License Manager screen and the Mobile License Editor window will be displayed.
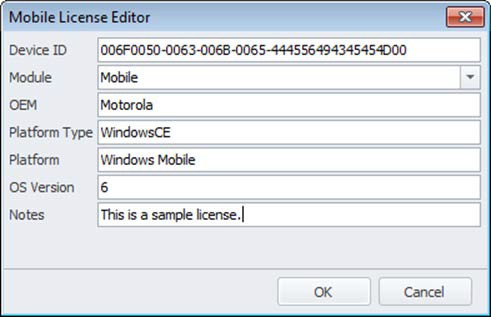
Enter a unique device ID, select a module from the Module dropdown, and click OK to add a mobile license. Device ID and module fields are required to add a mobile license; the rest of the fields are optional and can be used to enter information specific to the handheld.
The unique device ID is obtained from the handheld. On the “Login” screen tap the Settings button, then tap the ID button. The unique device ID will be displayed.

Add License (Automatic)
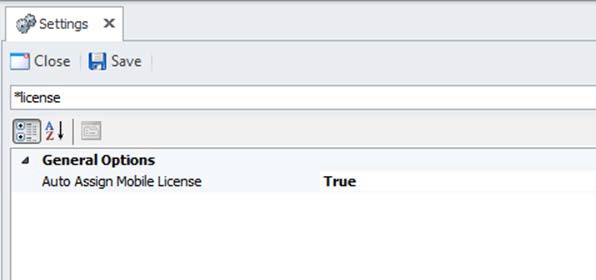
To allow DataCollection to automatically assign licenses when users log in to the DC mobile client, go to Settings in DC Console and set the Auto Assign Mobile License option to True.
You can view and modify added licenses on the Mobile License Manager screen.
Delete License
Select an existing license you wish to delete and click the Delete button. Click Yes on the resulting confirmation prompt to permanently delete the license.
Edit License
Select an existing license and click the Edit button. The Mobile License Editor window will be displayed. Modify the desired values and click OK to save your changes.
Please note that the device ID and module fields are not editable. To change these values, you will need to delete the license entry first and then add it again with new values.
Setting Up New Connections in DC Mobile
The Settings screen in DataCollection Mobile allows users to create, update and delete connections to different Dynamics GP companies. To create a new connection, follow the steps listed below:
- On the Login screen, tap the Settings button. The settings screen will appear
- Tap the + button under Connection Name to add a new connection
- Enter the Connection Name
- In the field under DataCollection Server, enter the name of the DataCollection Service you are connecting to
- Tap the Save button
- Tap OK to return to the Login screen
Login Screen
To log in to DataCollection Mobile, follow the instructions below:
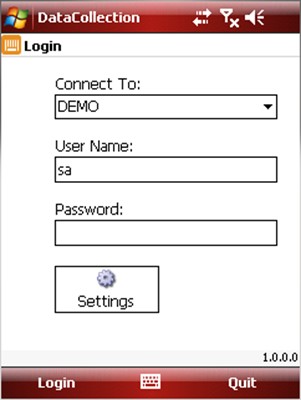
- Select the Connection Name from the dropdown menu
- Enter the User Name and Password. These fields are case sensitive
- Tap the Login button
- If the authentication is successful, the next screen you will see is the main menu where you can choose one of the inventory transactions available to start working
- If the authentication fails, an error is displayed at the top of the screen. Please tap the error message to see the error details
Note: The Quit button exits the DC Mobile application
Main Menu
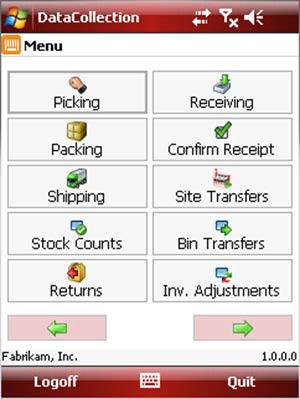
The Main Menu is a central screen from which users navigate to the functions available in DataCollection Mobile. To start a transaction, tap the button for that transaction. Choose from Picking, Receiving, Packing, Site Transfers, Shipping, Bin Transfers, Stock Counts, Inventory Adjustments, Returns, Receipt Confirmation and, if applicable, Pallet Transfers (see Pallet Tracking documentation). The information displayed at the bottom of the screen shows the company database you are working with, and the company and user used to authenticate to DC Mobile. The bottom right part of the screen also displays the version of DataCollection that is currently loaded on the mobile computer.
The keyboard icon that appears on the bottom right of every screen opens the operating system’s virtual keyboard. You may use this tool to as an alternate way of entering data.
From within any of the screens, tap the  button at the top right corner of the application screen to return to the Main Menu.
Note: DataCollection requires a constant connection to the wireless network. All processes are real-time. We do not support batch processing (scan a batch of items in a disconnected state and then upload that information at a later time).
Receiving
SalesPad DataCollection offers a variety of options for receiving. When you select Receiving from the Main Menu, you see the Receipt Header screen shown below. The information on this screen is optional, but allows for a wider variety of receiving. The Enable Classic Receiving Setting will cause this screen to be skipped if you do not need to allow for the additional options. See the Settings section for more information.
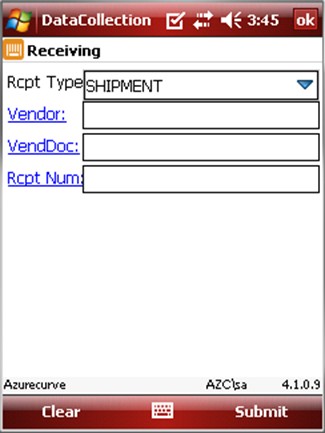
When you have supplied the information you wish on the Receipt Header, click Submit to begin receiving items by following the steps below.
Note: If you have chosen SHIPMENT INVOICE in the Rcpt Type field you will have to enter a Vendor Doc Number into the VendDoc field in order to continue.
- Scan or enter a purchase order number. You may only receive against a new or released PO.
You may also receive items without a PO, as long as you enter a valid, active Vendor ID. Receiving a line from a PO or supplying a Vendor ID on the Receipt Header screen will store a Vendor ID to be received against.
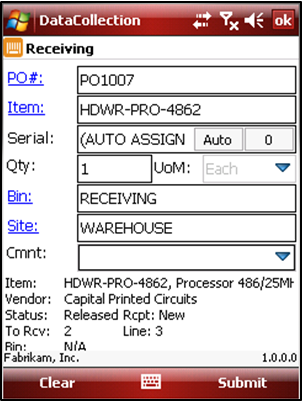
- Enter an item number in the Item field. You may also tap on the Item link to look up all the sales line items on that purchase order. Select an item and then tap the OK button. Note that if you have more than one sales line for the same item number, the lookup displays distinct sales lines for those items and they will need to be received separately
- If the item is a lot tracked item, the Lot field will appear on the screen (if not, skip this step):

Tap the ellipsis (...) to open the Lot Attributes screen, which allows users to view and add/change lot attributes including expiration and manufactured dates

Note: Lot Attributes are set up in Dynamics GP on the Item Maintenance Options screen
On the DC Lot Attributes screen, make any changes or additions, tap “Submit” to commit the changes, and tap OK to return to the Receiving screen - If the item you entered is serial or lot controlled, enter the serial/lot number, otherwise skip that field. You may also generate serial/lot numbers automatically by tapping the Auto button. If you select this option, you will need to enter the number of serials desired and a serial/lot number format depending on your settings. See the section Auto Assign Serial/Lot Number Format for details
- Enter the quantity. If you enter a quantity higher than the quantity to receive in the sales line item, a dialog will appear asking you to confirm the over-receipt. You may auto populate this field every time the screen loads by entering a value in the Default Receiving Quantity setting in the DC Console
- If GP has the multi-bin option enabled, you will see the bin field on the screen. Enter the bin to receive against. You may also tap on the Bin link to look up all the bins on that site. Select the bin desired and then tap the OK button
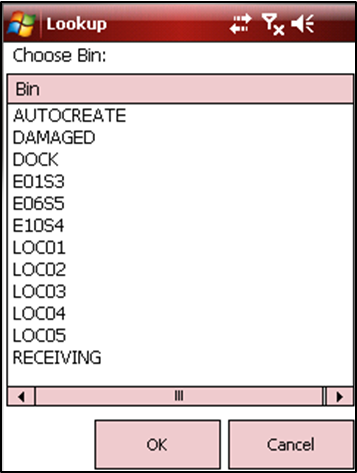
If the bin you entered does not exist but you have the setting Allow Bin Creation enabled in the DC Console, the application will automatically create that bin for you - Enter the site you want to receive against. You may auto populate this field every time the screen loads by entering a warehouse in the Default Warehouse setting in the DC Console
- Tap the Submit button to finish
- Repeat steps 2 to 7 until the PO is fully received. You may exit the transaction and finish entering the receipt later by tapping the OK button located on the right top corner of the application
- If you make a mistake while entering data or if you scanned the wrong bar code, you may backspace on that field and correct your data. The Clear button clears all fields on the form. The list of fields to clear may be adjusted in the DC Console via the setting Receiving Fields To Clear
- When the purchase order is fully received, a message will appear at the top of the screen informing the user and displaying the receipt number
Note: DataCollection Mobile does not post any transactions in Dynamics GP. Users must post the receipt manually.
Auto Assign Serial/Lot Number Format
You may specify the format of the serial/lot numbers used during the automatic generation process.
In the DataCollection Console, click on the Settings button in the toolbar and find the two settings below in the miscellaneous section.

The default format is {0:yyyyMMdd}_{1:0000} which adds the system date in yyyyMMdd format as a prefix to the auto incrementing number. You may change this format number to fit your needs.
If you set any of these settings to manual, you may enter the number format during the receipt by tapping the Auto button in the serial/lot field. In the image below, the yyMMdd format was used.
If you prefer to use Dynamics GP number formats you may set these settings to blank.
During the receipt, you only need to enter the number of serials to generate and skip the format text box.
Note: If you adjust your settings in the DC Console, you will need to save the changes, log off and log back in to DC Mobile before the changes take effect.
Receiving Settings
Adjust the following DataCollection Console settings as necessary. Save any changes you make in DC Console and log back in to both the DC Console and DC Mobile for changes to take effect.
Receiving General Settings
- Auto Generate Lot Numbers Format - Sets the format of the auto generated lot numbers created during receiving on DataCollection Console.
- Auto Assign Serial Number Format - Sets the format of the auto generated serial numbers created during receiving on DataCollection Console.
- Can Over Receive - When set to True, the user can receive items even when the quantity to receive is greater than the quantity ordered.
- Default Receiving Batch - A value used to determine the default batch during receiving.
- Default Receiving Bin - A value used to determine the default bin during receiving.
- Group Receipt Lines - When set to False, a new receipt line will be created every time new quantity is received for the same item.
- Prompt When Over Receiving - When set to True, DataCollection prompts the user to allow or prevent over receiving when the quantity received exceeds the quantity ordered.
Receiving Scanner Settings
- Allow Auto Generate Serial Lot - Determines whether the auto-generate button will be enabled on the scanner on Receiving and Inventory Adjustment. Set this to False if you’re using serials or lots that are generated outside of Dynamics and you need the users to scan the values in when receiving.
- Allow Item Lookup Selections As Scanned Receipt Items - If set to True, the quantity field will be incremented when the user selects an item through the lookup screen when the setting Increment By Scan is enabled.
- Auto Generate Bin Numbers - Creates bin numbers if the bin is empty based on the Auto Generate Bin Numbers Format setting.
- Auto Generate Bin Numbers Format - The layout of the bin numbers that will be auto generated. Defaults to an incrementing integer with an Auto prefix. (ex Auto:100)
- Auto Submit Receipts - If enabled, this setting allows serial/lot numbers to be auto-generated and receipts to be automatically submitted when the PO number and item number are entered.
- Catch Weight Separation Character - Specify a character that will separate the lot number and weight when receiving catch weight items.
- Clear Bin On Submit - Clears the Bin field on submit.
- Client Auto Assign Lot Number Format - Sets the format of the auto generated lot numbers created during receiving using DataCollection on a handheld scanner.
- Client Auto Assign Serial Number Format - Sets the format of the auto generated serial numbers created during receiving using DataCollection on a handheld scanner.
- Default Receiving Quantity - The number that will default into the quantity text box on the receiving screen when using the handheld scanner.
- Enable Classic Receiving - When set to True, the handheld receiving screen will skip the receipt header screen and go directly to a PO Receiving screen like older version of DataCollection. Receipts generated with this enabled will be Shipment Receipts.
- Enable Updating SalesPad Future Lot User Fields - If set to True, DataCollection will update SalesPad lot user fields (spxFutureInventoryLotNum) for lots that are not in the system yet.
- PO Lookup Cutoff Date - Enter the PO date field that specifies which date to use as a cutoff during PO Lookups. The options are: Promised_Ship_Date, Promised_Date, Required_Date.
- PO Lookup Date Range - Enter the number of days to use as date range criteria during PO Lookups. The value sets both the number of days in history that the search will go back and the cutoff date.
- Receipt Types Allowed - Defines a list of Receipt Types that will be allowed in Receiving. Currently, Shipment and Shipment Invoice are the only supported Receipt Types. This setting is used to populate the Receipt Types dropdown on the Receipt Header screen for Receiving; Enable Classic Receiving must be False.
- Receiving Increment By Scan - If set to True, the quantity field in the Receiving screen will be disabled and the quantity will be calculated/incremented by the number of individual items scanned. This setting cannot be used when the setting Suggest Next Item To Receive is enabled.
- Receiving Pre Submit Script - Receiving C# script that executes when the Submit button is clicked before the transaction is saved.
- Receiving Post Submit Script - Receiving C# script that executes when the Submit button is clicked after the transaction is saved.
- Require Bin On Submit - If set to True, users are required to enter a value in the Bin field when they submit the transaction.
- Require PO On Submit - When True, the receiving screen will require a Purchase Order number in order to receive items.
- Reuse Auto Generated Bin Numbers – Allows each mobile device to reuse the last bin number it generated.
- Suggest Next Item To Receive - If enabled, suggests the next item to receive in the order in which it is listed on the sales document. Upon tapping Submit, DC Mobile automatically loads the next item to the item number field
- Use PO Number As Receipt Batch - If True, batch names will match the receipt number. If False, all receipts will be in the same batch
General Settings
- Default Warehouse - Enter the name of the desired warehouse to pre-populate the warehouse field in all DC Mobile transactions when the screen loads.
- Force Rescan - If set to True, DC forces users to rescan item numbers for verification purposes. The item number will clear after the first scan and the item must be rescanned to be accepted as a valid entry to allow the user to continue the transaction. When set to False, the item number will be accepted the first time it is scanned.
Screen Setup Settings
- Receiving Field Sequence - See Changing the Field Sequences under Additional Settings
- Receiving Fields To Clear - See Modifying the Fields to Clear under Additional Settings
- Receiving Select Field Sequence - See Changing the Field Sequences under Additional Settings
- Receiving Select Fields To Clear - See Modifying the Fields to Clear under Additional Settings
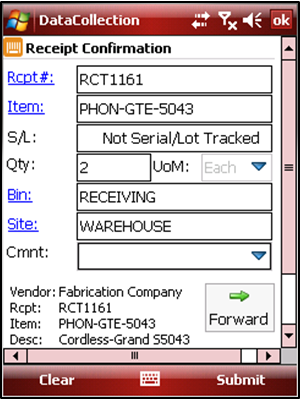
Receipt Confirmation
Receipt Confirmation allows users to confirm the completeness and accuracy of a receipt document and also enables users to edit the receipt and adjust it before it is posted. If an item is already on the receipt, users may change the receipt bin, quantity and lot number. Otherwise, the item is added to the receipt.
To confirm a receipt follow the steps below:
- Scan or enter a receipt document number. You may also enter or scan a purchase order number and DataCollection will load the receipt document associated with it. You may also use the Rcpt# link to lookup receipt documents in a ready to confirm batch. You may define the batch to monitor for this purpose in the Settings screen with the setting Receipt Confirmation Batch
- If you are going to change an item, enter the item number in the “Item” field. You may also tap on the Item link to see all the items received so far. Otherwise, if you are adding a new item to the receipt enter or scan the new item number
- If the item is a lot tracked item, the “Lot” field will appear on the screen (if not, skip this step):

Tap the ellipsis to open the Lot Attributes screen, which allows users to view and add/change lot attributes including expiration and manufactured dates. On the DC Lot Attributes screen, make any changes or additions, tap “Submit” to commit the changes, and tap OK to return to the Receiving screen - If the item you entered is serial or lot controlled, enter the serial/lot number, otherwise skip that field. Enter the quantity. If you enter a quantity higher than the quantity to receive in the sales line item, a dialog will appear asking you to confirm the over-receipt.
- If GP has the multi-bin option enabled, you will see the bin field on the screen. Enter the bin to receive against. You may also tap on the Bin link to look up all the bins on that site. Select the bin desired and then tap the OK button.
If the bin you entered does not exist but you have the setting Allow Bin Creation enabled in the DC Console, the application will automatically create that bin for you - Enter the warehouse you want to receive against. You may auto populate this field every time the screen loads by entering a warehouse in the Default Warehouse setting in the DC Console
- Tap the Submit button to finish
- Repeat steps 2 to 7 until the PO is fully confirmed
Receipt Confirmation Settings
Receipt Processing General Settings
- Filter Out Closed And Cancelled – If set to True, Purchase Orders with a status of Closed will be filtered out of search results and will not be displayed in the data grid.
- Filter Out Non-Standard Orders – If set to True, Purchase Orders with a type other than Standard will be filtered out of search results and will not be displayed in the data grid.
- Pre-Print Script - C# script that executes when you click the OK button on the print dialog, before the document prints.
- Receipt Label Put Away UofMs – Allows the user to change the unit of measure that will be used to print the receipt labels.
- Receipt Label Sticky Data Fields – Data entered here does not reset after printing a report so the user does not have to enter it each time.
- Receipt Label User Data Fields – User Data Fields allow the user to manually enter data during print time and add it to reports being printed.
Screen Setup Settings
- Receipt Confirmation Sequence – See Changing the Field Sequences under Additional Settings
- Receipt Confirmation Fields To Clear – See Modifying the Fields to Clear under Additional Settings
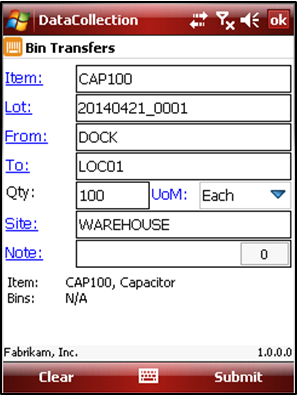
Bin Transfer
The Bin Transfer screen allows users to move merchandise to other bins located in the same site. To transfer items to another bin, follow the steps below:
Note: The Bin Transfers button will be disabled in the main menu if the multi-bin option is disabled in GP
- Scan or enter the item number
- If the item you entered is serial or lot controlled, enter the serial/lot number, otherwise skip that field
- Enter the bin you are transferring the item from. You may also tap on the From link to look up all bins containing the item. You may also enter the site for more precise searches. Select the bin desired and then tap the OK button
- Enter the bin you are transferring the item to. You may use the To link here as well. If the bin you entered does not exist but you have the setting Allow Bin Creation enabled in the DC Console Settings, the application will automatically create that bin for you
- Enter the quantity and select the unit of measure from the dropdown list
- If applicable, you can enter or view notes in the Note field
- Tap the Submit button
Bin Transfer Settings
Bin Transfer Scanner Settings
- Allow Item Lookup Selections As Scanned Transfer Items – If set tot True, the quantity field will be incremented when users select and item through the lookup screen when the setting Increment By Scan is enabled.
- Auto Submit Bin Transfers – If set to True, the bin transfer transaction will auto submit after entering all data in the scanner.
- Default Bin Transfer Quantity – The quantity that will default into the quantity text box on the bin transfer screen. Use Max to use the full bin quantity.
- Default Transfer To Bin – The default bin used for bin transfers.
- Increment Quantity By Scanning Transferred Item – If set to True, the quantity field in the Bin Transfers screen will be disabled and the quantity will be calculated/incremented by the number of individual items scanned.
- Shows Item Bins Only In the To Bin Lookup for Bin Transfers – If set to True, the To Bin lookup query results will only display the bins where the item has inventory for bin transfers.
Bin Transfer General Settings
BIN TRANSFER FIELD SEQUENCE – See Changing the Field Sequences under Additional Settings
BIN TRANSFER FIELDS TO CLEAR – See Modifying the Fields to Clear under Additional Settings
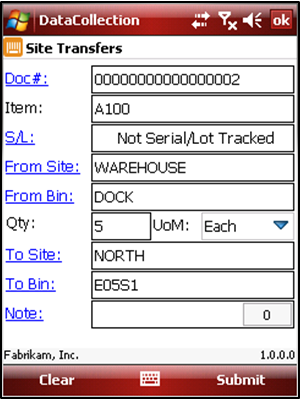
Site Transfer
The Site Transfer screen allows users to transfer merchandise to different warehouses. To transfer items to another site, follow the steps below:
- If you are starting a new transfer document, leave the document field blank. Otherwise, enter the document number you want to edit. You may use the Doc# link to lookup open transfer documents
- Scan or enter the item number
- Enter the warehouse you are transferring the item from. You may also tap on the From Site link to look up all warehouses containing the item. You may also enter the warehouse for more precise searches. Select the bin desired and then tap the OK button
- Enter the bin you are transferring the item from. You may use the From Bin link here as well
- If the item you entered is serial or lot controlled, enter the serial/lot number, otherwise skip that field
- Enter the quantity and select the unit of measure from the dropdown list
- Enter the warehouse you are transferring the item to. You may also tap on the To Site link
- Enter the bin you are transferring the item to. You may use the To Bin link here as well. If the bin you entered does not exist but you have the setting Allow Bin Creation enabled in the DC Console Settings, the application will automatically create that bin for you
- You can optionally add notes in the Note field, to see the notes entered click the Note link
- Tap the Submit button
Note: To make a successful transfer, the quantity being transferred must be on hand and unallocated in the From Site
Site Transfer Settings
Site Transfer Scanner Settings
- Shows Item Bins Only In the To Bin Lookup for Site Transfers - If set to True, the To Bin lookup query results will only display the bins where the item has inventory for site transfers.
- Site Transfer Document Lookup Batch – In the Site Transfers screen, the document lookup will only display the site transfer documents matching the specified workflow batch. If this setting is left blank, the lookup will not filter by workflow batch.
Site Transfer General Settings
- Site Transfer Field Sequence – See Changing the Field Sequences under Additional Settings
- Site Transfer Fields To Clear – See Modifying the Fields to Clear under Additional Settings
- Shows Item Bins Only In The To Bin Lookup – If True, the To Bin lookup query results will only display bins where the item has inventory. If the item number is not entered, the lookup will display all bins
SalesPad Support
Comments