Overview
DataCollection WMS provides a variety of options to effectively manage warehouses. This documentation will discuss in detail Warehouse Configuration, Customer Warehouse Configuration, Safety Stock, and the Extended Warehouse Module.
Warehouse Configuration
Overview
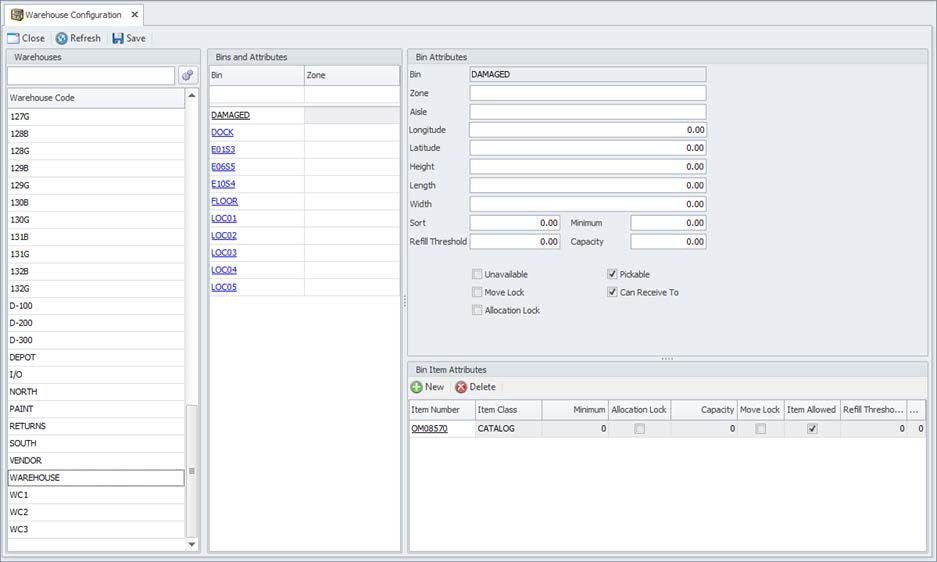
The Warehouse Configuration screen allows users to assign attributes to their bins and bin items. Users can edit a single bin or a range of bins and configure them to have the attributes they need to control inventory in those locations. The attributes assigned to bins and bin items in this screen are then read by the DataCollection Manager when the user submits inventory transactions and enforces their configuration.
Security
To access Warehouse Configuration, it must first be enabled in the Security Editor (Modules > Security Editor). Make sure the Warehouse Configuration box is checked in the Security grid.
Usage
In the Warehouses pane, users may search for warehouses and filter/sort the results. When a warehouse is selected, the Bins & Attributes pane will display all bins in the selected warehouse. Selecting a bin in the Bins & Attributes pane loads that bin’s attributes in the Bin Attributes pane, and loads item attributes in the Bin Item Attributes pane.
To edit a bin or a range of bins, select the bin or bins in the Bins & Attributes pane. To select multiple bins, hold down the Shift key and click on the last bin in your selection range. Then make the necessary changes in the Bin Attributes pane. When finished making changes, click Save.
User may also add, edit and delete Bin Item Attributes. These attributes define rules for specific items in a particular bin that must be respected by the DataCollection Manager when users submit transactions involving those items. For example, if item A100 in bin LOC01 has a move lock attribute, users would receive a message when attempting a Bin Transfer transaction that the item cannot be moved to another bin.
Bin Attribute Descriptions
Zone: Describes a physical location for a group of bins in the warehouse Minimum: Sets the minimum amount of pieces the bin is allowed to decrease to.
Capacity: Sets the maximum combined amount of pieces the bin can hold. Refill Threshold: Maximum threshold quantity for a bin.
Unavailable: Sets all pieces stored in the bin as reserved and not available for use.
Move Lock: Places a lock on the bin so users cannot move items from and to the bin
Pickable: Sets inventory available for picking in the bin.
Can Receive To: Sets bin open for inventory receiving.
Bin Item Attribute Descriptions
Item Allowed: Sets the item in the bin as allowed/not allowed based on the value of the option.
Max Lots: Sets the maximum number of distinct lot numbers allowed.
Minimum: Sets the minimum amount of pieces the bin item is allowed to decrease to.
Capacity: Sets the maximum capacity for the bin item.
Refill Threshold Qty: Maximum threshold quantity for a bin.
Move Lock: Places a lock on the bin item so users cannot move that item from and to the bin.
Customer Warehouse Configuration
Overview
The Customer Warehouse Configuration screen allows users to assign attributes to bins and bin items for a specific customer. Users can edit a single bin or a range of bins and configure them to have the attributes they need to control customer inventory in those locations. The attributes assigned to bins and bin items in this screen are then read by the DataCollection Manager when the user submits inventory transactions and enforces their configuration.
Security
To access Customer Warehouse Configuration, it must first be enabled in the Security Editor (Modules > Security Editor). Make sure the Customer Warehouse Configuration box is checked in the Security grid.
Usage
Customer Warehouse Configuration is not fully supported at this time.
Safety Stock
Overview
Safety stock is used to assign safety quantities to each item and warehouse. Safety stock quantity is quantity that cannot be allocated. In addition to item and warehouse, safety stock quantity can also be assigned to a particular customer.
Finally, customers can be completely exempt from safety stock regardless of the quantity that is specified for that item or customer.
Security
Safety stock quantities are entered on the Inventory Lookup screen. Safety stock exemptions are entered on the Safety Stock Exemptions screen.
To access Inventory Lookup, it must first be enabled in the Security Editor (Modules > Security Editor). Make sure Inventory Lookup box and Customer Inventory box are checked in the Security grid.
To access Safety Stock Exemption, it must first be enabled in the Security Editor (Modules > Security Editor). Make sure the Safety Stock Exemption box is checked in the Security grid.
Usage
Add Safety Stock

On the Inventory Lookup screen, enter an item number in the search field or click Search to perform a blanket search of inventory items. Select an item and a warehouse (items can have different safety stock quantities for each warehouse) and click the Safety cell on the grid. Enter the desired safety stock quantity and tab off. Safety stock is instantly saved and added.
Delete Safety Stock
On the Inventory Lookup screen, enter an item number in the search field or click Search to perform a blanket search of inventory items. Select an item and a warehouse and click the Safety cell on the grid. Set the safety stock quantity to 0 and tab off. Safety stock is instantly saved and removed.
Edit Safety Stock
On the Inventory Lookup screen, enter an item number in the search field or click Search to perform a blanket search of inventory items. Select an item and a warehouse and click the Safety cell on the grid. Modify the safety stock quantity and tab off. Safety stock is instantly saved and updated.
Add Customer Safety Stock
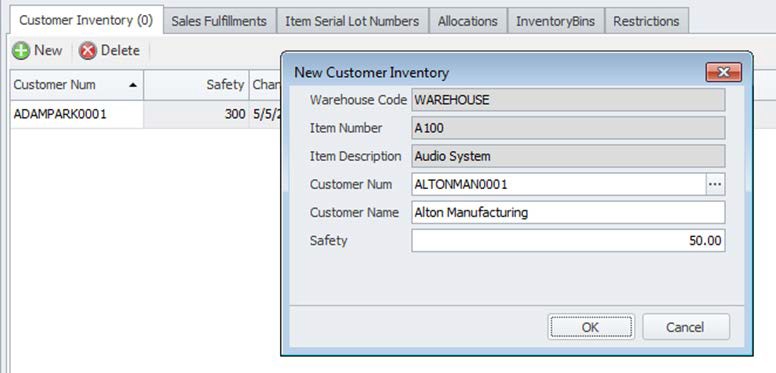
On the Customer Inventory screen on Inventory Lookup, click the New button. The New Customer Inventory window opens. Enter the customer number or click the ellipsis (…) button to search for a customer. Enter safety stock quantity and click OK to save your changes.
Delete Customer Safety Stock
Select an existing customer safety stock on the grid and click the Delete button. Click Yes on the resulting confirmation prompt to permanently delete the customer safety stock.
Edit Customer Safety Stock
To edit an existing customer safety stock, simply click the Safety cell on the grid and enter a new value. Tab off and the new value is instantly saved. Note that customer value cannot be edited. To change the customer you will need to delete the safety stock entry first and then add it again with a new customer.
Safety Stock Exemptions
Safety stock exemptions are added on the Safety Stock Exemption screen.
Adding an Exemption
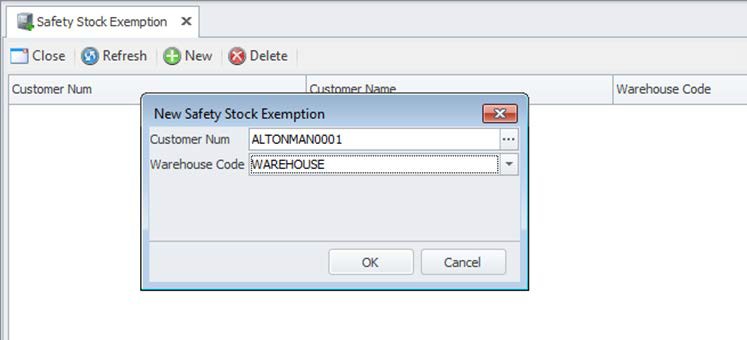
Click the New button on the Safety Stock Exemption screen to add a new exemption. New Safety Stock Exemption window opens. Enter the customer number or click the ellipsis (…) button to search for a customer. Select a warehouse from the dropdown list and click OK to add the exemption.
Note: Leave the warehouse code field blank if you want the exemption to apply to all warehouses.
Deleting an Exemption
Select an existing safety stock exemption on the grid and click the Delete button. Click Yes on the resulting confirmation prompt to permanently delete the exemption.
Editing an Exemption
Safety stock exemptions cannot be edited. You will need to remove the unwanted exemption and re-add.
SalesPad Support
Comments