Overview
Note: In order to use PayLink, you must have the SalesPad Remote Library Extended Module, and it must be using one of the ports listed below:
- 446
- 5002
- 5501
- 5502
- 5503
- 10443
Otherwise, your customer’s payments will not be recorded in SalesPad Desktop.
The Create PayLink Plugin is included in your PayFabric build of SalesPad Desktop by default. This plugin allows users to integrate their invoices with PayFabric’s PayLink system, which enables companies to send their customers a text message or an email, through which the customers are able to process their payment using their method of choice. PayFabric will then write back the customer’s payment information and fill in the appropriate fields in both SalesPad Desktop and Dynamics GP.
In this document, you will learn how to create and manage PayFabric PayLinks. Before proceeding, please visit the Security Settings and Application Settings sections at the end of this document to ensure that you won’t run into difficulties when learning to use PayLinks.
Setup
You must have a valid PayFabric account set up with SalesPad Desktop in order to use PayLink. If you do not, please read the PayFabric documentation to learn how to properly configure a PayFabric account into SalesPad Desktop.
Once you have a properly configured PayFabric account integrated with SalesPad Desktop, you must configure PayLink through your PayFabric account. For more information regarding setting up a PayFabric Paylink account, please visit PayFabric's documentation on the subject.
Once you have created your PayLink account, you must configure an ERP connection in order to complete the integration with SalesPad Deskop. Navigate to your PayLink Account -> Settings -> Configure an ERP connection. You will see a page that looks like this:
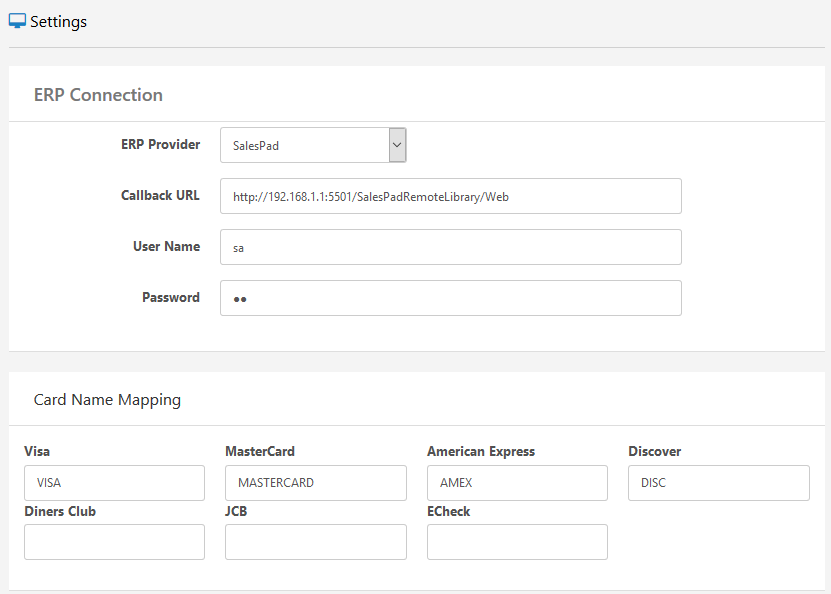
Select "SalesPad" from the ERP Provider dropdown list. Set the Callback URL to the SalesPad Remote Library URL. The User Name and Password fields are the login credentials to your SalesPad Desktop account. This user should have Admin access.
Under the Card Name Mapping section, you must match up the credit card names to what you have configured in your Credit Card Type Mappings PayFabric setting. These credit card mappings must map to what you have configured in your Dynamics GP account, found here:
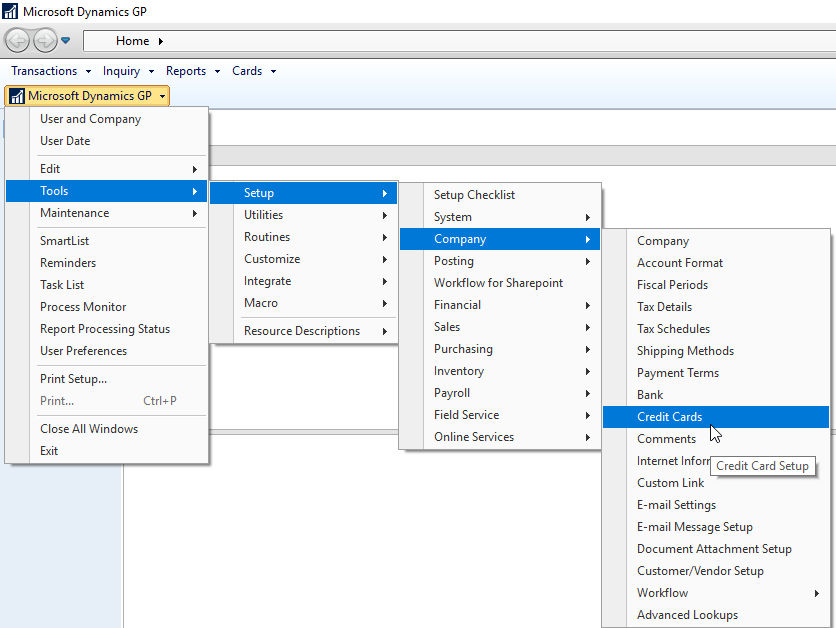
For more information regarding credit card mappings, please refer to this documentation.
Usage
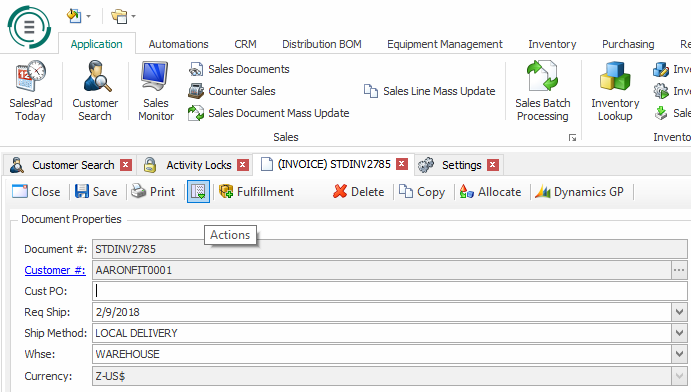
In order to create a PayLink, you must run the Create PayLink Sales Document Plugin, found in the Actions dropdown:
After you click run the Create PayLink Plugin, the sales document will be audited. There are a number of messages you may receive regarding the success of the plugin. Most of these messages should be self explanatory, however, there are some instances in which we are not able to provide enough information to correctly display to the user what the problem is. For example, the "Unauthorized" error message simply refers to the fact that your PayLink settings are not properly configured and that the call to PayLink was rejected by PayFabric.
Once you have successfully created a PayLink, depending on your Manually Send PayLink Notification setting, the notification will have either sent automatically or not. Regardless, if you navigate to your PayLink Account and click Document Queue, you will see your recently created PayLink in this queue. From here, you can see the current status of the PayLink, if there are any errors with the integration, or you can send out notifications straight from within the PayFabric Web Portal.
To apply a PayLink to a Historical document, make sure that the Show Historical checkbox is checked when searching for the document.
Using Smart Printing
PayLink information has also been added to SalesDocument Reports, which can be used in workflows to send out PayLink URLs from within SalesPad Desktop.
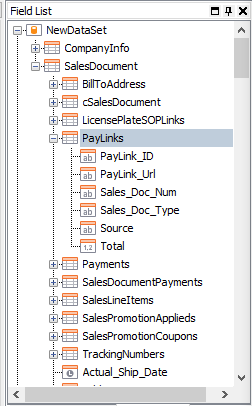
To find this information, head to the Report Manager in SalesPad and design an invoice report. Select the Field List tab on the right side of the screen, then open up the SalesDocument tree. Under this heading, you should see a PayLink section. This is where you can add the PayLink URL to any report you wish to send out to your customers.
You can then use the Smart Printing plugin to send out these reports containing PayLink information to customers.
Once the customer has made a payment using a PayLink, PayFabric will call Remote Library to write back the payment information captured through PayLink. This will be recorded on the original invoice.
Cancel PayLinks Plugin
The Cancel PayLinks Plugin cancels all unpaid PayLink references in SalesPad Desktop for the current document. It also cancels the associated PayLink documents in the PayFabric portal. This plugin has no form, but is simply a user prompt.
The Cancel PayLinks Plugin can be run manually from the Actions dropdown or through workflow, and is also triggered when deleting a sales document if unpaid PayLink references are found and the current user has access to the plugin.
Application Securities
Enable the following security:
Create Paylink – Allows the user to use the Create Paylink Sales Document plugin.
Note: You must log out and back in for security changes to take effect.
Application Settings
Make sure you have optimal settings enabled to perform the tasks outlined in this document. Navigate to Settings, then type “PayLink” into the search bar. Adjust your PayLink settings as desired.
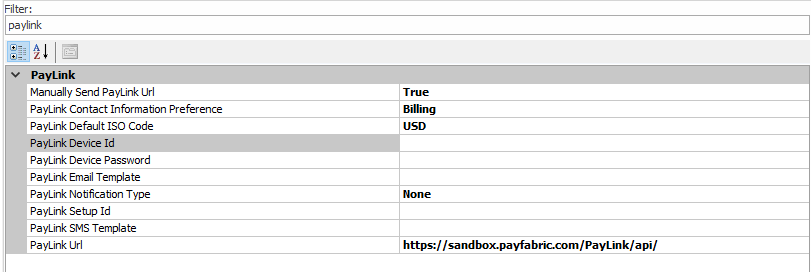
Manually Send PayLink Url - This setting determines whether or not to retrieve the PayLink URL to manually send to customers, or to have PayLink automatically send the notifications. Select True if you have some method set up to send PayLinks to a customer (for example via SalesPad’s Smart Printing). Otherwise, select False if you wish for PayFabric to automatically send Paylink Urls to your customers.
PayLink Contact Information Preference - This is the email address and/or phone number to be used when sending PayLink notifications automatically. The Billing and Shipping options refer to the customer’s Billing and Shipping Contact info, respectively. SalesPad will only use the contact’s Phone 1 and/or the Email to send a PayLink URL.
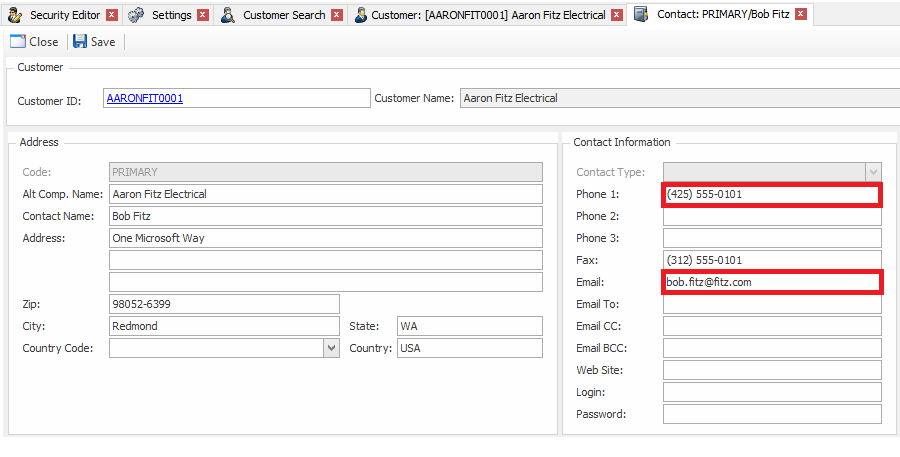
The DocumentBilling and DocumentShipping options refer to the sales document’s Billing and Shipping information, respectively. Contacts' phone numbers must contain the correct country calling code. If the phone number is a US number (1), SalesPad will automatically append a "1" to the beginning when sending the document information over to PayLink.
Note: This setting will only be used if the Manually Send PayLink Url setting is False.
PayLink Device ID - This is the Device ID from PayLink you must use when creating PayLinks. Navigate to your PayLink account -> Settings -> PayFabric Device.
PayLink Device Password - This is the Device Password from PayLink you must use when creating PayLinks. Navigate to your PayLink account -> Settings -> PayFabric Device.
PayLink Notification Type - This setting specifies the type of notification (Email, SMS, None, or Both) the created PayLink document will use.
Note: This setting will only be used if the Manually Send PayLink Url setting is False.
PayLink Email Template - This is the email template to use when sending PayLinks automatically. This is set up through your PayLink account. Navigate to PayLink account -> Settings -> Templates. By default, there are several templates, such as "Email Notification".
Note: This setting will only be used if the Manually Send PayLink Url setting is False.
PayLink SMS Template - This is the phone SMS template to use when sending PayLinks automatically. This is set up through your PayLink account. Navigate to PayLink account -> Settings -> Templates. By default, there are several templates, such as "SMS Notification".
Note: This will only be used if the Manually Send PayLink Url setting is False.
PayLink Setup ID - This is the Gateway Profile Setup ID from your PayLink Account. Navigate to your PayFabric Account -> Settings -> Gateway Profiles.
PayLink Url - This is the URL for the PayLink API.
Kayako Admin
Comments