Overview
The Accessories menu allows users to manage and connect to the external devices that are currently attached to their mobile device.
Navigation
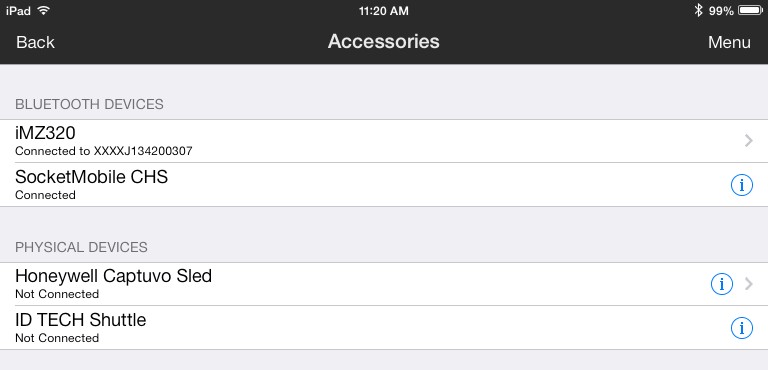
The Accessories screen can be accessed by tapping the Accessories button in the menu. Selecting this option will present a page showing all the accessories that the application supports. Each device will display the current connection status. If there are options available for the device, a tap on the device name will show the options screen for that particular device.
Usage of Supported Devices
Zebra Printer
To use a Zebra Printer with SalesPad Mobile, begin by pairing the printer with your mobile device. Once a successful pair has been completed, open the Accessories screen in SalesPad and tap on Zebra Printer.
After opening the options for the Zebra Printer, a screen is presented with a button prompting the user to select a device. Tapping the button will bring up a list of attached Bluetooth devices. Select the Zebra Printer from this list. The application will then attempt to connect to the printer. A message will be displayed once the connection is successful or unsuccessful. After a successful connection is made, the application will attempt to verify settings to ensure the printer is ready for operation.
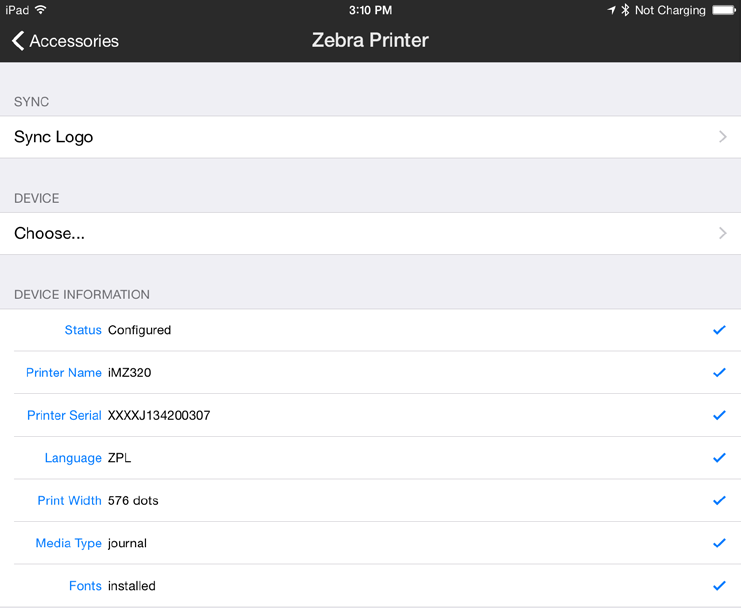
Some settings may be incorrectly configured on the Zebra printer. If this happens, the setting will not receive a blue checkmark next to it and will ask the user to Tap to Fix. Tapping on the setting will attempt to resolve the issue.
SalesPad automatically retrieves the print width from the Zebra Printer. If a different width is desired, tap on the number of dots to change it. Alternatively, update the printer firmware accordingly and reconnect SalesPad Mobile to the printer.
Selecting Sync Logo will download an image from the mobile server to print on the header of each receipt. This requires the Path to Company Logo field under the Printing category on the mobile server to be filled. Once the image is downloaded, it will be printed on every receipt and will not need to be downloaded again.
Adding a footer to the zebra receipt can be done from the mobile server. Add the desired ZPL to the Zebra Printer Footer field under the Printing Category. This will automatically be printed on the bottom of every receipt. Nothing needs to be done on the mobile devices.
Tutorials on writing ZPL can be found on Zebra’s website. A pdf of the documentation on ZPL is located at http://www.zebra.com/content/dam/zebra/manuals/en-us/software/zpl-zbi2-pm-en.pdf. In addition to this, the footer field allows escape characters to be inserted within the ZPL. When determining Y coordinates, entering {y} will be transformed into a number with an offset of y from the bottom of the receipt. For example: if text is desired at the bottom of the receipt, placing it at (0, {10}) will result in the text being displayed 10 dots below the bottom of the original receipt on the left side. Additionally, entering “{width}” will transform into the width of the receipt. For example: if the Print Width is 576, “{width}” will become “576.”
Removing fields from the receipt can be accomplished from the mobile server. Select the fields that should not appear on the receipt in the Zebra Avoid Printing Fields setting under Documents, Access Security in the Security Editor. After restarting the app, these fields will no longer be printed.
Configuring the Zebra printer to use bold text on the receipt requires installing new fonts on the printer. To do this, tap on the Fonts row in Device Information. This dialog will appear:

Selecting Install Fonts will determine which fonts are missing from the printer and install required fonts that are not there. Selecting Reinstall Fonts will delete the current fonts installed on the device. This is useful if the fonts have become corrupted. While the fonts are being downloaded to the printer, please do not disconnect the mobile device from the Zebra printer. This may result in both devices requiring a restart and corrupt the fonts on the Zebra printer.
To print a Sales Document from SalesPad, navigate to the Sales Document, tap Menu, and then Print. SalesPad will format the document appropriately and output to the previously configured Zebra Printer.
Socket Mobile SocketScan S740
Currently, SalesPad Mobile is compatible only with the Socket Mobile SocketScan S740. To use a SocketScan S740 with SalesPad, simply pair the scanner with your mobile device.
There are no additional options for Socket Mobile scanners. SalesPad will check all Bluetooth devices currently paired with the mobile device and connect to any scanners that are accessible and paired to the device.
A SocketScan S740 can be used throughout SalesPad to search for Sales Documents, Customers, etc. and add items to a Sales Document. Simply begin scanning product barcodes to begin adding them to a focused Sales Document in Edit mode.
Honeywell Captuvo Sled
To use a Honeywell Captuvo Sled with SalesPad, physically connect the sled to your mobile device. SalesPad officially supports the following devices:
- Captuvo SL22
- Captuvo SL22/42
- Captuvo SL62
- Other Captuvo sleds may work but we will not directly support them.
Customers will need the latest firmware versions for their sleds to properly work with SalesPad Mobile GP. The latest can be downloaded from Captuvo Firmware Upgrade Tool app in the app store.
The scanner on a Honeywell Sled can be used throughout SalesPad to search for Sales documents, Customers, etc. and add items to a Sales Document. Simply begin scanning product barcodes to begin adding them to a focused Sales Document in Edit mode.
Credit card information can be captured using a Honeywell Sled equipped with a credit card reader. Swipe a credit card while on an Order or Invoice to begin accepting a credit card payment. Manual payments can be accepted if not using CardControl with a SalesPad Mobile server.
ID TECH Shuttle
To use an ID TECH Shuttle with SalesPad, physically plug the shuttle to the audio jack on your mobile device.
There are no additional options for ID TECH Shuttles. SalesPad will automatically detect supported devices and connect to any shuttles that are accessible.
Credit card information can be captured using an ID TECH Shuttle. Swipe a credit card while on an Order or Invoice to begin accepting a credit card payment. Manual payments can be accepted if not using CardControl with a SalesPad Mobile server.
Square Credit Card Readers
Square credit card readers can be used with SalesPad Mobile as of version 1.4.0. Square readers require additional permissions, so additional information is shown for them in the Accessories screen. For more information, review the Square documentation here.
SalesPad Support
Comments