Overview
The Layout Tabs Setup module allows users to display only selected tabs on the Customer Card, Purchase Order, Sales Document, and/or Vendor Card, based on a property of the customer, PO, document, or vendor such as Customer Class or Sales Doc ID (it could also be set up to use a different value such as sales rep or currency). This module can also be used to delete custom layouts saved on the sales document header or customer card overview.
Note: For selected tabs to display, users must also have security access to them. Example: If the Item History tab is configured to display on the vendor card and the customer card, Vendor Item History and Customer Item History must also be enabled for that user group in the Security Editor. (Related security information can be found in the following SalesPad documents:
Security Settings, Customer Card, Sales Document Entry, Vendor Card, and Creating and Opening Purchase Orders.
Security
Layout Maintenance – Grants access to the Layout Maintenance function, where the Layout Tabs Setup is located.
Settings
To easily find related settings, open the Settings module and filter to “load.” Only enter values for the forms you wish to select tabs for.
Load Customer Tabs By Field – enter a value here (such as Customer_Class) to determine which tabs to display on the customer card, based on setup in the Layout Tab Setup screen.
Load Purchase Order Tabs By Field – enter a value here (such as PO_Type) to determine which tabs to display on POs, based on setup in the Layout Tab Setup screen.
Load Sales Document Tabs By Field – enter a value here (such as Sales_Doc_ID) to determine which tabs to display on sales documents, based on setup in the Layout Tab Setup screen.
Load Vendor Tabs By Field - enter a value here (such as Vendor_Class_ID) to determine which tabs to display on the vendor card, based on setup in the Layout Tab Setup screen.
Use
- Open the Layout Tabs Setup module (under Setup/Utilities)

- In the Form grid, select the form to edit
- In the Tabs grid, click New. The Form Name (based on the Form selected) and Type (based on what is entered in settings) will display
Note: If at any point you click another form before saving, you will lose your changes.
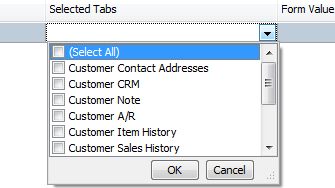
- In the Selected Tabs column, click the drop-down arrow and select the tabs to display or check
Select All for all. Then click OK
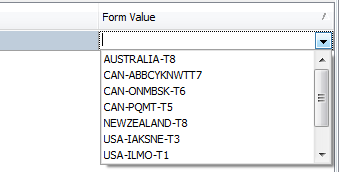
- In the Form Value column, click the drop-down arrow and select a value (based on the Form Type) for which to display the Selected Tabs
- Click Save
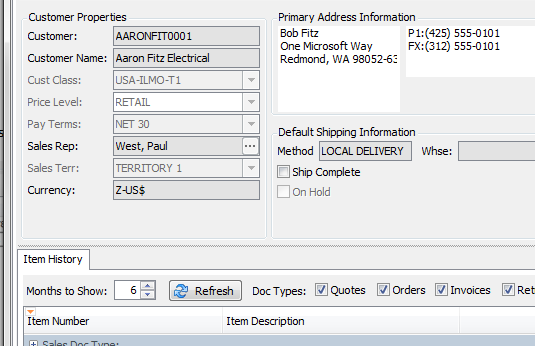
In the example below, the Customer Card for those with a Customer Class (Form Value) of Australia will display all tabs, but those with a Customer Class of USA-ILMO-T1 will display only the Item History tab:

You must log out and back in to see any tab changes on the Customer Card or any other Form.
Setting the Order for Loading Tabs
1. In newer versions of SalesPad, a column in the Layout Tabs Setup module allows you to specify a sequence for setting the order in which the tabs are loaded on Sales Documents, Customer Cards, Purchase Orders, and Vendor Cards.
To utilize this feature, go to Layout Tabs Setup and you will see a “Seq” column (2nd from left). Click within the column to specify or change the sequence.

LAYOUTS
Any previously saved layouts for Forms (only Customer Card and Sales Documents can be customized at this time) will appear in the Layouts grid at the bottom of the Layouts Tab Setup module. Select a Form Name (CustomerCard or SalesDocumentEntry) from the Form grid to view those layouts:

You can select a layout and Delete it from this grid. Upon refresh on the Customer Card or Sales Document, the custom layout will be removed.
Refer to the SalesPad Customizing Layouts document for more information on customizing layouts.
SalesPad Support
Comments