Overview
This document covers the setup and use of the Mobile Layout Manager, available in DataCollection versions 4.3+. The Mobile Layout Manager was created to replace a large number of settings which controlled the layout of the mobile device screens as well as a small amount of functionality. The Manager was created with the knowledge that existing customer might already have made changes to the settings which are now removed and will import these settings when the Manager is loaded for the first time.
Table of Contents
Features
The Mobile Layout Manager creates and maintains the layout of the mobile device screens. It controls both Windows Mobile and iOS devices with the same layout information. Some of the finer points of the layout are not implemented at initial release, but all features will be implemented as time permits.
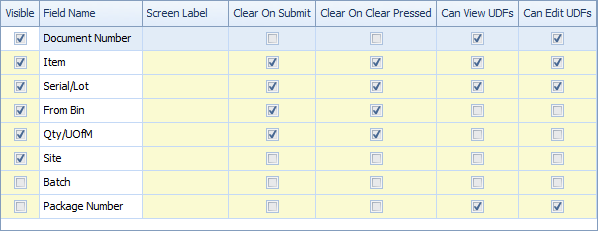
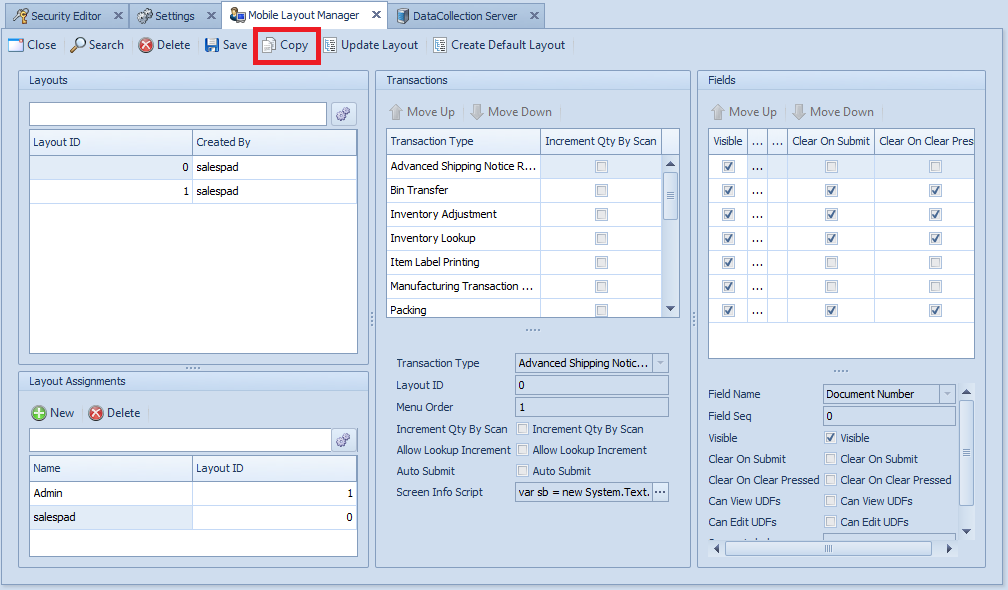
The Manager provides a more visual way of manipulating the mobile screens and removes any chance of mistyping values into the settings, which could prevent the screen from appearing as intended. By presenting the options for the screen in this visual manner, DataCollection removes a lot of the guess work in creating a layout. The Manager also now allows for individual users to have a layout designed to their liking. Below is a sample of the two layouts that will be created when the Manager is loaded for the first time.
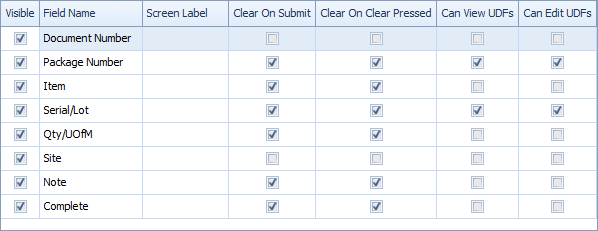

The Default Layout is not editable and provides a baseline for a new layout. The second is created using the existing settings and translating them into the new format. The imported layout is editable after its creation.

The center grid lists the transactions available. The order in this grid determines the handheld menu order. Each screen can also be configured to Auto Submit when the screen has complete data, set to increment the quantity on scan, and set to allow item lookups to increment the quantity.
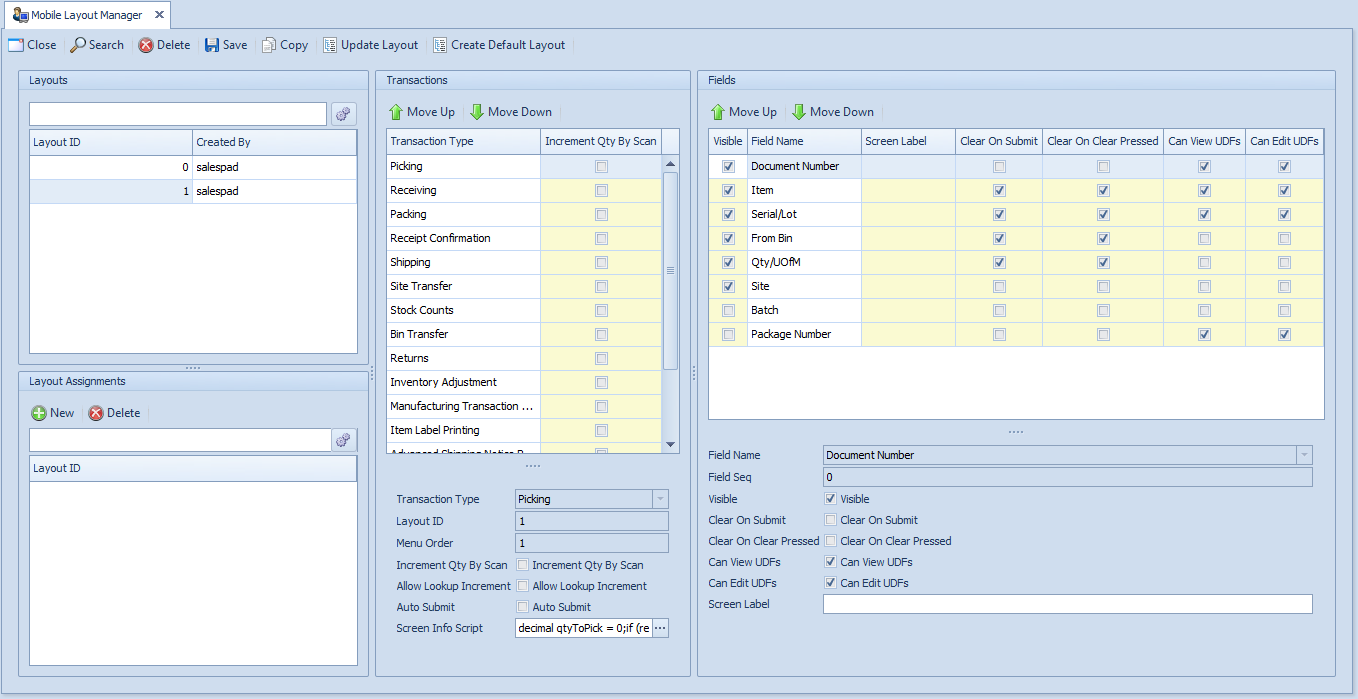
The pane on the right side of the screen shows the fields that are available on the selected transaction’s screen. The grid on the lower portion shows the order in which the fields will be displayed on the mobile device. The fields on the upper portion of the screen show the same information available on the grid in a different format. One addition to the upper pane is the Required checkbox. This is a static value that determines whether or not the field is required by the screen to function. If checked, the Visible flag is ignored for the field; it cannot be removed from the screen.
Screen Label is used to rename the field’s label on the mobile device. For instance, if Item is more commonly referred to as Product, you can rename the field’s label to Product on the mobile device. Each field can also be configured to be cleared based on two different events: “on submit” and “on clear pressed.” “On submit” is triggered when the transaction is submitted to the server. “On clear pressed” is triggered when the Clear button on the mobile device is pressed.
Each field can also be set up to allow the user to view and, separately, edit User Defined Fields. The security setting for the screen is still respected over the layout setting, but the security settings are only by system user group. The Manager can make these available on a per-user basis, if further control is desired. Only certain fields support UDFs on the mobile device; the configuration for UDFs is discussed in another document. A warning will be displayed in the Manager if a field does not support UDFs when the Can View or Can Edit values change.
Setup and Use
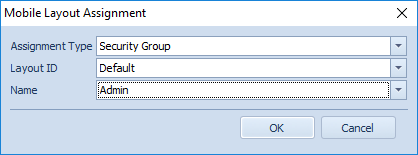
The Mobile Layout Manager is designed to be user-friendly. The initial setup is automatically handled as soon as the form opens for the first time. Layouts will also need to be assigned, and this is not automatic. In the Mobile Layout Manager window, go to the Layout Assignments pane and click the New button. Assignment Type determines if the layout is assigned to the Security Group or Username. Layouts assigned to security group will affect all users in a given security group, while layouts assigned to a Username will affect only that user. From here, you can choose the Layout ID to assign and then select the Group or User you want to assign the layout to. If you have assigned a layout to a user and a different layout to that user's security group, the layout assigned to the user has priority.
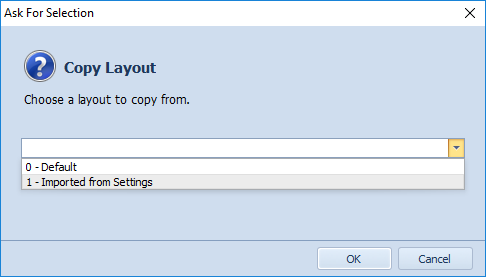
To create new layouts, click the Copy button in the main Mobile Layout Manager window. A dialog box will appear asking you to make a selection from the current list of available layouts. This creates a customizable copy of the layout.
To make changes to a layout, select it on the grid on the left panel. The other grids will load the information for that layout and highlight all columns that can be changed in a light yellow color.
To reorder the menu order, click the Move Up and Down buttons above the middle grid and the selected screen will move accordingly. To reorder fields on the selected screen, use the Move Up and Down buttons above that grid.
Occasionally, new screens or fields are added to DataCollection. When this happens, the layouts will need to be updated from this screen in order to have the new values added. Simply click the Update Layout button at the top of the screen with the layout selected on the left grid. The new values will be added in their default configuration.
If the default layout is ever lost from the database, it can be added again by clicking the Create Default Layout Button. If the system currently has no layouts, it will also re-import a layout from the settings, like on the first run of the screen.
To set the screen label for a field that is part of a pair (Qty/UofM), the screen label value requires a small amount of formatting. The labels need to be separated by a | character and must be in the order the fields show on the screen. For instance, to rename UofM to Unit and Qty to #, the screen label for that field would be #|Unit. To change only UofM, then the value would be Qty|Unit; Qty must be specified first.
Currently, the screen labels for item tracking (Serial/Lot) are not used, due to the nature of the field. The screen labels are changed to reflect the current item’s tracking option.
Settings and Security
Settings
There are no new settings created for the Mobile Layout Manager, however close to 50 were removed because their functionality was incorporated into the new Layouts. A quick list of the settings removed follows:
Handheld Menu Order
All Field Sequence settings (each screen)
All Fields to Clear settings (each screen)
Clear Bin on Submit
All Auto Submit settings (certain screens)
All Increment Qty By Scan (certain screens)
All Allow Item Lookup Increments (certain screens)
Security
To access the Mobile Layout Manager, open the Security Editor and search for its name. Select the security group which needs access and click the Access checkbox to enable. Save and logout for the changes to take effect.
SalesPad Support
Comments