Overview
The EDI Processing screen provides an easy way to monitor incoming and outgoing EDI documents. It displays any errors that occur and can be setup to email whenever there are any issues that need to be addressed. It is also where users can send/retrieve EDI documents to test their Business Object Mapping setup.
In this document, you will learn how to navigate the Transaction grid, how to test inbound documents, and about the Transaction and System Processing Logs.
Table of Contents
Transactions
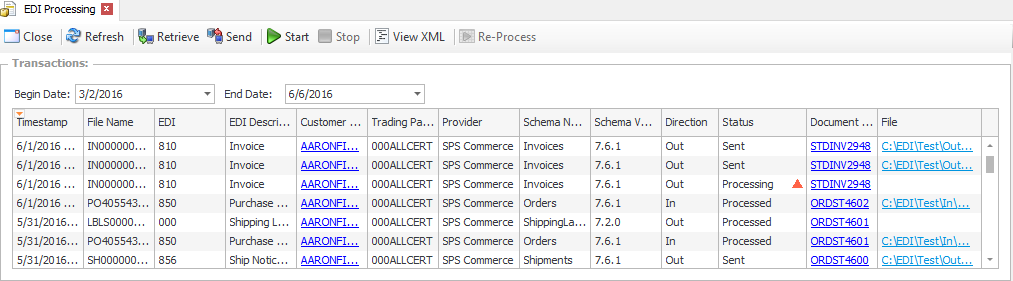
The Transaction grid is a list of all documents sent out or received into the system. The list can be filtered using the Begin Date and End Date dropdown grids or by using the auto filter row. Each row represents an EDI document with links to the Customer Card and/or the Sales Document associated with it. If there are any issues processing the document, there will be an orange triangle in the status column. To see the raw processed EDI Document, users can either select the View XML button along the top or click the file path link in the File column to open the file outside of SalesPad.
The Start and Stop buttons along the top of the EDI Processing window are used to start and stop any EDI Scheduler tasks that have been assigned to a server connection in the system. If no EDI Schedulers are assigned and the Start button is pressed, the system checks for new inbound documents every 10 minutes by default. This can be changed in the setting EDI Processing Download Frequency if needed. To learn how to assign EDI schedule, please review our documentation.
The Send and Retrieve buttons are mainly used for testing purposes and are only available when the Server Connection has Test Mode enabled and the Can Send Files To Test security is enabled.
Testing
In order to test inbound documents, Server Connection, Data Cross Reference and Business Object Mappings for the EDI document must be set up first. Users will also need sample/test EDI documents that can be imported into the system. Typically, these are given to you by your EDI provider.
- Select Send and select a server connection.
- Search for a sample document then click Open.
- In the Select A Directory window, choose Download Test from the dropdown menu and click OK. This will upload the sample EDI document to the ftp server.
- Click Retrieve.
The EDI document will now be processed and create a document in the system if successful. If unsuccessful, there will be an error log in the Transaction Log window where users can determine what exactly went wrong and how to resolve the issue. Once the issue is resolved, click the Re-Process button in order to reprocess the EDI document again.
Transaction Log
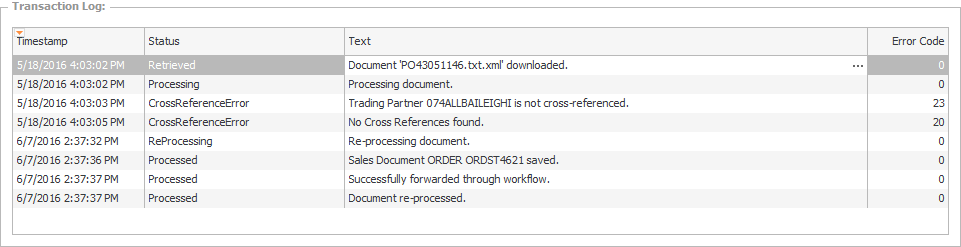
The transaction log is an audit log showing what has happened with a particular EDI document. In the example above, the document was retrieved from the server and went into processing. During processing, there was a Cross Reference Error found. Then the error was fixed and the document was reprocessed successful. To reprocess a document, simply click the Re-Process button along the top of the window. This button will only be available for inbound documents that were not processed successfully.
System Processing Log

Below the Transaction Log is a more in-depth log of all the processes that have happened while the EDI Processing screen is open. It shows when files were downloaded, when they were processed, and when the scheduler task’s status was changed. It is cleared each time you leave the EDI Processing screen.
Emailing
The EDI Processing screen can be set up to send an email whenever there is an issue processing an EDI document, or it can be set up to send a single email that contains a compiled listed of all issues during a certain interval of time. To set this up, navigate to Security Settings and search for “EDI Processing”. Customize the following securities:
- Email Addresses – Controls which address will receive the process error email.
- Email Error Interval – The interval in minutes in which processing error emails will be sent (Defaults to 30 minutes)
- Email Error Logs – Sets whether to send an email each time an error occurs or to send at intervals. Overrides the Email Error Interval security if set to true.
SalesPad Support
Comments