Overview
Cavallo’s integration with Adobe Commerce (FKA Magento 2) handles automatic syncing of inventory and sales information between SalesPad/GP and an Adobe Commerce website. Product and inventory level information is pushed from SalesPad/GP to the website so that customers have visibility of which products are available. Sales orders created by customers on the website are pulled down to SalesPad/GP so that they can be processed and fulfilled. Fulfillment and tracking information for each sales order is pushed back to the website for customer visibility. Payment information can be imported from the website, and PayFabric authorizations can be imported for capturing within SalesPad Desktop. When sales orders are invoiced or voided, those updates are communicated back to the website.
This document covers configuration for all components of the Adobe Commerce integration. To download a PDF version of this documentation that also includes specifics on the exact Adobe Commerce API endpoints used, see the attachment at the bottom of this article.
Table Of Contents
- General Information On Expressions
- Product Export
- Product Image Export
- Inventory Level Export
- Customer and Order Import
- Order Update Export
- Order Invoiced Export
- PayFabric Integration
- Multiple Stores
General Information On Expressions
Overview
Many integration settings allow the use of expressions to configure how internal and external entities should be matched, or to designate which values are assigned from external to internal entities.
Each expression editor will have a set of source objects to match or map from, and a set of destination objects to be matched or populated. These editors allow additional complexity beyond simply mapping source object fields to destination object fields.
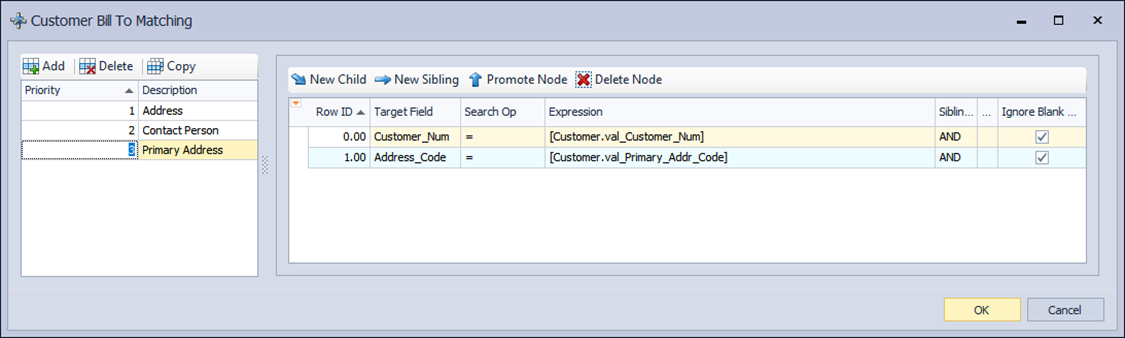
As an example, below is the default expression for Customer Bill To Address Assignment Mapping - Contact_Person. In this case, the Adobe Commerce order is the source object, and a SalesPad/GP CustomerAddr is the destination object. When a new SalesPad/GP CustomerAddr is created in the process of creating a customer for an imported order, this expression is used to populate the Contact_Person field.
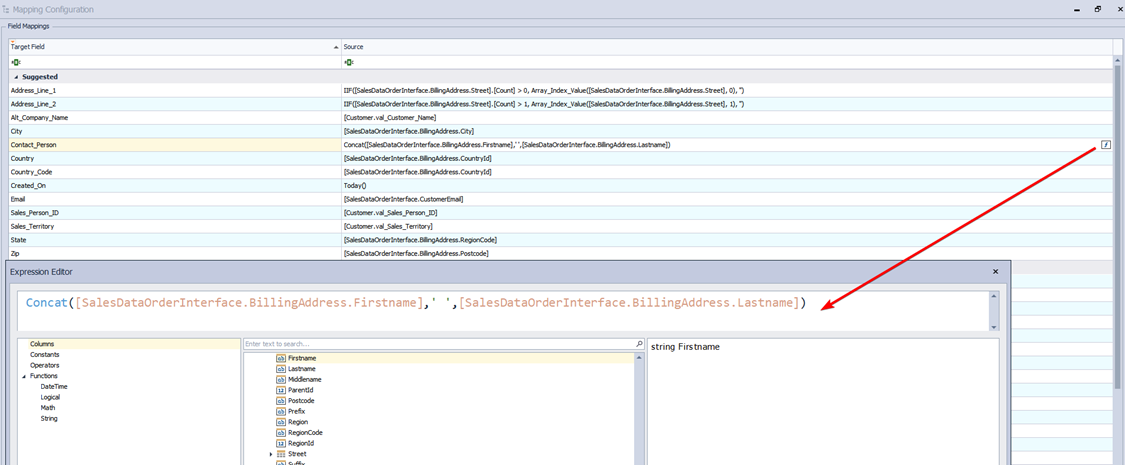
Rather than a single customer name field with the customer’s full name, Adobe Commerce has separate first and last name fields, so the Contact_Person field cannot be populated by simply mapping one field to another. The Concat function is used to append the Adobe Commerce Customer last name to the first name, with a space in between. If the customer’s first name is “Jane” and last name is “Doe”, the Contact_Person field will be “Jane Doe”.
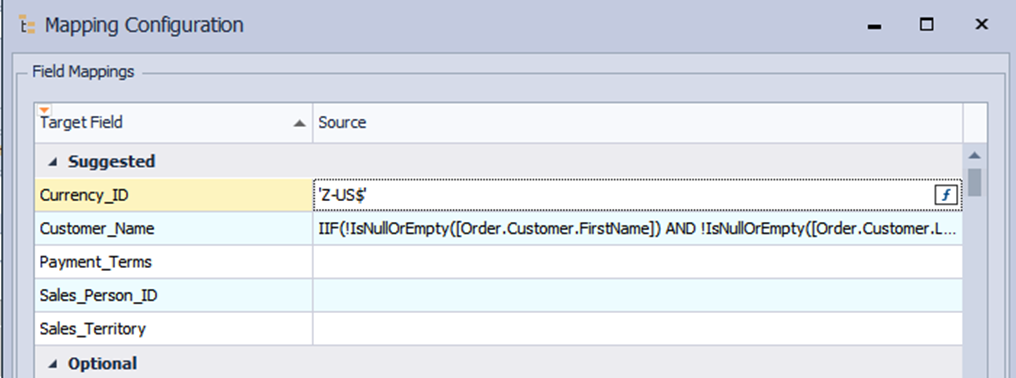
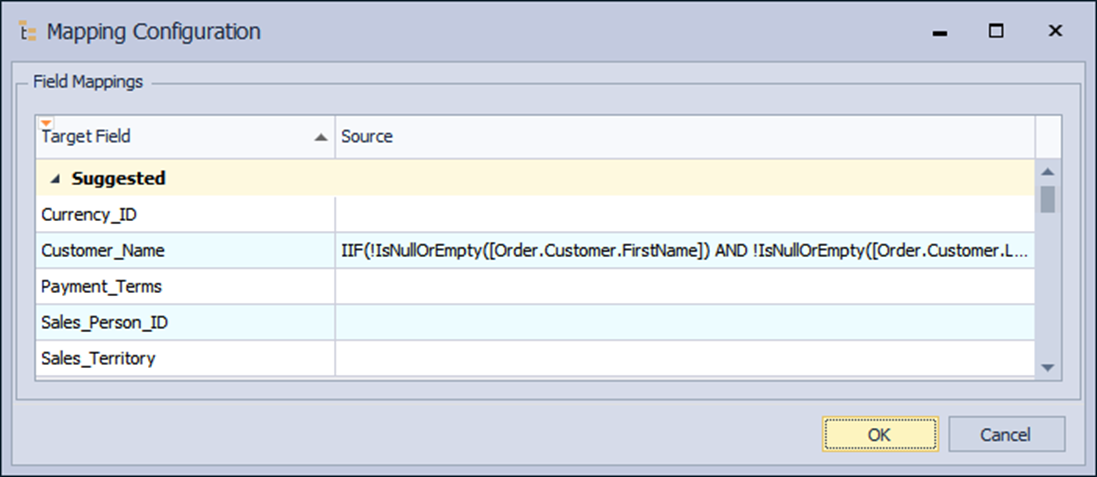
Expression editors can also be used to assign hardcoded values when populating fields. In the below example configuration of the Customer Assignment Mapping setting, all customers will be created with value “Z-US$” in the Currency_ID field.
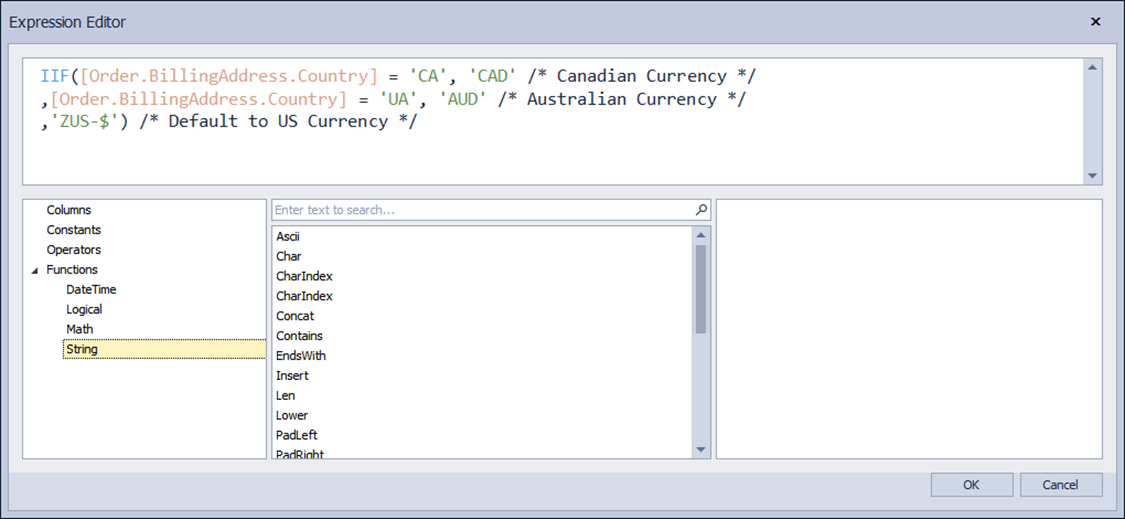
For an example of a more complex use case, the below expression includes an IIF (if statement) conditional. Comments may be included to provide notes for future reference.
The complete expression language documentation can be found here.
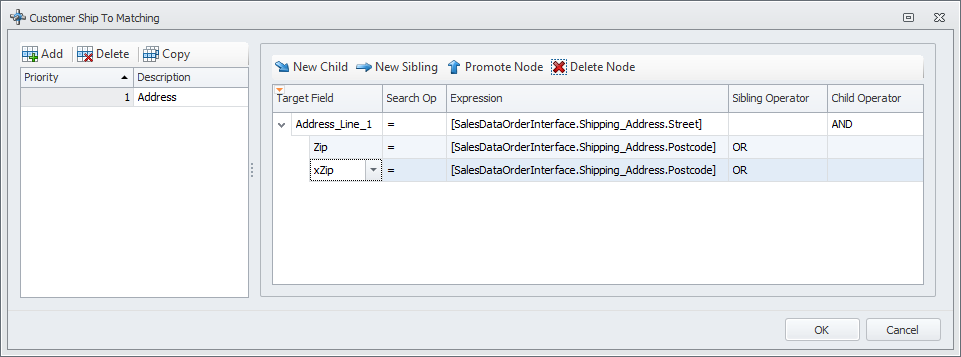
Sibling and Child Relationship
A combination of sibling and child expressions can be used during matching. The expressions can be joined using logical operators such as AND, OR, etc.
For example, to match customer address on Address Line 1 field and Zip field or xZip user field, set the Address Line 1 child operator to AND and the Zip and xZip sibling operator to OR:
Product Export
Overview
Export Item Masters and Price Levels from SalesPad/GP to Adobe Commerce. This component provides flexibility to specify which items and associated values are pushed to Adobe Commerce.
General Settings
Export Images During Inventory Export - Disable this setting to prevent exporting images during Product Export. This could speed up the Product Export considerably. NOTE: Images can still be exported with the Product Image Export while this setting is disabled. Defaults to True.
Matching Settings
Product Item Master Matching - This setting will be used to try and match every Adobe Commerce item to a GP Item. If a match is found, the GP Item will be used to update the Adobe Commerce product. NOTE: This setting applies to Inventory Export, Inventory Level Export and Inventory Image Export components.
Lookup Settings
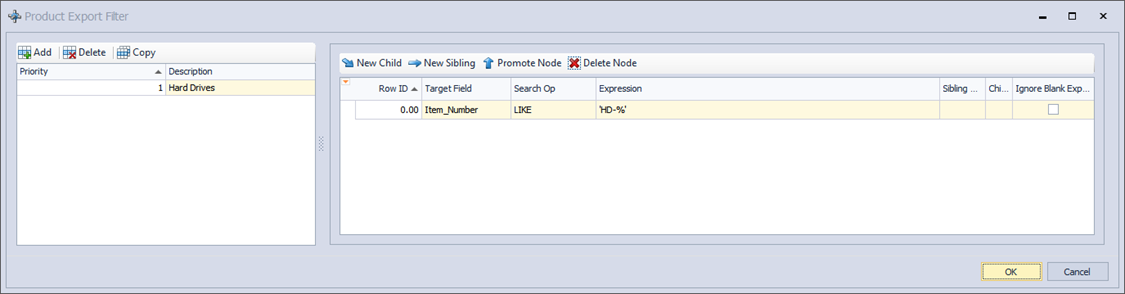
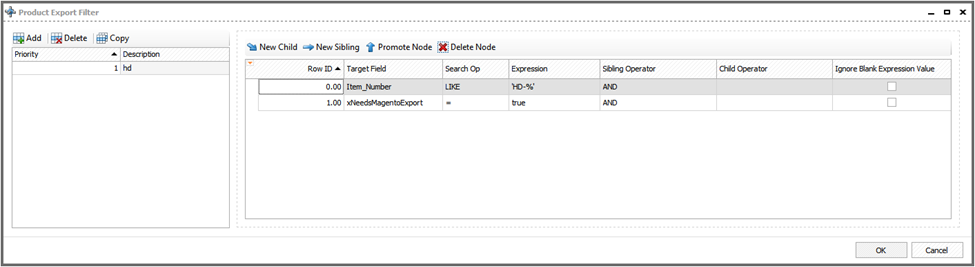
Product Export Filter - Define the criteria for which GP Item Numbers should be exported to Adobe Commerce. If left blank, all Active items will be exported. NOTE: This setting applies to Product Export and Product Image Export components.
Only one priority row should be added to the left grid. The conditions on the right will be used to determine which Item Masters will be exported to Adobe Commerce. In the example below, the system will export all items that start with HD-.
Item Price Lists Export Filter - Define the criteria for which Item Price Lists should be exported to Adobe Commerce. If left blank, no price lists will be exported.
Create only one record within the left grid and define which price lists should be exported on the right. It is recommended to only export one Price List entry per combination of Item, Quantity, Price Level. These price levels are loaded per Item that is to be exported, therefore filter criteria should only load Price Levels that match the Item Number (see example below).
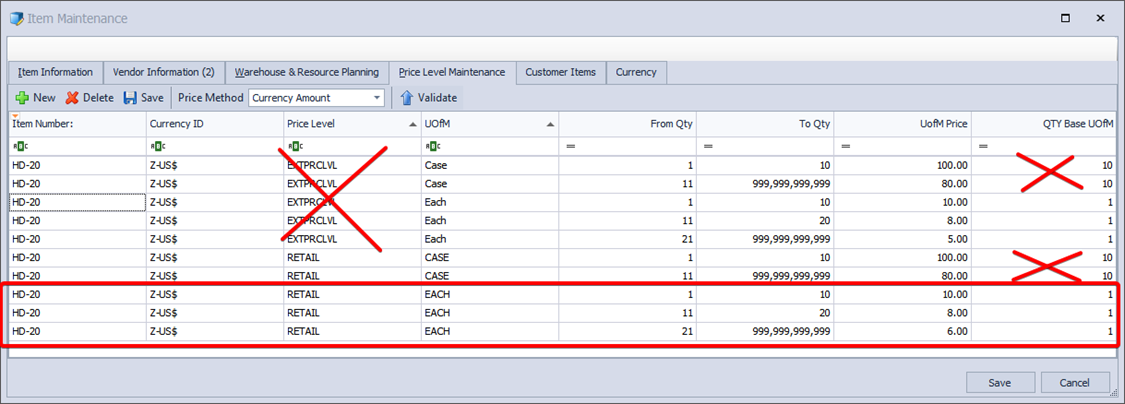
Given that Adobe Commerce does not have a concept of UofM, consider loading Price Lists for only the item’s base UofM. In a multi-currency company, the conditions should also filter on Currency ID.
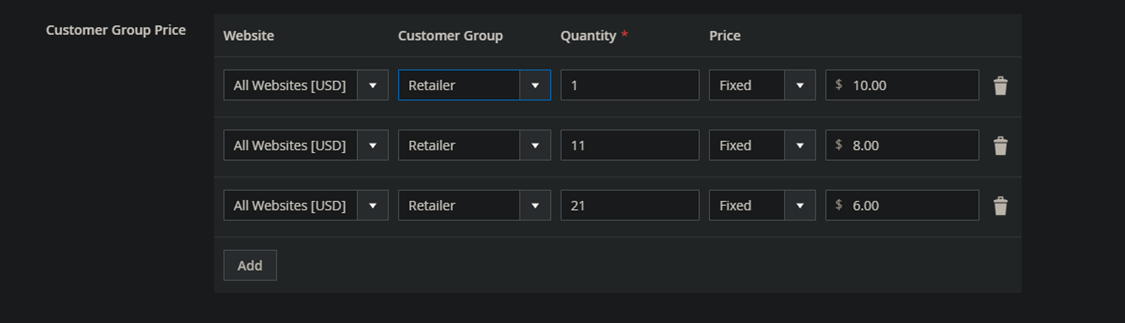
In the example below, 2 different Price Levels are sent to Adobe Commerce: Retail and Engineer.
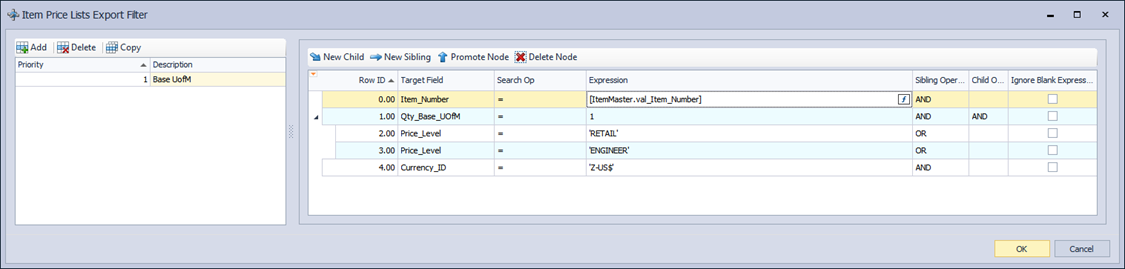
For HD-20, only 3 of the Price Levels will be exported in this example.
SalesPad
Adobe Commerce
Assignment Settings
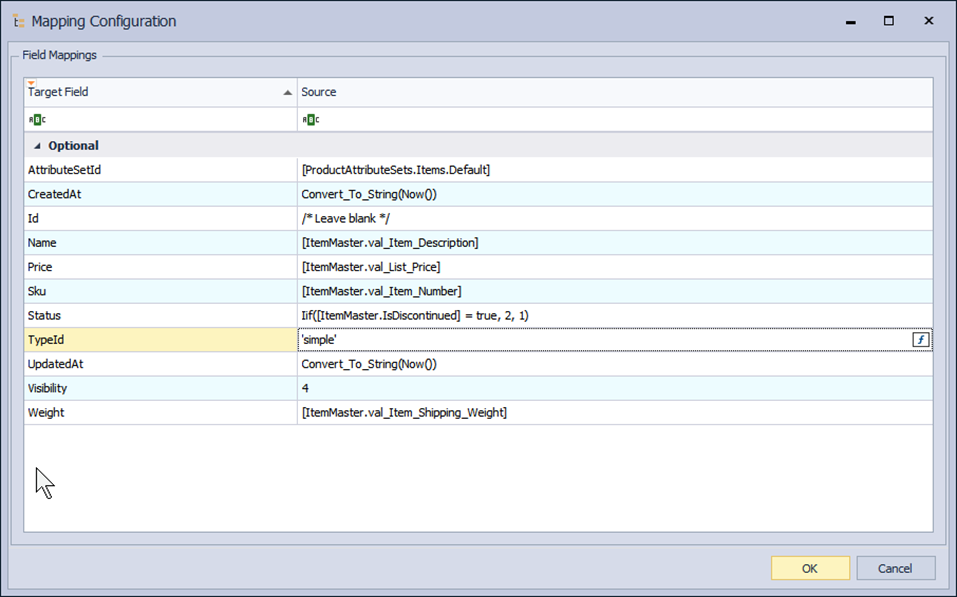
Product Mapping - Assign the Adobe Commerce product fields from the GP Item and Location Masters.
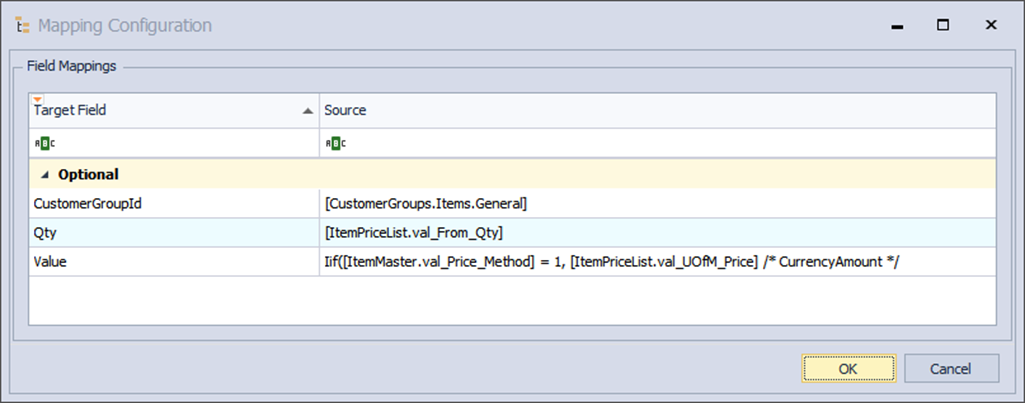
Item Price Level Mapping - Assign the Adobe Commerce Tiered Price fields from the GP Item Price Lists that were loaded via the definition in Item Price Lists Export Filter. A GP Price List should be mapped to a single Adobe Commerce Customer Group.
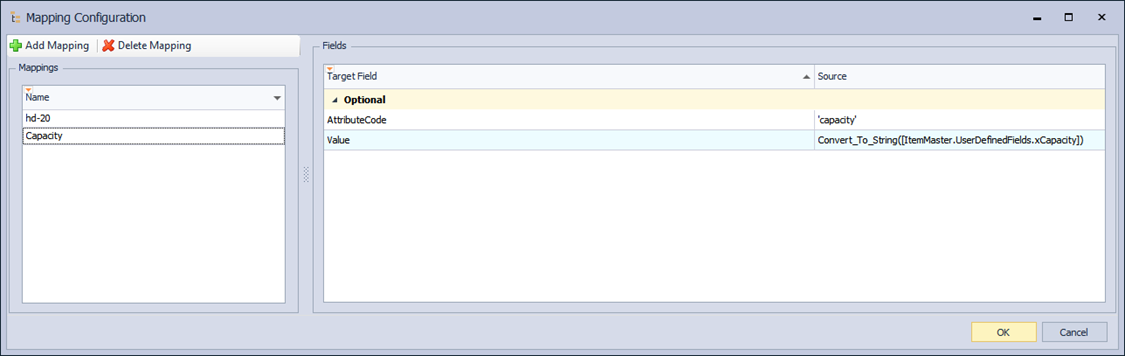
Product Assignment Custom Field Mapping - Assign values to Adobe Commerce custom attributes.
Create each Named group and specify the Adobe Commerce Attribute Code and the field assignment. This will create new attributes or update existing attributes on each item.
Item Image UDF - Set the Item Master UDFs that contain the product images to send to Adobe Commerce. NOTE: This setting applies to Product Export and Product Image Export components.
Processing
The Product Export bulk loads customer groups, product attributes and attribute sets, and products from Adobe Commerce. Then it updates any products that already exist in Adobe Commerce, and it creates new products in Adobe Commerce for the rest.
Scripts
Product Item Master Matching Script - A C# Script that can be used to match a GP item based on the Adobe Commerce Item. This runs after an evaluation has been made with setting: Product Item Master Matching.
Product Pre Export Script - A C# Script that runs before a Product is exported.
Product Image Pre Export Script - A C# script that runs before a product image is exported. NOTE: This setting only applies to the Product Image Export component.
Product Image Post Export Script - A C# script that runs after a product image is successfully exported. NOTE: This setting only applies to the Product Image Export component.
Image Export
Item images will be automatically exported by the Product Export component. To improve performance, this functionality can be disabled by setting the Export Images During Product Export setting to false.
Optimization
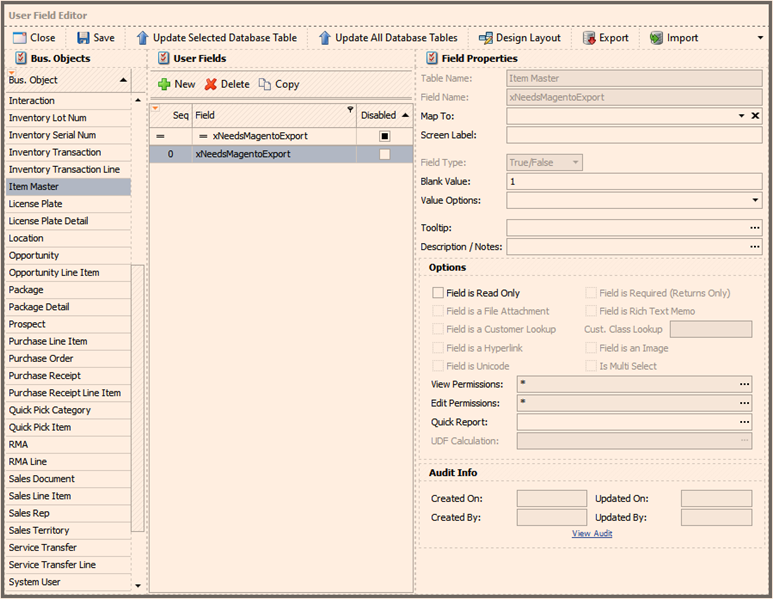
In order to reduce the number of SalesPad/GP items that need to be sent to Adobe Commerce each time the Product Export component runs, use a user field as a flag on the Item Master to determine if the item has changed since it was last exported to Adobe Commerce.
Step 1 - Create User Field
Create an Item Master UDF called xNeedsMagentoExport, The default value may be set to 1 so that all newly created items will be automatically exported during the next automation run.
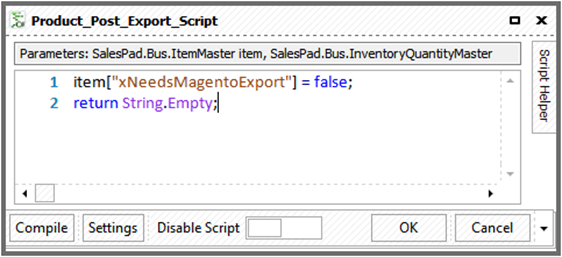
Step 2 - Update UDF After Export
Paste this script into the Product Post Export Script to set xNeedsMagentoExport to false immediately after export. This script runs after an item is successfully exported to Adobe Commerce, and it will save the item automatically after the script runs.
|
item["xNeedsMagentoExport"] = false; |
Step 3 - Filter For Items That Need To Be Exported
Update the Product Export Filter setting to include a clause to only return items for which xNeedsMagentoExport = true.
Step 4 - Apply SQL Triggers
Apply the following triggers on one or more SalesPad/GP inventory tables.
These triggers will monitor for changes on certain fields, and they will set xNeedsMagentoExport to true when a change occurs.
IV00101 - Item Master
|
CREATE TRIGGER [dbo].[sptMagentoIV00101Export] ON [dbo].[IV00101] |
IV00102 - Item Quantity Master
|
CREATE TRIGGER [dbo].[sptMagentoIV00102Export] ON [dbo].[IV00102] |
IV00105 - Item Currency Master
|
CREATE TRIGGER [dbo].[sptMagentoIV00105Export] ON [dbo].[IV00105] |
IV00108 - Item Price List
|
CREATE TRIGGER [dbo].[sptMagentoIV00108Export] ON [dbo].[IV00108] |
Product Image Export
Overview
This automation component sends updated product images from SalesPad/GP to Magento. This is an alternative to configuring the Product Export to export product images via the Export Images During Product Export setting. Images can take longer to sync, so it can be helpful to separate that processing so that the Product Export can run more quickly. This component also offers script hooks that are specific to the image export process.
Settings
While the Product Export component exports the entire item, the Product Image Export component only exports item images. The following settings for the Product Export must be configured for the Product Image Export to work properly:
-
Item Image UDF
-
Product Item Master Matching
-
Product Export Filter
Note: This component can only export images for products that already exist in Adobe Commerce.
Processing
The Product Image Export loads the products that exist in Adobe Commerce, and then it updates existing images where applicable, and adds new images for products that did not already have images.
Scripts
Product Image Pre Export Script - A C# script that runs before a product image is exported. NOTE: This setting only applies to the Product Image Export component.
Product Image Post Export Script - A C# script that runs after a product image is successfully exported. NOTE: This setting only applies to the Product Image Export component.
Inventory Level Export
Overview
This automation component allows sending specific SalesPad/GP Warehouse quantities to specific Adobe Commerce sources. Each Adobe Commerce source can be matched to a SalesPad/GP Warehouse.
General Settings
Number Of Source Levels Per Export Page - Specify the number of records in each page of the Inventory Level Export. (Max: 20) Defaults to 20.
Matching Settings
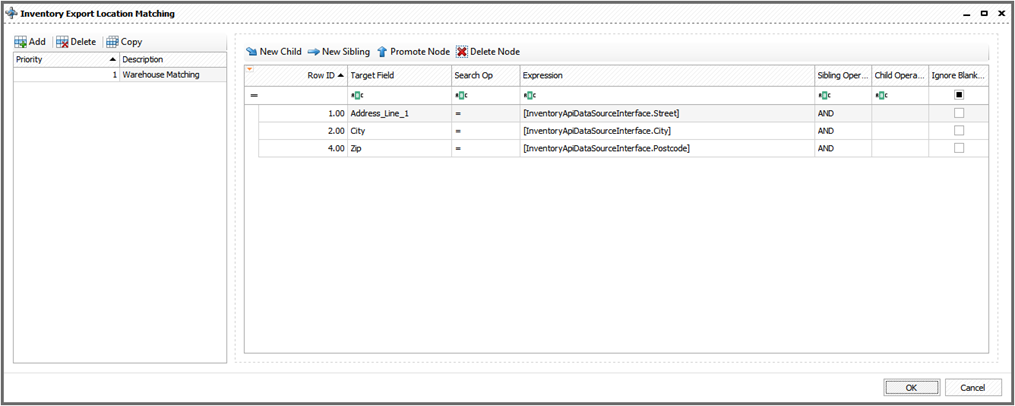
Inventory Level Export Location Matching - Define the criteria for matching an Adobe Commerce Source to a GP Location in the Inventory Level Export.
By default, the street, city, and zip of the Adobe Commerce location is used to look up a SalesPad/GP Warehouse with matching Address_Line_1, City, and Zip values.
Product Item Master Matching - This setting will be used to try and match every Adobe Commerce item to a GP Item. If a match is found, the GP Item will be used to update the Adobe Commerce product. NOTE: This setting applies to Product Export, Product Image Export, and Inventory Level Export components.

Assignment Settings
Source Export Mapping - Assign the mappings for each Adobe Commerce Source Inventory Level.
Processing
The Inventory Level Export bulk loads inventory sources and products from Adobe Commerce, and then it updates the inventory levels in Adobe Commerce.
Scripts
Inventory Level Pre Export Script - A C# Script that runs before an Inventory Level is exported.
Inventory Level Post Export Script - A C# Script that runs after a batch of Inventory Levels are successfully exported.
Customer and Order Import
Overview
For each sales order in the website, the Order Import component will attempt to match a SalesPad/GP Customer to the Adobe Commerce Customer based on the Customer Ship To Matching, Customer Bill To Matching, and Customer Matching settings. If no match is found, a new customer will be created in SalesPad/GP based on the Customer Assignment Matching setting, and address codes for the new customer will be determined by the Customer Ship To Assignment Mapping and Customer Bill To Assignment Mapping settings.
Once the customer and addresses are matched or created, the sales order will be created based on the Sales Document Assignment Mapping, Item Master Matching, and Sales Line Assignment Mapping settings. Payment information can be imported for sales orders as general or PayFabric payments.
General Settings
Enable Order Import Trace - If enabled, customer and customer address matching information will be logged during order import. This setting should be enabled for troubleshooting purposes only. Defaults to False.
Flag Comment For Imported Order - Create a comment to send to an Adobe Commerce order when the document is imported. Defaults to “This order was imported into SalesPad.”
Forward Document After Import - If enabled, the imported order will be forwarded in workflow after being saved. Defaults to False.
Import Orders In Status - Select the Order Statuses that should be imported from Adobe Commerce. Can use custom status set up in Stores -> Settings -> Order Status. Defaults to “New”.
Multiple Potential Customers Scenario - Review Queue - Queue that contains orders where a definitive customer match couldn't be found due to multiple possibilities being present. By default, the order will use the customer that has the earliest created date, then the order will be moved to the Workflow Queue designated by this setting to be reviewed.
Number Of Days To Look Back - Specify the number of days to look back from today to import orders. For example, set to 30 to import orders only from the last 30 days. Set to zero to import orders from any time. Defaults to 0.
Number Of Orders Per Page - Specify the number of orders to import at one time. Defaults to 30.
Roll Back Order Import Transaction On Error - When enabled, the transaction encompassing the order import will be rolled back when an error occurs. This prevents data from a partially completed import from being saved to the database. Defaults to True.
Target Adobe Commerce Store - Name of the Adobe Commerce store from which orders will be imported. When left blank, orders will be imported from all stores.
Update Adobe Commerce Order Status After Import - After an order is imported into SalesPad, update the Order Status in Adobe Commerce. Can use a custom status code set up in Stores -> Settings -> Order Status.
Matching Settings
These settings use Expression Editors that allow creating custom matching criteria to determine how an Adobe Commerce entity should match to a SalesPad/GP entity.
Each Matching setting will build one or more SQL queries to attempt to find a match in the SalesPad/GP database. These queries are executed one at a time in order of Priority (lowest to highest). If an earlier priority query returns a result, that result will be returned to be used in the import, and the subsequent priorities will not execute.
The diagram below illustrates the sequence in which SalesPad Desktop attempts to match a SalesPad/GP Customer, Ship To Address, and Bill To Address each time an Adobe Commerce Order is imported.
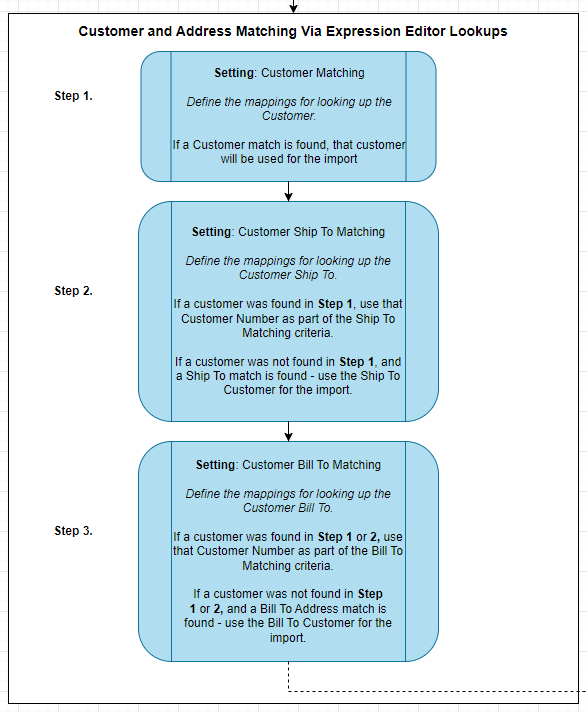
Customer Matching - Define the mappings for looking up the Customer.
This setting is used as the first attempt to match a SalesPad/GP Customer to the Adobe Commerce Customer. If a customer is found in this step, that customer’s Customer Number will be added to the search criteria when looking up the Ship To and Bill To Addresses.
The default settings attempt to match a SalesPad/GP Customer based on the email of the Adobe Commerce Order. The conditions include a LIKE operator combined with an OR sibling operator. The LIKE operator indicates that the Email_To field must contain, but not exactly match, the expression. The OR sibling operator indicates that at least one of the conditions must match in order for a customer record to be considered a match. either the Order.Email field, or the Order.Email field with a ‘;’ character appended. For example, if the Adobe Commerce customer’s email is “aaronfitz@gmail.com”, a SalesPad/GP customer with “aaronfitz@gmail.com;aaron@fitzelectrical.com” would be a match. The approximate SQL lookup executed for this condition would be:
“WHERE (customer.Email_To LIKE ‘%aaronfitz@gmail.com%’) or customer.Email_To LIKE ‘%aaronfitz@gmail.com;%’
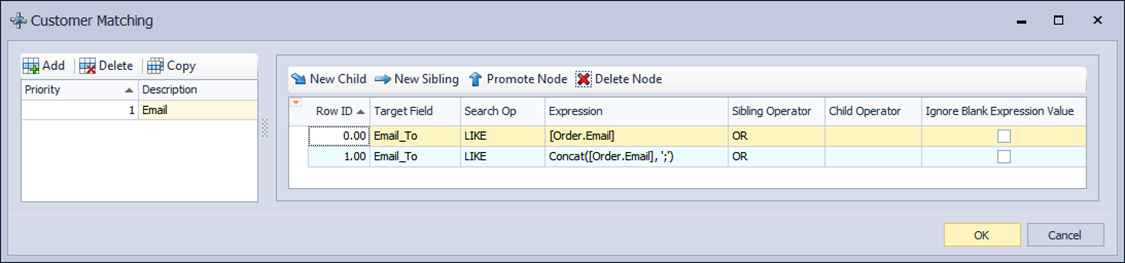
Note that this setting does not need to be populated, since the customer can also be matched indirectly via Customer Ship To Matching or Customer Bill To Matching settings. If Adobe Commerce Orders should be matched by the shipping address instead, then the Customer Matching setting can be cleared, and the Customer Ship To Matching and/or Customer Bill To Matching settings will be used to load the Ship To / Bill To and the corresponding customer.
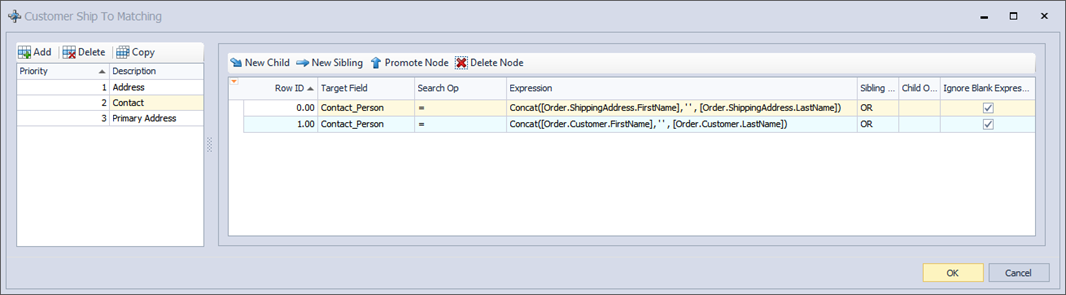
Customer Ship To Matching - Define the mappings for looking up the Customer Ship To Address.
This setting determines how SalesPad will attempt to look up the Ship To Address for an incoming Adobe Commerce order. If a SalesPad/GP Customer was matched via the Customer Matching setting, the Ship To Address must also belong to that customer. Otherwise, the search will consider address codes across all customers.
For example, if the customer ‘AARONFIT0001’ has already been matched, only address codes having a Customer_Num of ‘AARONFIT0001’ will be considered, even if they otherwise match the criteria in the Ship To Address Matching setting. If a customer has not yet been matched when a Shipping Address is found, the order will be imported under the customer for that shipping address.
The default settings attempt to match a SalesPad/GP Shipping Address in three different steps.
Priority 1
Address: Attempt to find a match based on Address Line 1, City, State, and Zip. All four of these fields must be matched.
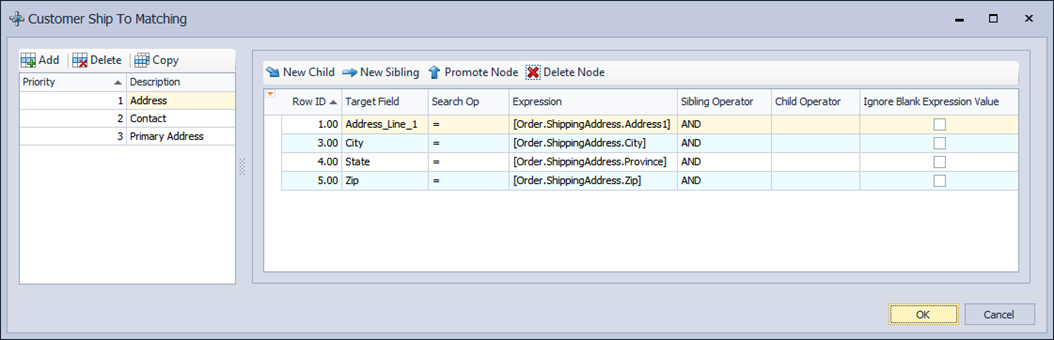
Priority 2
Contact: Attempt to find a match based on the First and Last Name of the Adobe Commerce Customer or Adobe Commerce Shipping Address.
Priority 3
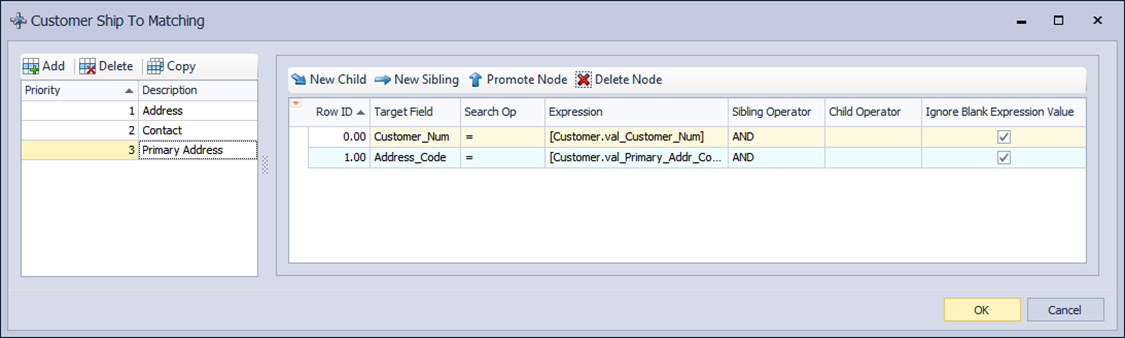
Primary Address: Attempt to find a match based on the Primary Address for the Customer. This assumes that the Customer was matched via the Customer Matching setting.
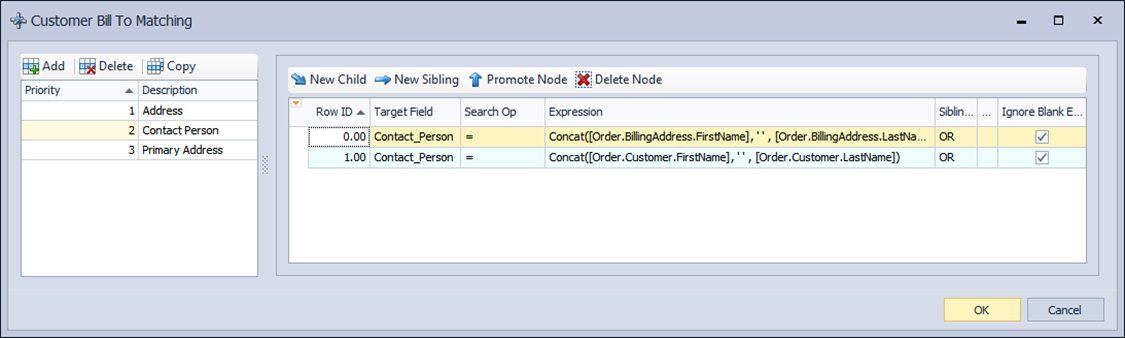
Customer Bill To Matching - Define the mappings for looking up the Customer Ship To Address.
This setting determines how SalesPad Desktop will attempt to look up the Bill To Address for an incoming Adobe Commerce order. If a SalesPad/GP Customer was matched via the Customer Matching setting, the Bill To Address must also belong to that customer. Otherwise, the search will consider address codes across all customers.
For example, if the customer ‘AARONFIT0001’ has already been matched, only address codes having a Customer_Num of ‘AARONFIT0001’ will be considered, even if they otherwise match the criteria in the Bill To Address Matching setting. If a customer has not yet been matched when a Bill To Address is found, the order will be imported under the customer for that shipping address.
The default settings attempt to match a SalesPad/GP Billing Address in three different steps.
Priority 1
Address: Attempt to find a match based on Address Line 1, City, State, and Zip. All four of these fields must be matched.
Priority 2
Contact Person: Attempt to find a match based on the First and Last Name of the Adobe Commerce Customer or Adobe Commerce Shipping Address.
Priority 3
Primary Address: Attempt to find a match based on the Primary Address for the Customer. This assumes that the Customer was matched via the Customer Matching setting.
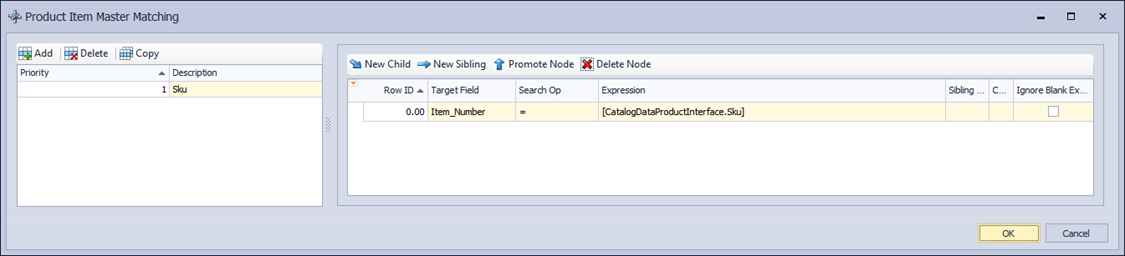
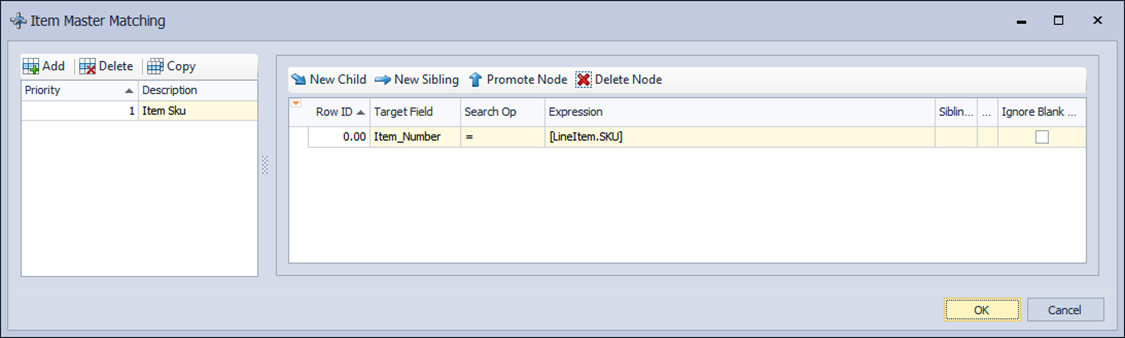
Item Master Matching - Define the mappings for matching Adobe Commerce items to a GP Item Master.
Each Adobe Commerce Line Item will use this setting to find the corresponding SalesPad/GP Item.
The default settings attempt to match an Adobe Commerce SKU directly to a SalesPad/GP Item Number.

Assignment Settings
Assignment settings use Expression Editors to define how newly created Customers, Orders and Sales Lines will be populated when created during the order import process.
The target objects will be SalesPad/GP Customers, Contacts, Sales Documents, and Sales Line Items. The source objects will be Adobe Commerce Customers, Contacts, Orders, and Line Items.
Example JSON for Adobe Commerce objects can be found at https://devdocs.magento.com/redoc/2.3/
Each Mapping contains a grid of all the target fields, and an expression that will be used to populate each field. Required fields are grouped under the Suggested category. If a Suggested category field is not populated, an error may occur.
Customer Assignment Mapping - Define the mappings to be used when creating a new Customer.
If an existing SalesPad/GP Customer was not found using the matching settings, then a new Customer will be created using the values in the Customer Assignment Mapping setting.
Customer Ship To Assignment Mapping - Define the mappings to be used when creating a new Customer Ship To Address.
If an existing SalesPad/GP Customer Address was not found using the Customer Ship To Matching setting, then a new Customer Address will be created using the values in Customer Ship To Assignment Mapping setting.

Customer Bill To Assignment Mapping - Define the mappings to be used when creating a new Customer Bill To Address.
If an existing SalesPad/GP Customer Address was not found using the Customer Bill To Matching setting, then a new Customer Address will be created using the values in the Customer Bill To Assignment Mapping setting.
Sales Document Assignment Mapping - Define the mappings to be used when creating a new Sales Document.
When the Adobe Commerce Order is imported, this setting will be used to populate the header level fields on the SalesPad/GP Sales Document.
Sales Line Assignment Mapping - Define the mappings to be used when creating a new Sales Line Item.
When the Adobe Commerce Order is imported, each line on that order will be created as a sales line on the SalesPad/GP Sales Document. Each sales line’s fields are set based on the Sales Line Assignment Mapping setting.
This setting does not contain any default expressions. The Item Number is determined by the Item Master that is matched by the Item Master Matching setting. If a valid item was not found, then an expression like the one below can be used to import the Adobe Commerce Line Item as a Sales Line Item that is a non-inventory item. (Note that ZZ- is the Non-Inventory Prefix)

A few other line item fields are set by the integration component’s source code, but they can be overridden by this setting: Unit_Price, Markdown_Amount, Tax_Amount, Funct_Tax_Amount.
Sales Document Payment Mapping - Define the mappings to be used when creating a Sales Document Payment.
Sales Document PayFabric Mapping - Define the mappings to be used when creating a PayFabric transaction.
Names Notes Mapping - Assign Named Notes during order import.
Processing
The Order Import retrieves all orders in Adobe Commerce that are ready to be imported, and then it creates customers and addresses as needed before creating the sales orders. It adds a comment and updates the status of the order in Adobe Commerce to indicate that importing was completed.
Scripts
Sales Document Pre Import Script - A C# Script that runs before a Sales Document is imported.
Parameters: System.ComponentModel.CancelEventArgs ce, Object sourceDoc, SalesPad.Bus.SalesDocument sd
When importing an Adobe Commerce Order, this script runs before any assignments have been executed. This script can be used to cancel the import early by setting ce.Cancel = true. Note that Sales Document fields populated by this script may be overridden by assignment settings.
New Customer Creation Script - A C# Script that runs after a new customer is created and before it is saved.
System.ComponentModel.CancelEventArgs ce, Object sourceDoc, SalesPad.Bus.SalesDocument sd, SalesPad.Bus.Customer customer
This script will run before a new customer is saved for the first time. The script runs after the assignments from the Customer Assignment Mapping, but before the assignments from the Customer Ship To Assignment Mapping and the Customer Bill To Assignment Mapping.
The script can be used to do more complex assignments, and it can cancel the import by setting ce.Cancel = true.
Customer And Address Matching Script - A C# Script that runs after the customer and addresses have been matched, and can be used to load a different customer, ship to address, or bill to address.
System.ComponentModel.CancelEventArgs ce, Object sourceDoc, SalesPad.Bus.Customer customer, SalesPad.Bus.CustomerAddr shipToAddr, SalesPad.Bus.CustomerAddr billToAddr, bool multipleCustomersFound
This script will run after the customer and addresses have been matched. It can be used to do more complex assignments or additional validation, and it can cancel the import by setting ce.Cancel = true.
Sales Document Pre Save - A C# Script that runs just before a Sales Document is saved.
System.ComponentModel.CancelEventArgs ce, Object sourceDoc, SalesPad.Bus.SalesDocument sd
After this script runs, the new sales document is saved. This script is the last opportunity to adjust values, or cancel the import by setting ce.Cancel = true.
Sales Document Payment Script - A C# Script that can be used to override the default payment mappings. (Setting: Sales Document Payment Mapping)
Parameters: System.ComponentModel.CancelEventArgs ce, Object sourceDoc, SalesPad.Bus.SalesDocument sd
This script can override the default payment mappings, and it can cancel the import by setting ce.Cancel = true.
Item Master Matching Script - A C# Script that can be used to load SalesPad.Bus.ItemMaster item.
Parameters: System.ComponentModel.CancelEventArgs ce, Object sourceDoc, Object sourceLine, SalesPad.Bus.SalesDocument sd, SalesPad.Bus.ItemMaster item
This script can override the default matched Item Master, and it can cancel the import by setting ce.Cancel = true.
Customer and Customer Address Tracing
Depending on the complexity of the matching configuration, it may be difficult to tell how each customer and customer address is getting matched during order import. Order Import Tracing functionality will log every possible matching result to the spAAIntegrationTrace table in the database, regardless if matching was successful or not. Tracing may be enabled by enabling the Enable Order Import Trace setting under Order Import. Note that enabling this setting may cause database bloat, so it is intended only for troubleshooting purposes.
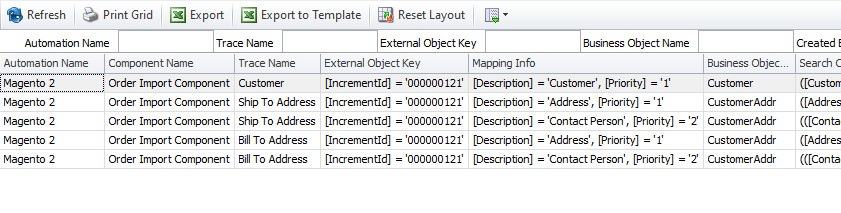
The following quick report can be used to query the spAAIntegrationTrace table in SalesPad:
|
<report name="AA Integration Trace" AutoLinks="true" GroupFooterShowMode="Expanded" bestFitAll="true" AutoFit="false"> |
The embedded SQL query can be used directly from SSMS.
Order Update Export
Overview
The Order Update Export Component is used to export tracking numbers and fulfillments back to Adobe Commerce for orders that were originally created by the Order Import Component.
This component will target a designated workflow queue. Each document in that queue will use the link that was created during the order import to call the Adobe Commerce API and update the appropriate document. For Sales Documents, the External ID designates the linked Adobe Commerce Order ID. For Sales Line Items, the Sales Line Matching setting is used to find the corresponding sales Adobe Commerce line. The Sales Line Item also includes an External ID column that stores the ID of the corresponding Adobe Commerce line item. If the Sales Line Matching setting has been left blank, or did not find a match for a given line, the External ID will be used to find the Adobe Commerce line.
General Settings
Export Queue - Queue that contains orders ready to be exported to Adobe Commerce.
Orders that were imported from Adobe Commerce will need to be directed into this queue so that they can export fulfillment and tracking information back to Adobe Commerce. They will wait to be processed, and afterward they will be forwarded in workflow.
Export Failure Queue - In the event of an unsuccessful export, the document will be placed into this queue.
If there is an exception during the order export process, the document will be moved to this queue and the error will be logged to the Automation Agent Action Center.
Number Of Orders Per Export Page - Specify the number of orders in each page of the order export. Defaults to 50.
Use this setting to minimize the number of orders that SalesPad attempts to load and process at the same time.
Roll Back Order Update Export Transaction On Error - When enabled, the transaction encompassing the Order Update Export will be rolled back when an error occurs. This prevents data from a partially completed export from being saved to the database. Defaults to True.
Tracking Update Comment - Comment to be used when uploading tracking information.
Tracking Update Comment Visible On Front - Sets Visible On Front value for comment. Used only if 'Tracking Update Comment' has a value. Defaults to True.
Tracking Update Notify - Notify customer of tracking update. Defaults to True.
Update Adobe Commerce Order Status After Order Update Export - The status to update Adobe Commerce orders to during the Order Update Export. Leave blank to not update order status. Can use a custom status code set up in Stores -> Settings -> Order Status.
Update Order Status Comment For Updated Order - A comment to append to the Adobe Commerce order while updating its status during the Order Update Export. NOTE: This setting will be ignored if Update Adobe Commerce Order Status After Order Update Export is blank.
Matching Settings
Sales Line Matching - Define the optional mappings for matching a Sales Line to an Adobe Commerce line. Can be used to override the default line matching.
When an order is imported from Adobe Commerce, a link record is created per sales line within the spAASalesLineImportLink database table. This record contains the sales line’s External ID. If this setting is not defined, or it does not match to an existing SalesPad/GP Sales Line, then the External ID for the sales line will be used to find the corresponding Adobe Commerce order line.
Assignment Settings
Shipment Item Mapping - Define the mappings for exporting shipment item information.
The default calculation for this setting should account for any existing shipment quantity that is already on the Adobe Commerce order.

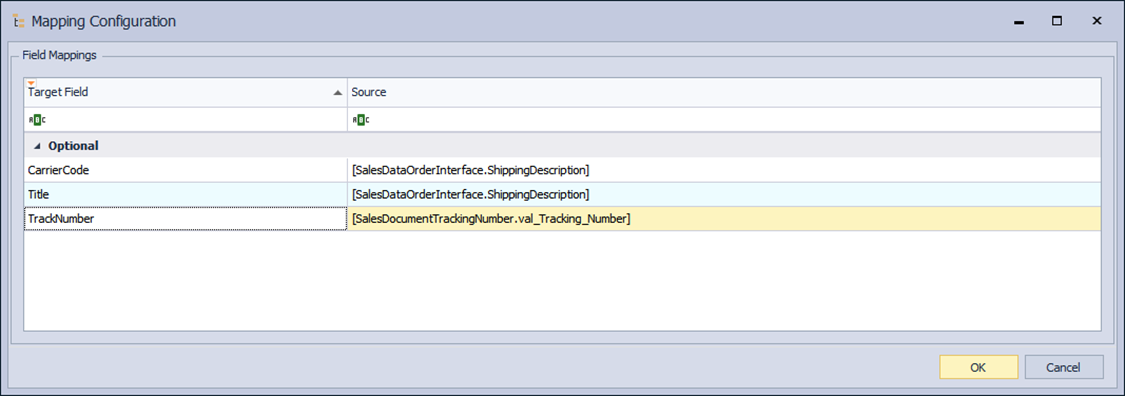
Tracking Number Mapping - Define the mappings for exporting tracking information.
Processing
The Order Update Export gets each order from Adobe Commerce as well as its shipments, and then it creates the new shipment, adds a comment, and updates the status to indicate that the export completed.
Scripts
Order Export Pre Submission Script - A C# Script that will execute prior to sending tracking info to Adobe Commerce.
Order Invoiced Export
Overview
This automation component processes Adobe Commerce orders that have been invoiced in SalesPad/GP and handles sending the invoice notification to Adobe Commerce.
General Settings
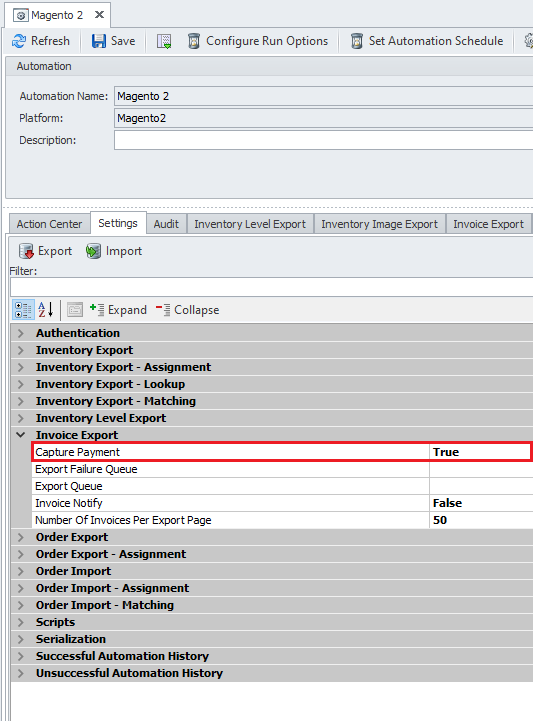
Capture Payment - Capture payment authorization if one exists on the Adobe Commerce order. Defaults to False.
Invoice Export Failure Queue - In the event of an unsuccessful export, the document will be placed into this workflow queue.
Invoice Export Queue - Queue that contains invoices ready to be exported to Adobe Commerce.
Invoice Notify - Notify customer of invoice update. Defaults to False.
Number Of Invoices Per Export Page - Specify the number of invoices in each page of the Order Invoiced export. Defaults to 50.
Update Adobe Commerce Order Status After Order Invoiced Export - The status to update Adobe Commerce orders to during the Order Invoiced Export. Leave blank to not update order status. Can use a custom status code set up in Stores -> Settings -> Order Status.
Update Order Status Comment For Invoiced Order - A comment to append to the Adobe Commerce order while updating its status during the Order Invoiced Export. NOTE: This setting will be ignored if Update Adobe Commerce Order Status After Order Invoiced Export is blank.
Processing
The Order Invoiced Export sends a notification to Adobe Commerce that indicates that Adobe Commerce should invoice that order.
Partial Invoicing and Payment Capture
The Order Invoiced Export component now supports partial invoicing and payment capture for partial invoices.
When an order is imported, the External_ID column on the imported document is set to the ID of the Adobe Commerce order, and the External_ID for each Sales Line Item is set to the ID of the corresponding Adobe Commerce line. When an order is transferred to an invoice - either partially or entirely - these External_ID values carry over to the invoice. The values will also carry over if the order is partially invoiced by splitting the document and then invoicing each split document.
When a partial invoice is exported back to Adobe Commerce , SalesPad Desktop uses the External_ID on the invoice to find the corresponding Adobe Commerce order, and it uses the External_ID on each sles line to determine the corresponding Adobe Commerce line item to invoice.
PayFabric Integration
Overview
PayFabric offers a gateway plugin for Magento 2.3 or higher that adds payment processing capabilities into Adobe Commerce without any custom coding.
There are currently two ways SalesPad Desktop can handle PayFabric transactions: during the Order Import and the Order Invoiced Export. These methods are currently incompatible with each other, so only one should be used at a time.
Order Import
PayFabric authorizations or charge transactions can be imported from Adobe Commerce during the standard Order Import. This allows users to capture authorizations or void charges during sales order processing in SalesPad.
Order Invoiced Export
PayFabric authorization transactions on Adobe Commerce orders can be captured when those Adobe Commerce orders are invoiced.
Due to Adobe Commerce API limitations, SalesPad Desktop cannot send payment data during export. This means that authorizations that have been captured or voided in SalesPad/GP will not be reflected in Adobe Commerce even if they were originally created in Adobe Commerce.
PayFabric Gateway Plugin
Configuration
The PayFabric Adobe Commerce gateway plugin can be downloaded from GitHub. Installation and configuration steps are outlined on the GitHub page.
Transaction Type
The PayFabric gateway can be configured to create authorization or charge transactions when orders are created. In Adobe Commerce, go to Stores -> Configuration -> Sales -> Payment Methods -> PayFabric Gateway and make sure the Payment Action is set to Authorization for authorizations or Sale for charges.
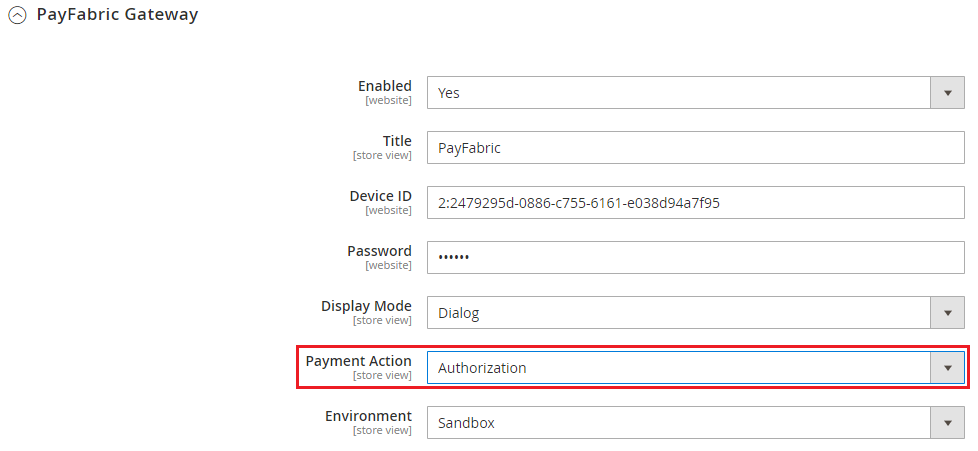
If an authentication error occurs when saving these changes, it may be necessary to create a new device in the PayFabric portal.
In the PayFabric portal, go to Settings -> Dev Central -> Device Management and click the Generate button to create a new device. Enter the new device ID and password in the PayFabric Gateway settings in Adobe Commerce and save.
After successfully saving the changes, the Adobe Commerce cache must be flushed by going to System > Cache Management and selecting Flush Magento Cache.
Note: SalesPad Desktop will automatically create payments in SalesPad/GP for charge (sale) transactions.
Order Import
Configuration
Note: This documentation assumes that Adobe Commerce Order Import has already been configured. If that is not the case, please see the Order Import section of this documentation before proceeding.
The Adobe Commerce PayFabric order import integration in SalesPad Desktop is configured to work out of the box. To disable it or make adjustments, update the Sales Document PayFabric Mapping setting.
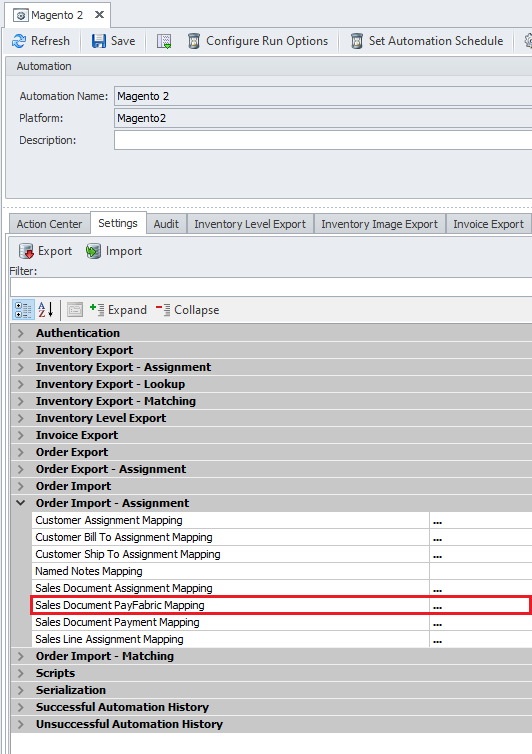
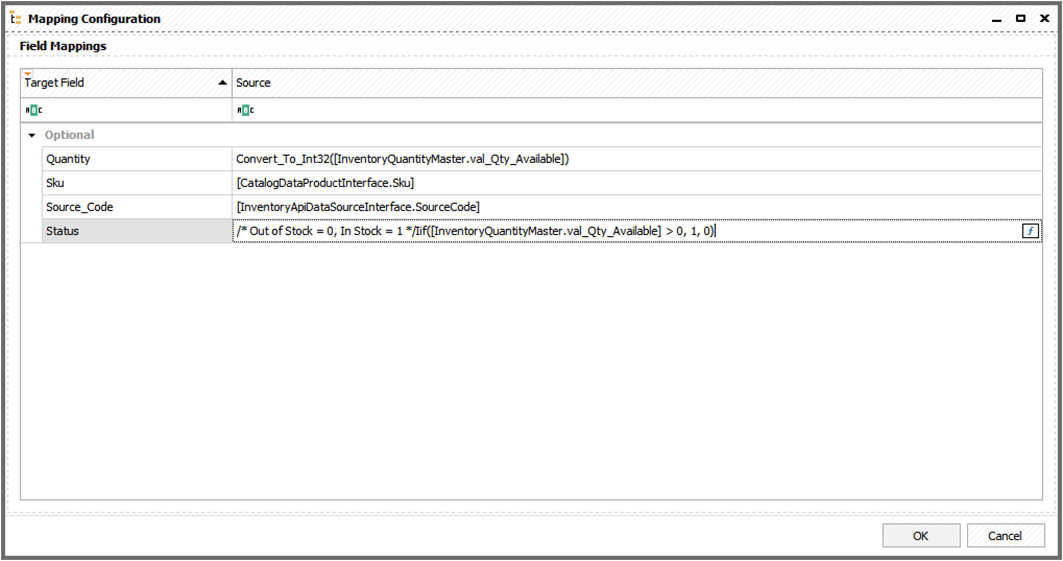
Click the ellipsis (...) button to open the Mapping Configuration window.
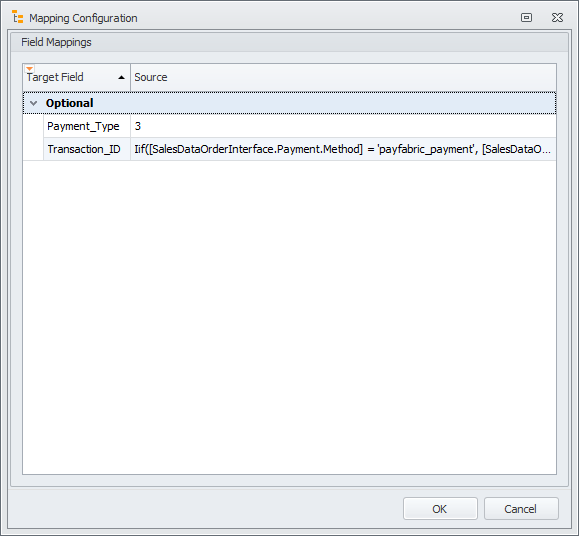
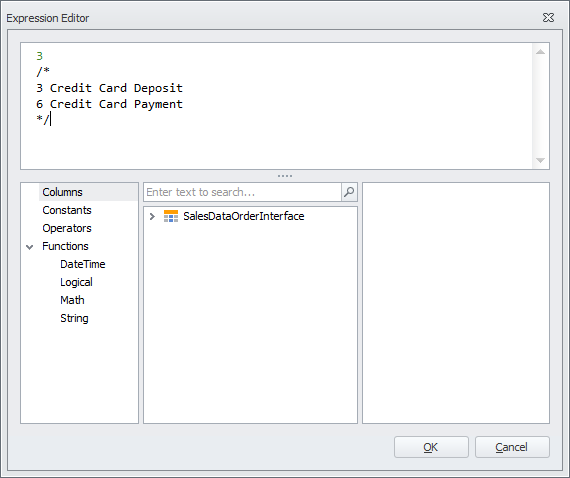
The default payment type is 3 (Credit Card Deposit), but this can be changed to 6 (Credit Card Payment) if needed.
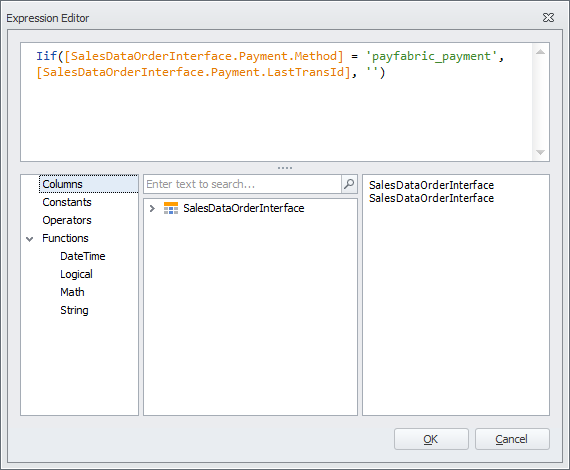
The default transaction ID mapping logic is as follows:
-
If the payment method is payfabric_payment, the LastTransId field in Adobe Commerce will be translated to the Transaction ID field in SalesPad.
-
If the payment method is not payfabric_payment or is blank, the transaction ID will remain blank and the payment transaction will not get imported.
Creating Payments In Adobe Commerce
To create a new order in Adobe Commerce and take a PayFabric payment, follow these steps:
-
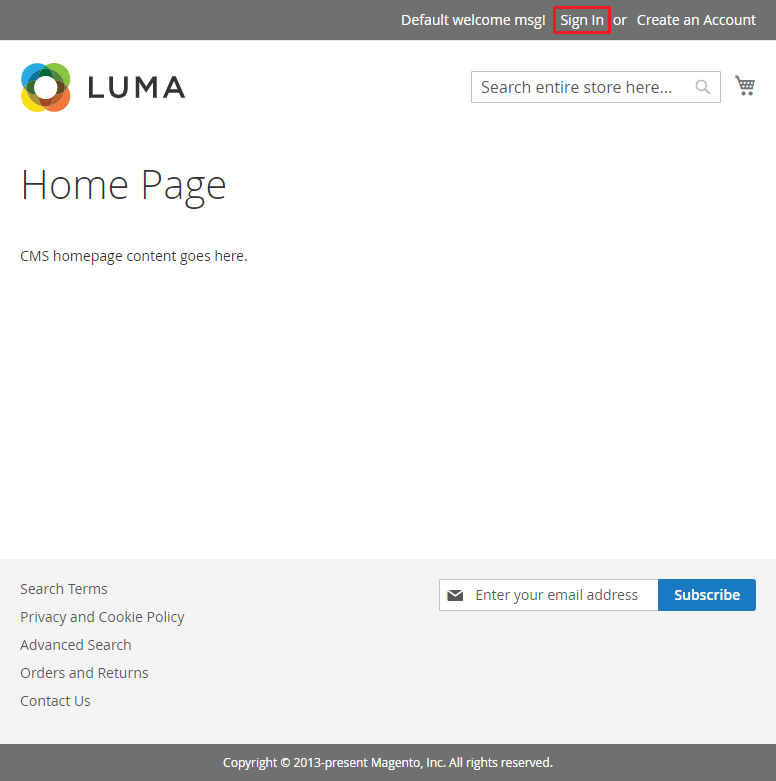
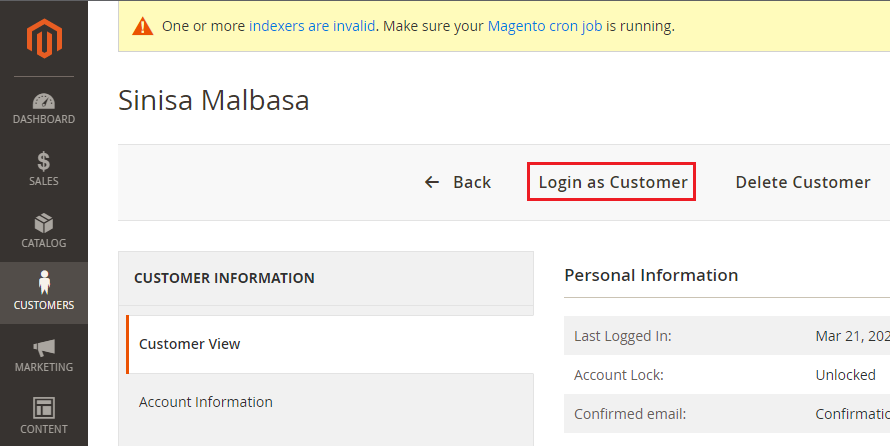
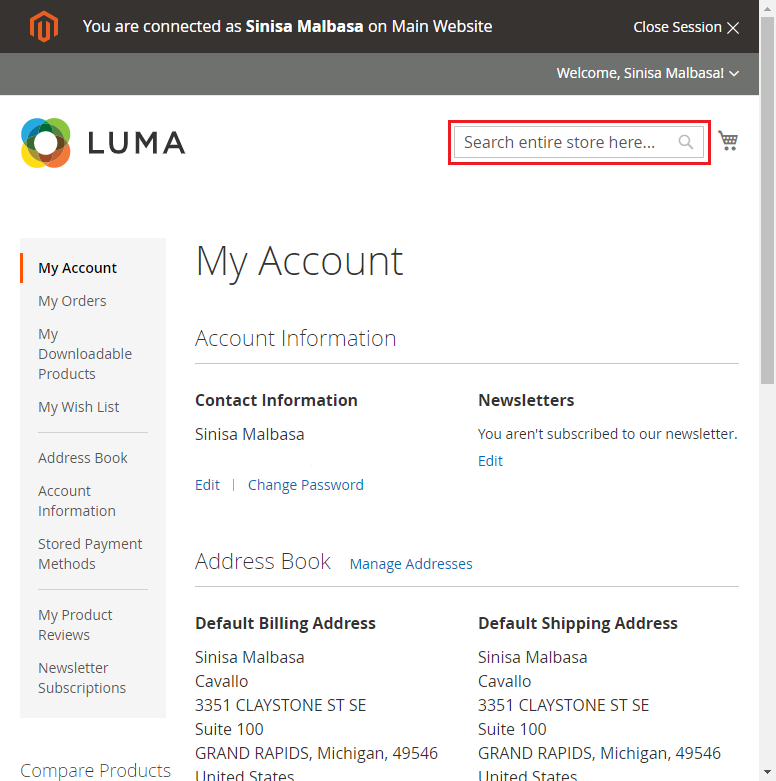
Payment transactions may only be created in Adobe Commerce while logged in as a customer. To log in as a customer, navigate to the Adobe Commerce store website and click the Sign In button. Alternatively. log into the Adobe Commerce portal as an administrator: go to Customers -> All Customers, select the customer to log in as, select Edit, and then Login as Customer.
-
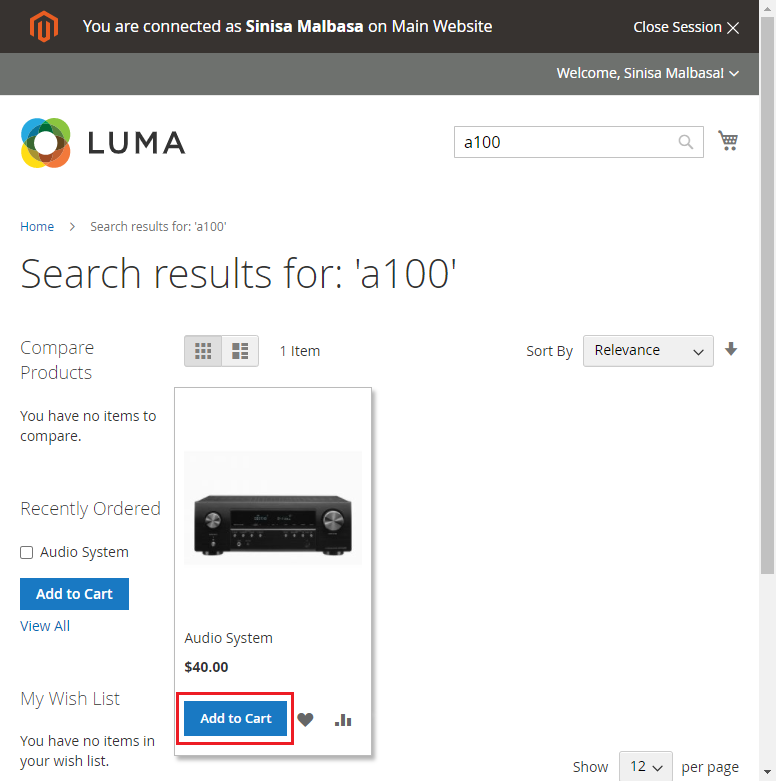
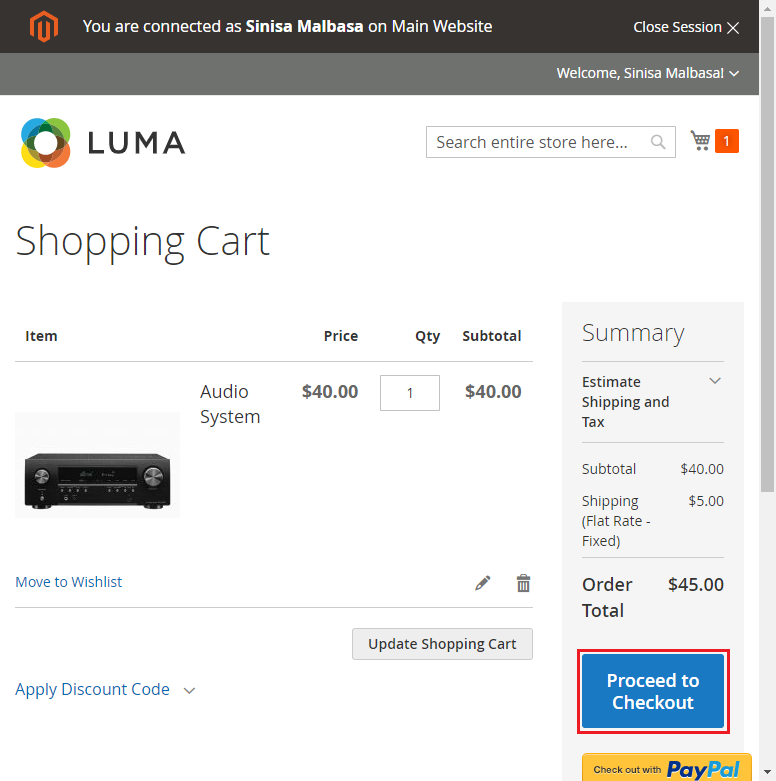
After logging in as a customer, search for an item using the search bar and add at least one item to the shopping cart.
-
Open the shopping cart and click the Proceed to Checkout button.
-
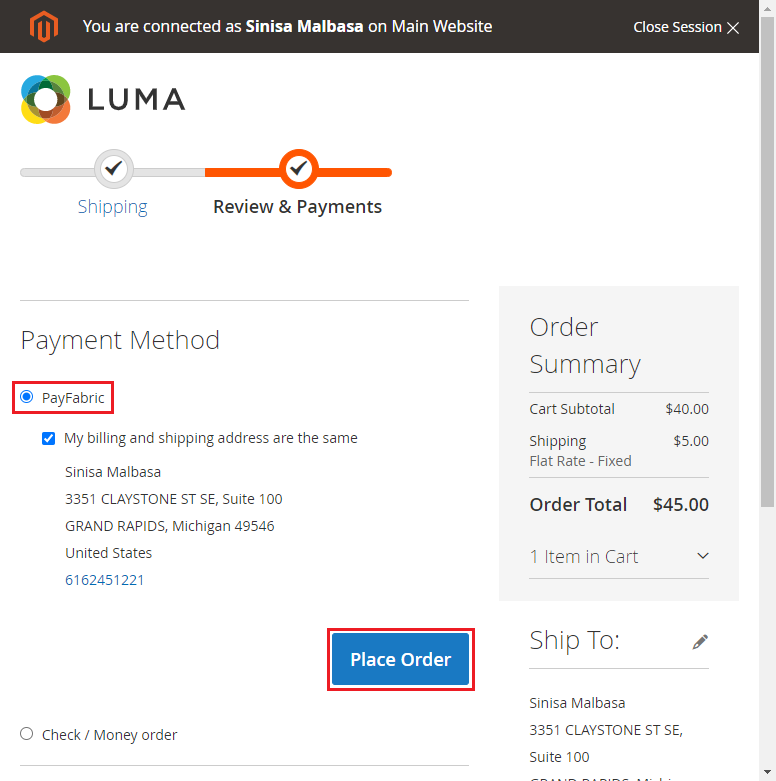
Fill out the required shipping information and proceed to the next step. Make sure to select PayFabric as the payment method and then click Place Order to create the order.
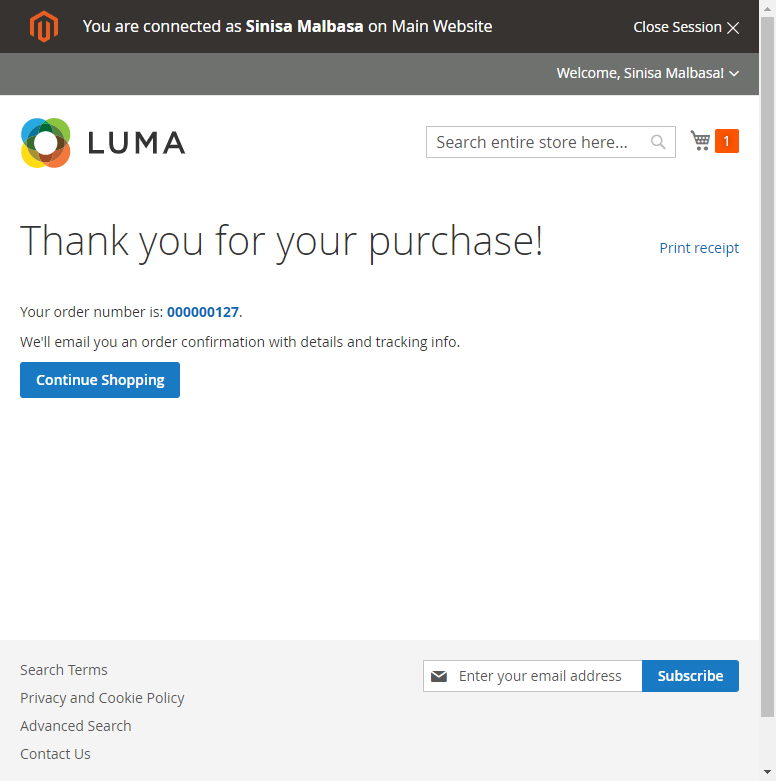
The confirmation page should appear and state that the order has been created successfully.
-
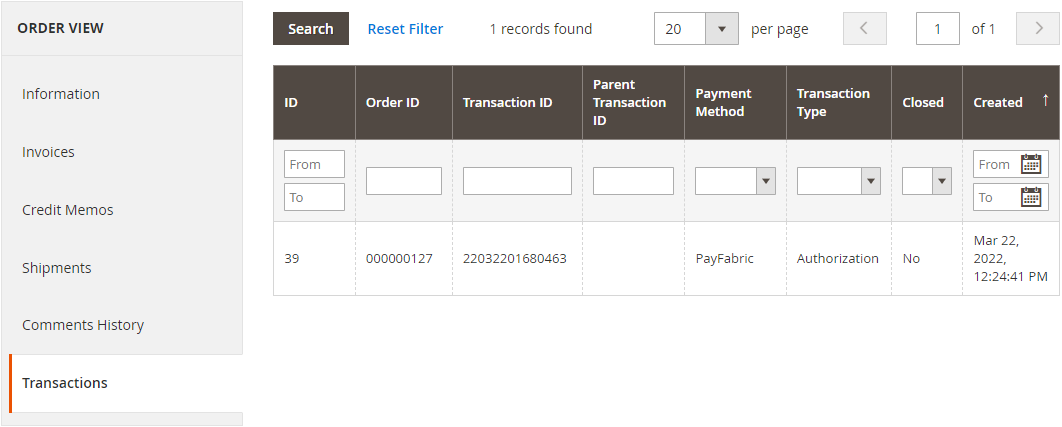
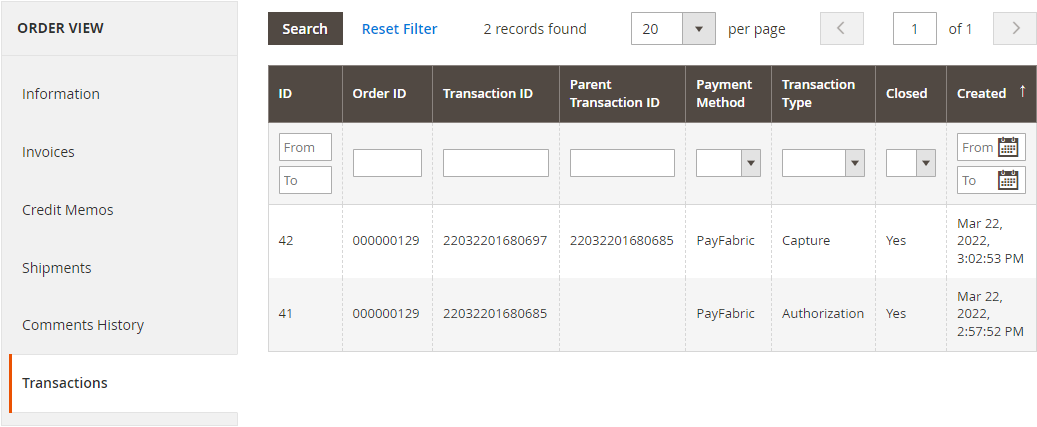
Return to the Adobe Commerce portal and open the order by going to Sales -> Orders. Click View to view the order and then select the Transactions tab on the left-hand side. The PayFabric payment transaction for the order should appear in the grid. The transaction type will be Authorization for authorizations and Order for charges.
Importing Orders
After the order has been imported into SalesPad/GP from Adobe Commerce, the payment transaction should be visible on the resulting sales order.
From here, transactions can be processed just as they would if they had been originally created in SalesPad/GP.
Note: Due to Adobe Commerce API limitations, SalesPad Desktop cannot send payment information back to Adobe Commerce. Capturing or voiding an authorization in SalesPad Desktop will not be reflected on the corresponding Adobe Commerce order.
Order Invoiced Export
Configuration
To capture payment authorizations during invoicing, make sure the Capture Payment setting is enabled.
Note that there are no matching or mapping settings to configure for invoice exporting.
Invoicing Orders
The Order Invoiced Export will invoice Adobe Commerce orders. In order for this to work, a SalesPad/GP invoice must be created from the SalesPad/GP sales order that was originally imported from Adobe Commerce.
Here are the steps:
-
An Adobe Commerce order is imported by SalesPad Desktop and a new SalesPad/GP sales order is created. A link for the two orders is created in the spAAIntegratedEntityLink table in the database.
-
In addition to the link in the spAAIntegratedEntityLink table, the External_ID column on the imported document is set to the ID of the Adobe Commerce order, and the External_ID for each Sales Line Item is set to the ID of the corresponding Adobe Commerce line.
-
-
The SalesPad/GP sales order is invoiced in SalesPad Desktop or Dynamics GP.
-
The SalesPad/GP invoice is exported to Adobe Commerce. This will invoice the Adobe Commerce order and capture any pending payment authorizations.
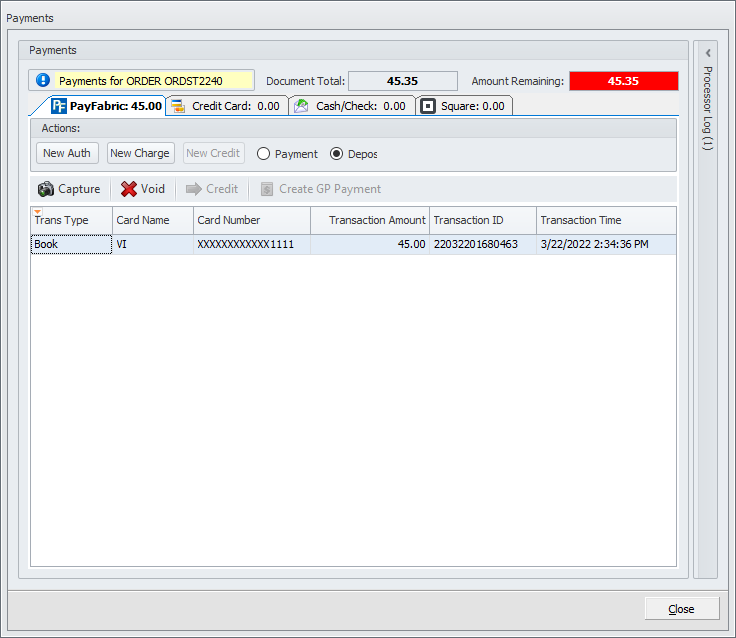
After an Adobe Commerce order has been successfully invoiced, the payment capture transaction should be visible on the Transactions tab.
Payment Capture during Partial Invoicing
When a partial invoice is exported to Adobe Commerce, the payment for each line on the partial invoice will also be captured. Note that SalesPad Desktop itself does not capture the payment or determine the precise amount captured. The API call from SalesPad Desktop instructs Adobe Commerce to capture payment for certain lines, and Adobe Commerce is responsible for calculating the amounts and actually communicating with the payment gateway.
Processing
Enabling PayFabric payment handling does not result in extra API calls to Adobe Commerce. Certain fields are captured or sent in the existing processing for the Order Import and Order Invoiced Export. The Order Import will load the transaction from PayFabric if it is configured to import PayFabric transactions. If the Order Invoiced Export is configured to handle PayFabric transactions, then it will request that the PayFabric authorization is captured.
Multiple Stores
Overview
Adobe Commerce allows creating multiple different stores/websites within the same internal portal, which provides separate external portals that can be used for different customer types (e.g. B2B vs B2C). These individual stores share a single internal portal for configuration, and they share product and inventory availability information, but sales documents created within one store are specific to that store.
The Adobe Commerce integration within SalesPad supports this multiple store structure. When there are no significant configuration differences between how orders must be imported for the stores, then the Target Adobe Commerce Store setting can be left blank, and no other extra configuration is needed. This will ensure that the integration automatically imports orders from all stores and can later push updates for all of those orders back to their appropriate stores.
However, if each store requires different order processing that affects how the order syncing settings must be set (e.g. different Doc IDs, customer matching rules, document assignment rules, or invoicing/payment processes), then this requires extra configuration per store. This structure is documented below.
Configuration
When configuring the Adobe Commerce integration for a setup that involves different rules for orders from different stores, it is recommended to create one AA job for the shared data syncing, and then create one AA job for each store to handle syncing that store’s orders. Each job will be configured to trigger some components and not others.
For the shared job:
-
Leave its Target Adobe Commerce Store setting blank.
-
Configure the Product Export, Product Image Export, and Inventory Level Export as needed.
-
Do not configure the Order Import component.
-
Configure the Order Update/Invoiced/Voided Export components as needed.
-
The Order Voided Export should only be configured in the shared job, not the store-specific jobs.
-
The Order Update and/or Order Invoiced Export components can be configured in the shared job as long as some or all stores share the same target queue for processing, and the other settings for the component can all be configured the same way for those stores. Otherwise, these components can be configured in the store-specific jobs.
-
For each individual store job:
-
Set its Target Adobe Commerce Store setting to the store name configured in Adobe Commerce.
-
Do not configure any of the Product or Inventory components.
-
Configure the Order Import component.
-
Configure the Order Update/Invoiced Export components as needed.
-
The Order Update and/or Order Invoiced Export components can be configured in the individual store jobs as long as they have different target queues for processing. This is only necessary if they must have different target queues for processing, or if settings for the given component must be configured differently for the stores.
-
If the settings for the component must be configured differently for the stores, then the orders must also have different target queues for processing. This is because the target queues determine which job’s settings are followed.
-
It is allowed to have these components configured both in the store-specific jobs and the shared job as long as each component in each of those jobs has a different target queue for processing.
-
With this setup, the shared job will control the syncing of product and inventory availability information. All stores on the Adobe Commerce side will use this information. The shared job can also handle exporting order update information, because it can determine which store the order was imported from without relying on the Target Adobe Commerce Store setting.
Each store-specific job will control importing the orders for that store. Orders created on the website for that store will be imported by its specific job following the configuration in that job’s settings. If that order is later voided, the Order Voided Export in the shared job will handle updating that order on the website. Any other future updates or invoicing can be sent back to the website by the shared job or the store-specific jobs, depending on how this is configured and which target queue the order is directed to via workflow.
SalesPad Support
Comments