Overview
The Item Aggregate Pricing function allows users to set up sale items that can be grouped together for the purpose of calculating quantities to meet price breaks.
For example, assume that a user wanted to set up a price break of $2.00 off after the first 25 t-shirts sold. However, different color t-shirts have different item numbers. This functionality allows the user to group the different colored shirts together to meet the quantity price break for each t-shirt color.
Note: Aggregate Pricing will work with Dynamics GP Extended Pricing.
Settings
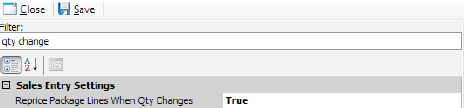
Follow the steps below in Modules > Settings :
- Filter to Qty Change
- Select Reprice Package Lines When Qty Changes and set to True
- Save the changes
Security
Follow the steps below in Modules > Security Editor:
- In the Security grid, filter to *agg
- Enable Aggregate Pricing and Item Aggregate Pricing by selecting the boxes
Note: Aggregate Pricing sub-settings use this information if your build has these sub-settings:
Clear Markdown (Versions 3.9+): If set to True, when a new aggregate price is found both markdown amount and markdown percent are set to 0. By default, this is set to False.
Customer Price Level Permissions {Versions 4.0.1214+): To allow access to the Aggregate Pricing plugin on only certain customer price levels, enter a semicolon-delimited list of customer price levels to allow. Leave blank to allow access on all price levels. - Save any changes. You must log out of SalesPad and then back in for security changes to take place.
Setup
Aggregate pricing assumes that the items intended to be included in the pricing definition have price breaks set up in GP for the selected price type.
In the "Item Aggregate Pricing" screen (Modules > Item Aggregate Pricing), set up a pricing definition:
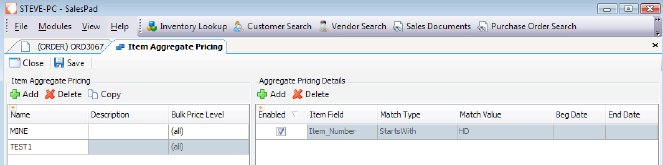
- To create a new pricing definition, click the Add button under the Item Aggregate Pricing column (left)
- In the window that opens, enter the name of the new pricing definition and click OK.
- For the new record, enter a short description, and the Price Level that will control the pricing breaks.
- In the Aggregate Pricing Details column (right), click the Add button to enter a detail pricing record:
- Enter the desired field name that is to be used for grouping items in the pricing definition. This field name can be any field from the spvltemMaster (which also pulls all fields from spvltemMaster_Base). Fields are case sensitive and below are a few commonly used fields:
- Item_Number
- Item_Description
- Item_Type
- Item_Class_Code
- Price_Level
- Price_Group
- Item_Generic_Description
- Item_Short_Name
- Select the desired Match Type that will be used for comparing items.
- Enter the Match Value that will be used to compare items.
- Example:
- Field: ltem_Number
- Match Type: Starts With
- Match Value: HD
- This will match all item numbers that start with 'HD'
- Example:
- Enter the desired field name that is to be used for grouping items in the pricing definition. This field name can be any field from the spvltemMaster (which also pulls all fields from spvltemMaster_Base). Fields are case sensitive and below are a few commonly used fields:
- Save the new pricing definition.
Usage
To use the new aggregate pricing definition, create a new sales document that includes items that match the pricing definition created.
By default, the aggregate pricing will not be automatically applied. To apply the aggregate pricing, click the Actions dropdown ( ) from the header and select Aggregate Pricing. This will automatically apply the pricing structure to the items that match the definition.
To have the aggregate pricing automatically applied, modify the Sales workflow (all that apply) in Modules > Workflow. For the queue that the order is in when created, select Aggregate Pricing from the Plugin column:
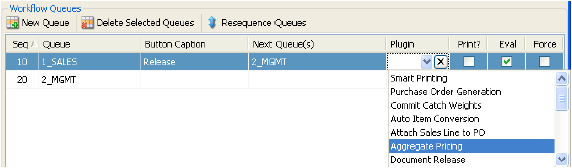
When the sales document leaves this queue, the aggregate pricing will automatically be applied to all items matching the definition.
Before hitting price break for multiple items:

After hitting price break for multiple items :

SalesPad Support
Comments