Overview
Purchase orders can be created in SalesPad from a sales document with backordered line items, or from a vendor card. They can then be sent to the vendor via email or print. Existing POs can be found via Purchase Order Search, the Vendor Card, or a linked sales document. Proper configuration is required; refer to the Configuring SalesPad for Purchasing document for more information.
Usage
Creating POs from a Sales Document
To create a PO from a sales document, first create and save a sales document. If any item on a document is backordered or marked as Dropship, the Purchase button will appear in the header upon saving:

Click the Purchase button to open the The Choose Purchase Plan Items window.

Under Purchase Plans Items, select the items to purchase and any desired options to copy from the sales document to the PO.
Click Create PO to open the Purchase Order entry window. The selected Items will appear on the purchase order.

Make any needed changes (see the Purchase Order Entry Screen section of this document for more information) and click Save. If not already entered, a purchase order number will be assigned.
To send the PO to the vendor, click Print. In versions prior to 4.0, a preview of the PO will open and from this preview, purchase orders can either be emailed or printed. In versions 4.0 and later, the standard Print dialog will appear, allowing unlimited PO formats and allowing users to fax or email POs to the vendor directly from SalesPad using predefined templates. Printing a PO in 4.0 or later is now the same as printing a Sales Document. Refer to the Emailing and Email Templates document and the “How do I email/fax/print a sales document” FAQ for more information.
Creating a PO From a Vendor Card
After selecting the desired vendor, open the vendor card (for further info on the Vendor Search, refer to the SalesPad Vendor Search document).
For a Dropship PO:
On the Vendor Card header, click Drop Ship:

On the following screen, find and select (by clicking the Customer ID) a customer:

On the following Dropship PO entry screen, the Ship to Customer box will be selected and the selected customer’s address entered under Ship To Address:

For a Standard PO:
On the Vendor Card header, click Standard.

Purchase line items can be entered on the following screen.

If desired, enter a PO number under PO Properties. Otherwise, after the PO is saved, the next available PO number from GP will be generated and assigned to the PO.
Under the Line Items tab, click New.
Enter the item number (or search for an item by clicking the ellipsis), item location, etc. and hit Enter. Repeat for additional items.
Note: The Location field must be populated on each line item to successfully save a purchase order.
When finished, click Save
To send the PO to the vendor, click Print. In versions prior to 4.0, a preview of the PO will open and from this preview, users can print or email the purchase order. In versions 4.0 and later, the standard Print dialog will appear, allowing unlimited PO formats and allowing users to fax or email POs to the vendor directly from SalesPad using predefined templates. Printing a PO in 4.0 or later is now the same as printing a Sales Document. Refer to the Emailing and Email Templates document and the How do I email/fax/print a sales document FAQ for more information.
The SalesPad Purchase Order Entry screen allows users create POs and add line items, as well as add/access notes and User Fields on the PO, and view/update ship to and vendor addresses and linked sales documents. Users can also email, fax, or print the purchase order to send to the vendor.
Purchase Order Components
On the Purchase Order header, various plugins can be accessed from the Actions dropdown menu.
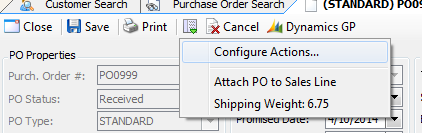
The Print button allows printing, faxing, or emailing the PO. Click Save to save any changes, or click Close to exit the Vendor Card, from the Purchase Order header.
Header
The header portion of the Purchase Order entry screen displays PO Properties – the PO number, status, type, Vendor ID, and Vendor Name. These fields are editable with proper security. Dates*, terms, shipping method and buyer can also be edited. Ship To Address and purchase order totals display toward the right, and can be adjusted with proper security.
Tabs
Tabs on the Purchase Order Entry screen are enabled in the Security Editor. Refer to ConfiguringSalesPad for Purchasing for more information.
Line Items
Click New to enter item numbers on the Line Items tab. Users can also click the ellipsis (...) button on the new line to search for an item in Inventory Lookup.
Grids can be customized to display only desired columns. Drag and drop columns off the grid to remove them. To add columns, right-click on the column header and select Column Chooser for a list of columns to add. Drag and drop columns onto the column header to add.

Note: If the Vendor Item # field is red, the vendor item number needs to be set up before the PO can be saved. This can be done in Item Maintenance, or, click Update Missing Vendor Items, and the information is copied from the item card.
Note: Unit cost will pull from Current, Standard, Manual, or Last Vendor Invoice cost. If a PO is created from a sales document, it will use the unit cost from the sales document.
The Insert button allows insterting a line before or after a selected line. Click Cancel to delete a selected line item.
Cost totals will appear at the very bottom of the Line Items tab:

Notes
Notes and comments appear under the Notes tab. Notes entered here will display by default on PO printed reports. With proper security, notes and comments can be freely added, or click Add Comment or Add Note to access popup screens:
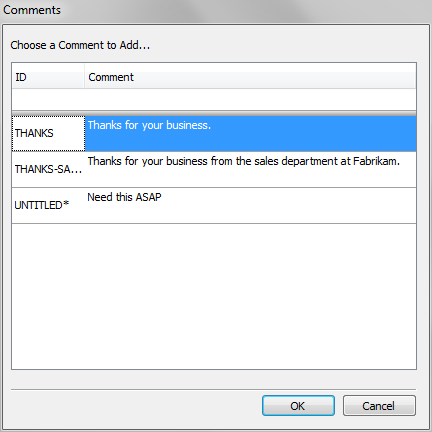

Pre-saved comments (added in GP – refer to the Setting Up Pre-Saved Comments article) can be selected from the "Comments" popup. Time-stamped notes can be added from the "Notes" popup. Click OK to return to the Purchase Order Entry screen.
Addresses
Ship To, Vendor, and Bill To addresses are visible from the Addresses tab and can be modified with proper security.
User Fields
The User Fields tab displays all user defined fields created on the Purchase Order Business Object. Refer to the SalesPad User Defined Fields document for more information.
Note: In versions 4.0 and later, Vendor UDFs will automatically copy to the same Purchase Order UDF.
Links
The Links tab displays any sales documents attached to the open PO. Click the sales document number to view a linked sales document, or select a document and click Remove Link to remove the link.
Audit
In version 4.0 and higher, the Purchase Order Entry screen has an Audit tab where changes to the PO are logged.
Quick Report
In later version 4 builds (approximately .1058+), the Purchase Order Entry screen has a Quick Report tab where one or more Quick Reports can be viewed. Refer to SalesPad’s Quick Report documents for more information on Quick Reports.
Note: When Quick Reports have been added, the name of the tab changes from Quick Report to the title of the Quick Report (single) or Purchase Order Quick Reports (multiple).
Once POs are created, they can be viewed from:
- The Vendor Card Purchase Orders tab – displays all POs assigned to that vendor:
- The sales document Purchases tab – displays all POs created from or linked to (refer to Linking POs and Sales Line Items document) the sales document:
- Purchase Order Search


Purchase Order Search
To search for an existing PO, open the Purchase Order Search module. Enter desired search criteria in the search fields and click Search. The Search Results grid will display all POs that match the search criteria.

Click on a PO number to open the PO. The Vendor ID can also be clicked to open the Vendor Card.
Security
Choose Purchase Plan - Allows the creation of a PO from a sales document.
Purchase Order Addresses - Grants access to the addresses tab on the Purchase Order Entry screen.
Purchase Order Audit - Grants access to the Audit tab on the Purchase Order Entry screen.
Purchase Order Email Audit - Grants access to the Email Audit tab on the Purchase Order Entry screen.
Purchase Order Entry - Grants access to the Purchase Order Entry screen.
Purchase Order Line Items - Grants access to the Line Items tab on the Purchase Order Entry screen.
Purchase Order Links - Grants access to the Links tab on the Purchase Order Entry screen.
Purchase Order Notes - Grants access to the Notes tab on the Purchase Order Entry screen.
Purchase Order Properties - Grants access to the Properties section of the Purchase Order Entry screen.
Purchase Order Quick Report - Grants access to the Quick Reports tab on the Purchase Order Entry screen.
Purchase Order Receipts - Grants access to the receipts tab on the Purchase Order Entry screen.
Purchase Order Resources - Grants access to the Resources tab on the Purchase Order Entry screen.
Purchase Order Search - Grants access to the Purchase Order Search module.
Purchase Order User Fields - Grants access to the User Fields tab on the Purchase Order Entry screen.
SalesPad Support
Comments